Home
| What's New |
Features |
Gallery |
Reviews |
Reference |
Forum |
Search
Home
| What's New |
Features |
Gallery |
Reviews |
Reference |
Forum |
Search
|
|
|
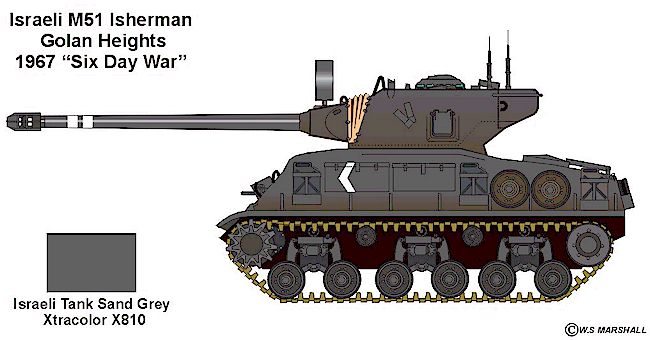
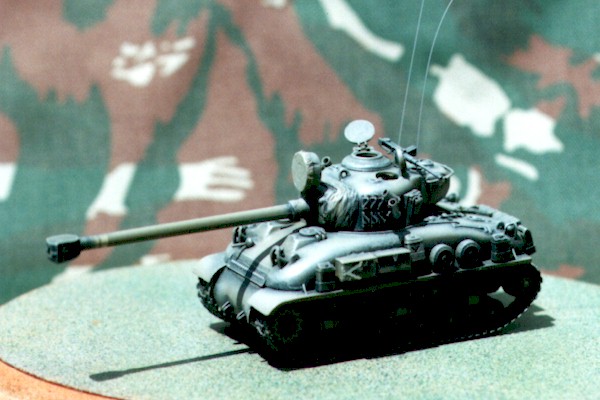
M51 Isherman in 1/76 Scale by William Marshall
I have always liked the M51 Isherman used by the Israeli's during the late 1960s and 1970s. Shep Paine's book, " How to build Dioramas" has a sexy diorama of a M51 on a tank transporter. The diorama was called "The Road to Damascus". The M51 is on a tank transporter combined into a diorama with a T62 and U.N. Land Rover. The scene is of the transporter trying to negotiate a narrow street in an Arab village. I think this diorama was my main motivator in building this vehicle.
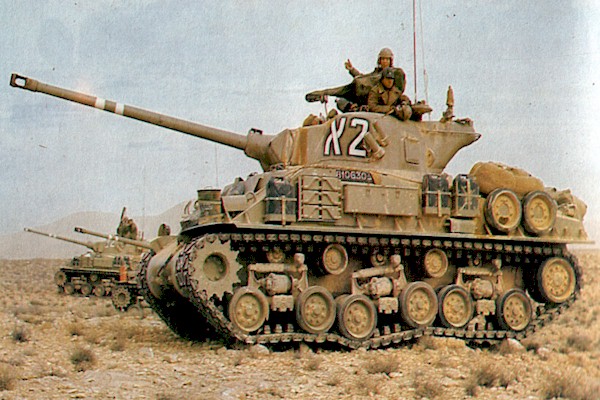
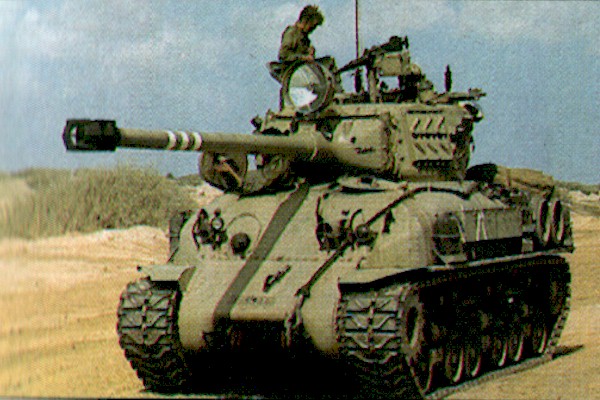
There were three principle vehicle variants of home-grown Israeli Shermans. The first was the M50 equipped with the French SA50, high velocity, 75mm, 62 calibre gun. This vehicle was quite capable of dealing with the T34/85 tank. (The difference between the M50 and M51 is in the turret and main gun).
Out of this early-modified M50 Sherman the M51 Isherman tank was born. The Israeli's developed it in the late 50's and early 60's. Several models of the basic Sherman tank were used, and several different main guns being tested with the idea of finding a combination to counter the modern Russian tanks that were being acquired by her neighbours. The end result was the French CN 105F-1, 105mm gun mounted in a Type 23 turret. This gun fired the "OCC" non-rotating shaped charge at a muzzle velocity of 1000 metres per second and capable of penetrating 300mm of armour at normal combat ranges. Recoil was unacceptable but reducing the length of the original barrel from 56 to 51 calibre's, fitting a large double baffled muzzle brake and redesigning the ammunition solved the problem. The turret was modified with a larger rear overhang, which included the relocated radio equipment and the ventilator. Ammunition stowage was relocated within the vehicle. The battery charger was too bulky and was replaced by an external armoured dynamo. The vehicle was also fitted with a new V8, 460hp Cummins diesel engine. The type 80, 23" tracks was also used. An improved steering mechanism and transmission was also added. This made it the fastest tank in the IDF. Externally, the .50 Browning was moved from the rear of the turret to the front centre between the gunner and commanders hatch. (This I did not do on my model and I will have to make a small modification) Two smoke grenade launchers were added to either side of the turret. The hull was fitted with some spare bogie wheels, jerry cans and stowage bins. This pushed the weight of the tank up to 39 tons.
The new tank first appeared successfully during the conflict in the Sinai, the West Bank and the Golan Hights during the 1967 "Six Day War". In the early 1970's the M51 was again modified, the spare track link was moved from the front side hull position to the front right turret, in front of the smoke grenade launchers and an extra stowage bin added in the place of the track link.
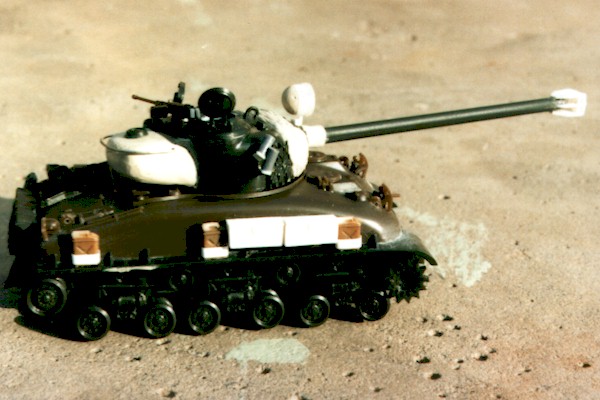
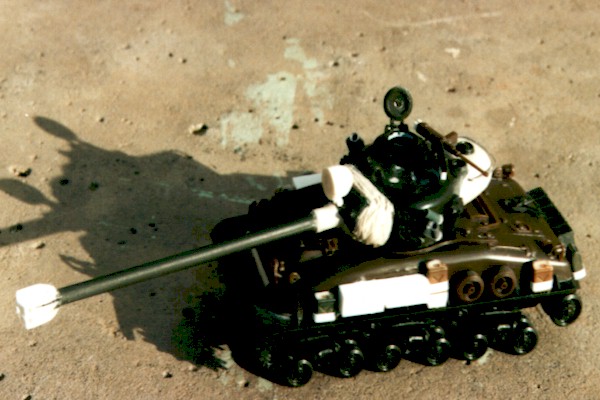
Building this vehicle in 1/76 scale posed some major problems. At the time of construction several years ago, there was no kit available and I am not aware of one being available today in small scale. One can clearly see that this vehicle makes use of the "Easy Eight" suspension and a rounded cast-type hull. It has a unique turret (Type 23) with the massive French gun. Once the "what" was sorted out I could start on the "how". I started by using two kits:
The Fujimi kit was to supply the lower hull of the "Easy Eight" suspension; and the Nitto kit, the cast upper hull and turret interior.
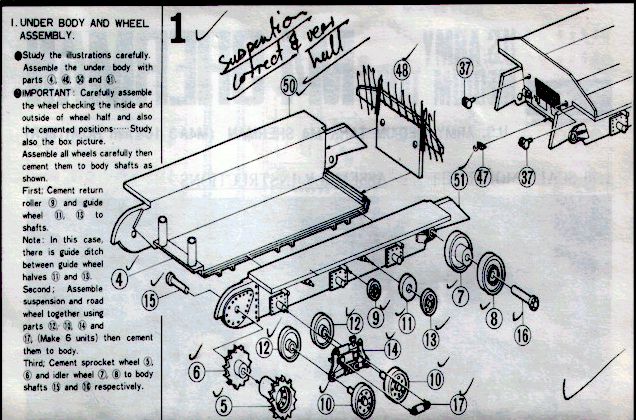
The Lower Hull The Fujimi kit supplied these parts. The basic vehicle construction began with Step 1 of the kit instructions. The kit was built from the box with a modification to part 48 (rear hull bulkhead). It had to be cut into a square to accommodate the Nitto cast hull. Part no 3, the sand skits had to be trimmed to represent the type used on the M51. Three of the vertical sand skirt supports had to be removed as the M51 only had eight, the Fujimi kit supplied eleven.
The Upper Hull This was a surprise. The hull was a near perfect match and a great fit - what luck! I added the hull details, kit parts no 7/8 rear engine hull access hatch, rear lights no 9/10, front hull crew access hatches parts no 26/27, front lights parts no 16 and 17.
Turret Exterior I made use of the Fujimi turret and added a counter weight to the rear of the turret. I had to make carve this out of epoxy putty and sand to shape. Fuse wire was used to make the rail on the rear of the counter weight. Parts 35,32,36 and 36 were omitted due to the fitting of the counter weight. The large searchlight was made from an old tank wheel covered with tissue paper soaked in white glue. Small details were added to the search light such as the cables, switches and the mounting bracket.
Main Armament This key feature of this vehicle was mainly constructed of plastic tube. The Fujimi gun (parts 21,20 and 54) was relegated to the spares box. The scratchbuilt gun was then inserted into the gun mantle, part 52. Epoxy putty was again used to make the mantle cover. The main feature of the gun is the muzzle brake; it was constructed from plastic card and strip. This took several evenings, as the details are small and need first to dry during various stages of the construction.
Turret Interior I needed to have some gun interior detail and decide to make use of the Nitto gun details as the turret hatches would be open and one would be able to see some interior details. Kit parts 15,21, 22,36 and 37 were constructed and added to the rear inside of the gun mantlet.
I added some other details not included in either of the kits. These included:
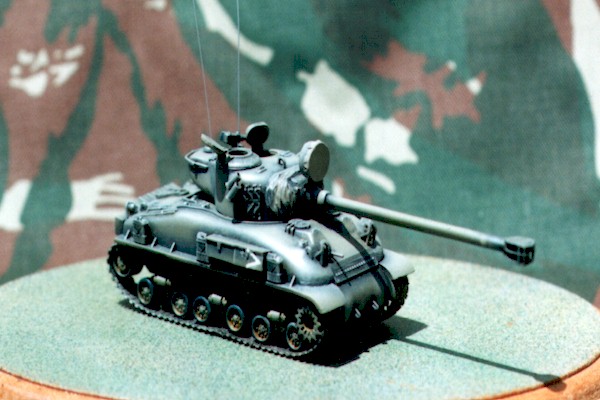
Tracks The Fujimi tracks were painted in a combination of Matt Black and Grey; then drybrushed with silver and given a wash of Raw Umber artists oils.
The model was painted in the characteristic colour of Israeli Grey. This was sourced from the Xtra Color paint range no X810 "Israeli Tank Sand Grey". A good representation can also be obtained by mixing Humbrol colours. The colours to use are; two parts of Matt HM8 (Khaki drill) with one part of HM1 (Sand Yellow) and one part of Matt White.
White tactical markings were airbrushed on after cutting a template from Frisket. This can be in the form of a large white chevron pointing forward, rearward, up or down. Some tanks had up to four white rings around the gun barrel (not on my model). Israeli type numberplates can also be added to the front and rear of the vehicle. Callsigns were usually painted on large canvas sheets and attached to the turret, this I omitted so as not to obscure any detail of the turret. The model was then shaded with matt Black and again given a light mist of the Grey paint. Drybrushing then followed with a combination of Light Grey and Silver to highlight the details. A light wash of Raw Umber was added. The interior of the tank was painted off-white. Finally, a light coat of Matt varnish completed the painting of the model.
I now have a unique model of the Israeli M51, with its massive main gun. The model has attracted quite a lot of comment from members of the public, fellow modellers and friends. I also have quite a major addition to the spares box with all the unused kit parts form the Nitto kit. This will come in handy during other construction projects. Now for the earlier M50 or perhaps the tank transporter?
[1] Hogg Ian V, Israeli War Machine, Hamlyn, 1983. [2] Crow D and Icks R.J, Encyclopaedia of Tanks, Barrie & Jenkins Ltd, 1975. [3] Military Modelling, Issue: July 1984 : Argus Specialist Publications. [4] Born In Battle Magazine, Issue No 4: Israel's Armor in Action, Eshel-Dramit Ltd, 1978. [5] Paine S, Modelling Tanks and Military Vehicles, Kalmbach Books, 1982. [6] Paine S, How to build Dioramas, Kalmbach Books, 1982. [7] Born In Battle Magazine, Issue No13: Sherman M50/51, Eshel-Dramit Ltd, 1978. Model, Images and Article Copyright
© 2000 by William Marshall Back to HyperScale Main Page Back to Features Page |