|
Macchi C.202 |
by Glenn Irvine
|
Macchi C.202 |
Five more images in the text, and three more at the bottom of the page.
I n t r o d u c t i o n |
This Hasegawa 1/72 scale kit yields a very good representation of the Macchi straight from
the box. Highly accurate, it requires little to bring it up to a show winner.
 For the compulsive
detailer, the areas that need some work include:
For the compulsive
detailer, the areas that need some work include:
1 - the cockpit
2 - the wheel wells
3 - the flaps
4 - the canopy
5 - general airframe detailing
6 - painting
7 - the base
C o n s t r u c t i o n |
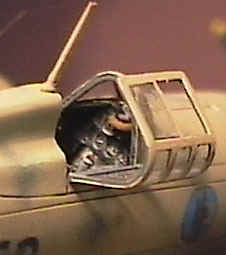
An Eduard photoetched set was bought to help with detailing. Work began with the cockpit
tub. Construction was as per the Eduard instructions, with the exception of thinning down
the edges of the kit seat with a Dremel tool. Etched metal was replaced with stretched
sprue where round section detail was required. An armour plate was added behind the seat
from 5 thou card with a spacer to seperate it from the fuselage. Seat belts were added
from fine slices of tape and wire for buckles.
The wheel wells were cut out, boxed in, a mainspar section was built
from card and detailed with parts from the Eduard set and the rear of the DB601 engine was
scratchbuilt from plastic and wire.
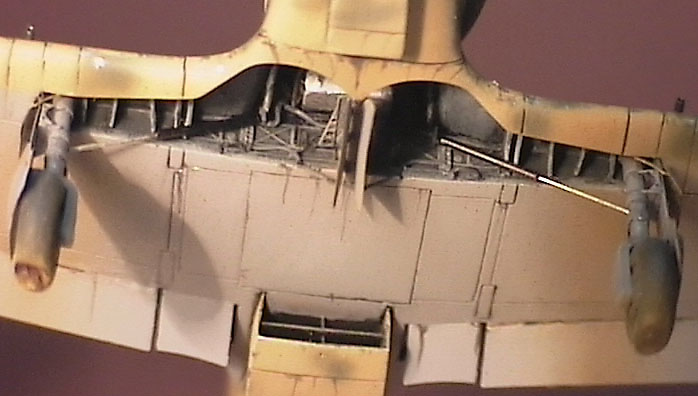
The fuselage framework was built up from 10 thou plastic rod and various other items were
added to the thinned down wheel well area from card and sprue. The oleo legs were cleaned
up and detailed with Eduard wheel covers and fuse wire for the brake lines. However the
stiffeners for the lower leg covers were filed to a curve on the inner faces to allow the
leg cover to form a gentle curve when assembled.
The flaps were removed from the kit and the Eduard parts assembled using a length of wire through the innermost row of holes for a flap pivot. The inner wing area was detailed with microstrip and plastic card to simulate inner flap well detail. The flaps were left off until last to assemble.
As no commercial vac form canopy was available at the time of construction, a replacement was formed over the kit part. A side panel was removed to simulate an open sliding glass panel. The inner framework was simulated with fine lead wire glued in with white glue.
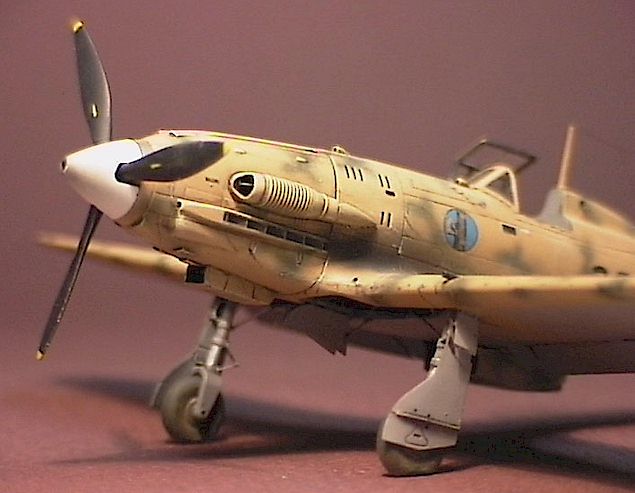
The airframe in general was detailed where necessary. The propeller blades were thinned down with files and sandpaper, the profile is correct but the section is, due to the moulding process, too thick. The air scoops were thinned to razor thickness on all leading and trailing edges. The engine intake was hollowed out and a 'door' simulated from 5 thou sheet punched out with a leather punch. The oil cooler had a radiator matrix made from voil curtain net glued to card with liquid glue, painted black and drybrushed silver. The radiator bath was detailed with the Eduard set.
Navigation lights were replaced with clear sprue with holes drilled from the rear and filled with transparent green and red, glued in place and sanded to shape and polished. The rear tail light was replaced with clear stretched sprue sanded to shape and polished.
The pilots step on the port side was made from brass left over from the Eduard fret and filed to shape. The exhaust manifolds were drilled out on the very front and the small scoops were all hollowed out slightly as well. The gun barrels were drilled out of the wing and replaced with stretched plastic tube to the correct diameter. The tail wheel well was hollowed out and painted black. The tyres were all flattened with a file.
The aerial post was thinned down and after painting, aerial wire was glued in place using cyano. This 'wire' is a product from an eastern European model accessory manufacturer. It is a very fine synthetic fibre, transparent in colour and stretchable, which allows the aerial wire to be assembled under tension and so no sags or kinks. It was then painted semigloss black.
P a i n t i n g a n d M a r k i n g s |
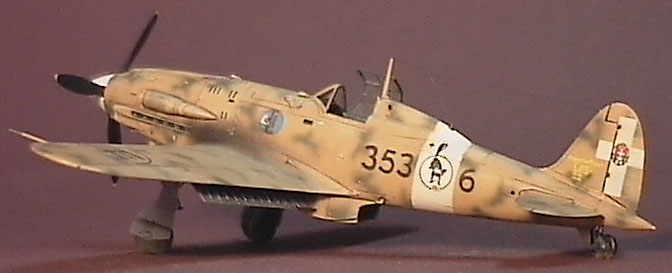
Painting of the airframe commenced with the grey undersurfaces. This colour was mixed to
match the FS595a colour chips and applied with an airbrush. The 'sand' top colour was then
applied, again matched to the FS595a chips and the green mottle applied over this. Then,
the sand colour was reapplied around the mottle to sharpen up the shape of the pattern to
give it the look of the sand applied over the green base coat.
 The model was given a coat of clear gloss and decals applied followed by a
coat of clear flat. All surface detail and engraved panel lines were given a wash with
heavily thinned artists black watercolour with a drop of dishwashing liquid added to
assist flow. The excess was wiped off in the airflow direction using cotton buds. The
aircraft was then drybrushed with a canvas colour in enamel paint (the previous colours
being Gunze) over the leading edges of the wings, scuff areas around the cockpit, gun
access panels, vents, and also the supercharger intake. This lifts the detail. Also, heavy
drybrushing of the fabric control surfaces was applied to achieve a faded fabric look.
The model was given a coat of clear gloss and decals applied followed by a
coat of clear flat. All surface detail and engraved panel lines were given a wash with
heavily thinned artists black watercolour with a drop of dishwashing liquid added to
assist flow. The excess was wiped off in the airflow direction using cotton buds. The
aircraft was then drybrushed with a canvas colour in enamel paint (the previous colours
being Gunze) over the leading edges of the wings, scuff areas around the cockpit, gun
access panels, vents, and also the supercharger intake. This lifts the detail. Also, heavy
drybrushing of the fabric control surfaces was applied to achieve a faded fabric look.
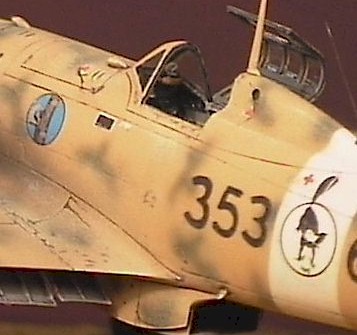
The main decal markings were taken from the Hasegawa kit and the cat logo from an old FROG kit decal sheet. The tree blind mice were touched in with green. The numerals were homemade by photocopier onto clear decal sheet.
All interior areas were painted grey and washed with black water colour before drybrushing with light grey. The cockpit was detail painted with various colours. Paint damage was simulated around the airframe using silver, and oil streaks with Gunze 'oil'.
D i s p l a y B a s e |
The display base was made from craft wood with a routed decorative edge. The base was then
stained and varnished. The edges were masked and a ground base was made from coloured
grout, and crushed cat litter was glued on the base. Also a little static grass was glued
on. The whole base was sprayed sand colour, washed in various areas with black and
drybrushed with a 'concrete white' colour. Finally, finely-ground pastels were applied
liberally to all areas of the base to give it a dusty look. These pastels were also
applied to the plane to blend it into the base. A name plaque was engraved in brass and
etched with black to complete the presentation.
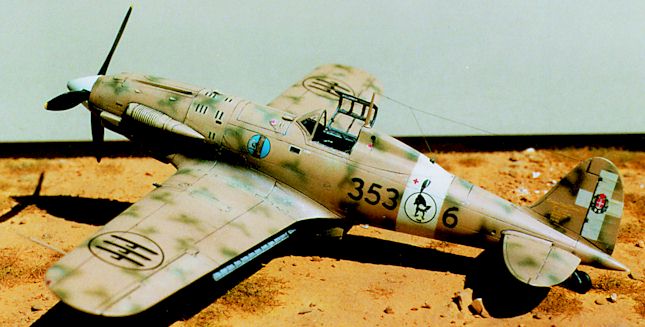
This model won its class at the Model Expo in Melbourne in 1995 and also won best paint at the same show.
Click on the thumbnails below to see the full sized image. To return to this page click
the "Return" arrow on your browser.
![]()

![]()
R e f e r e n c e s |
Squadron Signal Macchi 202 in action
Argus books Aircraft Archive fighters of World War Two Vol. 2
Modelaid Camouflage and Markings Italian Airforces 1939-1945 by R.J.Caruana
Squadron Signal Regia Aeronautica Vols. 1 & 2
Back to HyperScale Main Page
Back to Features Page