Home
| What's New |
Features |
Gallery |
Reviews |
Reference |
Forum |
Search
Home
| What's New |
Features |
Gallery |
Reviews |
Reference |
Forum |
Search
|
|
|
Messerschmitt
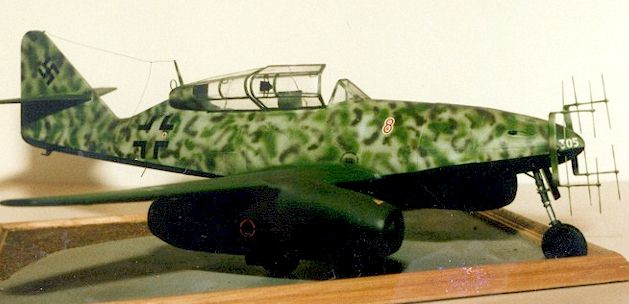
Me 262B
This unique example of the first operational jet nightfighter resides in the South African Military Museum in Saxonwold, Johannesburg. The colour scheme is quite unusual. It is not in the typical nightfighter colours of Grey RLM74/75/76, but Green RLM 81 and 82. I built this model in 1/32nd scale using the Hasegawa "Collectors' Series". This kit had the correct markings supplied but the incorrect colour scheme. I was very surprised that Hasegawa had got it wrong, especially considering there is the fully preserved example sitting in a museum with easy access for reference! These so-called "high-grade" kits that Hasegawa have released range from excellent to being unreasonably expensive. This kit represents the second category.
The boxart on this kit is very misleading as it shows a photo of a well built superdetailed kit and bears only a passing resemblance to the supplied components. There is a lot of effort required to bring the basic old kit up to the standard of the new "high-grade" parts. The basic kit supplied is the original single seater version that was released during the I970's with all the major components having large rivets all over. These had to go to match the new parts that are up to Hasegawa's current standards. I feel that Hasegawa should have retooled but understand that economics precluded this. Despite the shortcomings of the kit I still enjoyed the project.
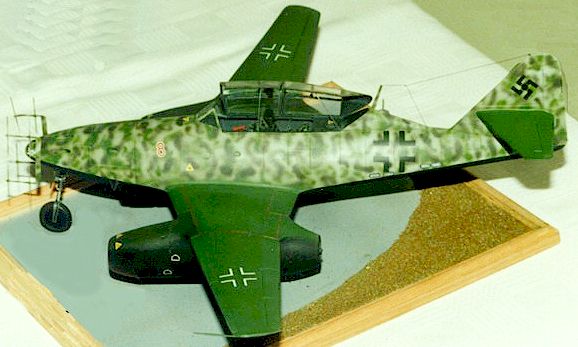
I commenced by rescribing all panel details using an Olfa P-cutter. Once all this was completed the basic construction was started although I did not fit the wings to the fuselage yet. At the outset I intended to have the engine cowlings open, so I cut out and detailed the bulkheads and engine mounts. These were fitted at the appropriate positions in the engine cowling. While I was waiting for all this to dry I turned my attention to the cockpit. This was built as per instructions with a lot of careful painting and dry brushing of raised details. The seats were painted and seatbelts made from 'Micropore' surgical tape painted the correct colour. Some further details were added from stretched sprue and scrap. Once I was satisfied with the cockpit the tub was glued into the fuselage and the top was scaled off to protect the completed cockpit. Once the cockpit had set I turned to detailing the wheelwell. I started this by adding the stringer details to the fuselage sidewalls. I then built up the bulkheads as required from 20 thou card and added into the wing assembly. Once all the details were completed the wings were added to the fuselage. This presented a problem as the fuselage was about 0.5mm narrower than the wing slot. To solve this I added thin plastic strips in the wing root to provide a more substantial support for filler. This also gave extra strength to the joint, as it was now solid. Once all joints were filled and sanded to my satisfaction all the lost scribed details were reinstated.
I found that the white metal undercarriage legs are not as good as they have been made out to be as they started bending on their own after a few years. Plastic legs would have served much better in this case, but I suppose it did not help much that I had inserted two 50-caliber rounds in the engines in an attempt to weight down the tyres! Now comes the radical part. With a No. 6 brush I hand brushed a coat of MEK all over the model. This had the effect of countersinking all sanded off detail like rivets thus leaving a very faint impression in the plastic. This operation is very difficult to achieve, as too much MEK will dissolve your model. I recommend that you practice this operation on an old kit before going ahead on the model. Once covered with a coat of paint a most realistic effect results. The model was then washed and prepared for painting.
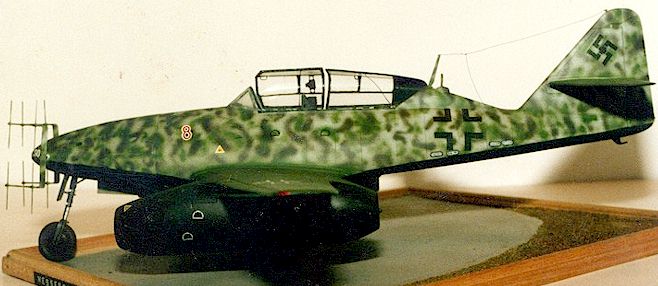
Painting started with airbrushing the top of the wings and tail surfaces RLM 83 bright green. Once dry I masked the wing roots and then airbrushed the fuselage an overall coat of RLM 76 light blue. I next airbrushed a very light coat of RLM 02 grey to obtain a slight greenish/yellow colour. This is a very difficult colour to explain and obtain but is very similar to the British sky shade. This may be the shade referred to in some references as RLM 84. I then airbrushed the mottle scheme of RLM 81/82 on the fuselage following the patterns of the aircraft. This scheme was well documented by Ron Belling in an old issue of S.A. Man magazine. Once the fuselage was dry I masked to permit the black undersurfaces to be painted.
The wheelwells and droptanks were painted aluminium and then the entire aircraft was sprayed with Microgloss in preparation for decalling. All decals were now applied. Note that the aircraft number 8 was crooked on the left-hand side. Once all decals were set a coat of Microflat was applied. All masking was removed and final cleanup performed.
There are many different viewpoints about the validity of releasing old kits with new parts. However, these arguments do not detract from the fact that we are modellers and should be prepared to put some effort into achieving a good result. I was pleased with my results and this monster now resides in pride of place in my display cabinet. This was my first "Hi-Tech" model and I found it very interesting to build. A negative point of the model is the price but the limited edition does mean that it is one of few. For those of you wishing to build the aircraft in 1/72 scale start with the excellent Hasegawa kit which will build into a good replica straight from the box (maybe I'll do an article on superdetailing one in the future). The aircraft number can be sourced from the Hasegawa 1/72 Tiger tank to complete your model. With extra work on this kit you can turn it into a superb replica of the original. Also see Charlie's Me 262B-1a/U1 Reference Feature with 60 Walkaround Images Model, Images and Article
Copyright © 1999 by Charles Hugo Back to HyperScale Main Page Back to Features Page |