![]()
Messerschmitt
Me 262A-2a
"Stormbird"
by Sam
Garcia
|
Messerschmitt Me 262A-2a |
B a c k g r o u n d |
Recognizing the significant military and commercial potential of Ernst Heinkel’s early work with jet propelled aircraft designs, Willi Messerschmitt initiated his first jet powered design as Projekt 65 (P.65) in Augsburg during April 1939. Messerschmitt and his design team refined the initial P.65 and presented it to the Reichluftfahrtsministerium (RLM) as P.1065 on 7 June 1939.
For the next several months, a steady stream of refinements would be made to P.1065 including, among other things, fuselage shape and cross section, wing location and shape, engine placement and landing gear configuration. P.1065/II was presented to the RLM on 9 November 1939. Shortly after presentation of cockpit and aircraft mockups in December 1939 and January 1940, respectively, the RLM ordered twenty prototype aircraft. Under this provisional contract, tooling and jigging work for two prototypes, P.1065 V1 (PC+UA) and V2 (PC+UB), began in January 1940. The P.1065 design was to be powered by the P.3302 jet engine under development by BMW.
BMW engineers reported production versions of their P.3302 prototype would be larger in diameter and heavier than originally anticipated, forcing a third major revision of the P.1065 design. Emerging from this redesign, however, was an entirely new aircraft as set forth in March 1940. Redesigned were the fuselage and its cross-section (now embracing the familiar triangular shape). Additionally, the outer wing panels were swept back to properly preserve cg considerations with the heavier production engines. Various placement options for the engines (including overwing) were examined via wind tunnel testing in June 1940. Collectively, these refinements plus others, gave rise to P.1065/III officially submitted to the RLM in October 1940. In this incarnation, the graceful lines of what would ultimately become the Me 262 finally appeared.
From the outset, Hitler was convinced that the Me 262 should be utilized exclusively in the schnellbomber role. While the potential "merit" of this decision has been the subject of debate for decades, it was de facto softened to a requirement that every production Me 262 have the ability to be easily field-modified to carry bombs. Series production of fighter (Me 262A-1) and schnellbomber (Me 262A-2) variants commenced in parallel with Jumo 004 engines in June 1944.
In order to develop tactics for this revolutionary aircraft, a new test unit was required. In answer to that need, Erprobungskommando 262 had been formed on paper in December 1943 at Lechfeld. Pilots of Stab/ZG26 and III/ZG26 reported to Ekdo 262 in May 1944 operating pre-production aircraft. Ekdo 262 recorded the first official jet victory on 26 July 1944 when Lt. Schreiber shot down an RAF recon Mosquito. Combat operations quickly expanded as more production aircraft became available. Several jet units, including (but not limited to) Kommando Nowotny, JV 44, JG7 and Industrie Selbstschutzstaffeln I and II (ISS I, II) were formed between late 1944 and early 1945 as fighter units. Me 262As and a very limited number of converted two-seat Me 262Bs achieved operational status with 10/NJG 11 as nightfighters. Me 262A-1a and A-1/U3 aircraft were used by units such as Kommando Braunegg and NAG 1 for army tactical support recon.
Although overshadowed by the more romantic image of her kin struggling valiantly to defend the skies over the Fatherland, the Me 262A-2’s use in the schnellbomber role was equally widespread. This came about for several reasons including the superior survivability of the jet design and fuel selection. While overall fuel stocks were low, fuel for jet bomber operations tended to be more readily available on a percentage basis as it required less refining than fuel for piston-engined counterparts. Further, the higher octane fuels were undoubtedly routed on a priority basis to RVD units in 1945.
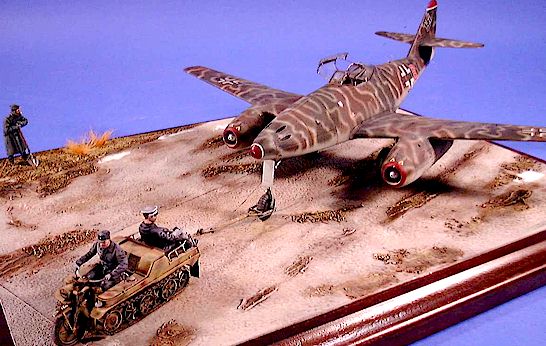
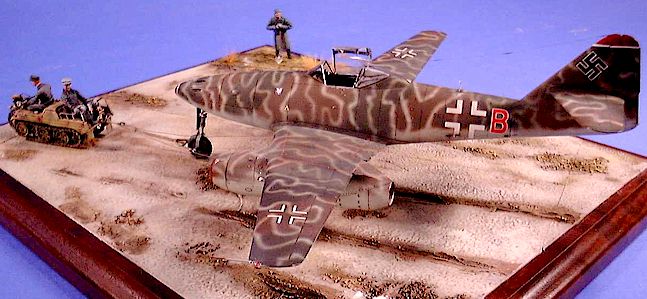
The subject Me 262A-2a, 9K+BN, was assigned to 5/KG(J) 54 based at Schwabisch Hall in December 1944. This colorful aircraft displays the visually stunning camouflage typical of KG(J) 54 during the period. The subject aircraft operated for several months until it was eventually brought down by Allied fighters over Coesfeld on 14 February 1945.
C o n s t r u c t i o n |
Construction is straightforward per kit instructions. This DML kit is beautifully detailed but has a couple of minor challenges which are highlighted below.
DML’s Me 262A-1/U3 (kit 5535) was available so I used it. DML made the Me 262A-1/U3 kit by incorporating "extra parts" into their earlier Me 262A-1a kit. The Me 262A-2a can be built from the Me 262A-1/U3 by:
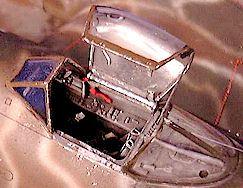 The cockpit was
built up per instruction. While nicely detailed, the kit seat was replaced with a scratch
built item without cushions. The cockpit was finished with a normal wash/drybrush
procedure. The vertical and horizontal stabilizers and corresponding control surfaces were
each thinned by ~0.7mm in total to render more accurate looking empennage. All four Mk 108
shell ejector ports were opened and internal chutes scratchbuilt for a kiss more realism
(see note on Mk 108s below). Make sure you add plenty of nose weight before closing
up the fuselage otherwise you’ll have to reopen it at the cannon bay like I did!
The cockpit was
built up per instruction. While nicely detailed, the kit seat was replaced with a scratch
built item without cushions. The cockpit was finished with a normal wash/drybrush
procedure. The vertical and horizontal stabilizers and corresponding control surfaces were
each thinned by ~0.7mm in total to render more accurate looking empennage. All four Mk 108
shell ejector ports were opened and internal chutes scratchbuilt for a kiss more realism
(see note on Mk 108s below). Make sure you add plenty of nose weight before closing
up the fuselage otherwise you’ll have to reopen it at the cannon bay like I did!
In total three notable challenges were experienced. First, the left and right upper wing halves will need to be shimmed up from the bottom wing halves beginning at the engine nacelle and running inboard to the wing root. At the wing root, the upper wing needs to be raised by ~1.3mm to properly mate with the fuselage-to-wing fairings. A tapered plastic strip was added to accomplish this. Second, the wing dihedral must be corrected and properly set. This will also help close the gap running along the fuselage/upper wing joint. Take care here with your fillers/sanding, otherwise you will lose some detail. Finally, the fit of the engine nacelles to the wing requires some attention. While the nacelles fit nicely into the slots on the bottom side of the wings without any difficulty, a moderate amount of CA filler was required on the upper-wing-to-engine-nacelle fairings (fore and aft) in order to cover up steps present there. Once properly dry, the CA is brought to the proper shape with file and sandpaper. Lost detail will need to be rescribed.
 As a final touch, I
opened all four Mk 108 cannon ballistic ports in the fuselage nose. For those disposed to
model the most historically accurate A-2a possible, realize that factory standard Me
262A-2a aircraft were typically armed with only the lower two Mk 108 cannon. Thus,
in most cases the upper two ballistic ports of the A-2a were faired over. However, several
references have pictures of aircraft that appear to be Me 262A-2a with four open ballistic
ports. Whether these particular aircraft were A-1a’s retrofitted with bomb racks upon
arrival at their operational units, or whether these specific aircraft were actually A-2a
factory standard which simply possessed four open ports serving two Mk 108 cannon or
whether they physically possessed four cannon, all remain open for discussion. I just
don’t know. I chose to model 9K+BN with all four ballistic chutes open while cannon
barrels are included in just the lower two (what, a compromise?).
As a final touch, I
opened all four Mk 108 cannon ballistic ports in the fuselage nose. For those disposed to
model the most historically accurate A-2a possible, realize that factory standard Me
262A-2a aircraft were typically armed with only the lower two Mk 108 cannon. Thus,
in most cases the upper two ballistic ports of the A-2a were faired over. However, several
references have pictures of aircraft that appear to be Me 262A-2a with four open ballistic
ports. Whether these particular aircraft were A-1a’s retrofitted with bomb racks upon
arrival at their operational units, or whether these specific aircraft were actually A-2a
factory standard which simply possessed four open ports serving two Mk 108 cannon or
whether they physically possessed four cannon, all remain open for discussion. I just
don’t know. I chose to model 9K+BN with all four ballistic chutes open while cannon
barrels are included in just the lower two (what, a compromise?).
P a i n t i n g a n d D e c a l s |
Custom-blended Tamiya acrylics and Aeromaster decals were used throughout the project unless otherwise noted. Mask the canopy and attach it to the fuselage using your favorite method. Spray the canopy interior color, Schwarzgrau 66, over the canopy framing first so it is visible through the "glass".
Humbrol Graublau 76 was sprayed over the dressed and primered seams. When dry, the entire aircraft was sprayed with a second light coat of Humbrol Graublau 76. When it was dry, the aircraft was very lightly sanded with 600 grit paper, cleaned and finally sprayed with Tamiya Graublau 76. (You may recall this pretreatment from my last article. Undercoating in this way really helps the Tamiya acrylics stand up to handling. If you aren’t tempted to pick up your finished aircraft a lot, you can skip this step and go right to the acrylic application).
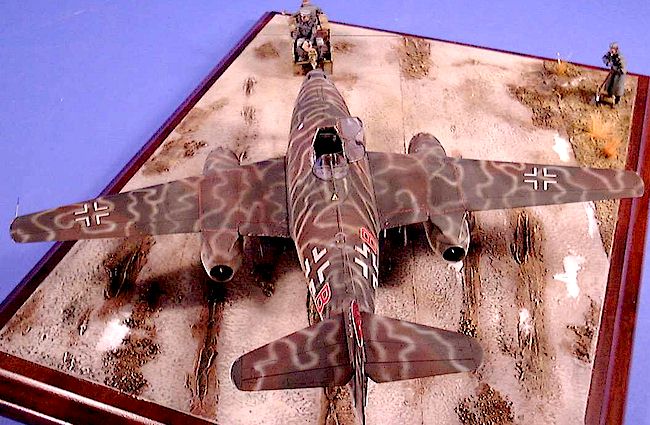
The splinter pattern of Braunviolett 81 and Dunkelgrun 83 was sprayed freehand and allowed to cure overnight. A squiggle pattern of Graublau 76 consisting of 2mm wide lines was sprayed onto the splinter pattern. This exercise requires patience, a steady hand and a brave heart but produces a visually stunning effect if a consistent line width and intensity can be maintained. I would like you to believe this was a once-off exercise, but it wasn’t. Even with the steadiest of hands some "back and forth" paint application was needed to arrive at the desired effect. Use of a soft mask would eliminate that problem, but would also detract from the real effect. After all was sprayed and cured, the red and white flashing on the nose, vertical stabilizer and engine intakes was added with the help of a hard mask. Time for a break….
After curing, a light gloss coat was applied overall and allowed to dry. Aeromaster decals were used in conjunction with the Microscale system. Any gross excess of solution was sopped up immediately as it becomes a little harder to remove when dry. The decals were allowed to dry overnight, after which a light overcoat of acrylic flat was applied. Once dry, the aircraft was given a moderate wash treatment with thinned brown and black artist oils. The aircraft was let to stand for 24 hours. Upper surfaces were lightly drybrushed with white to add bring out surface detail. A kiss of silver/grey mix was added around the cockpit and port wing root area. Once dry, a couple of light coats of acrylic clear flat were sprayed and the aircraft left undisturbed overnight. Once done, remove the canopy mask, paint the glass area with Future and allow it to dry. At this point you have a truly wonderful looking aircraft! Shazam!
C o n c l u s i o n |
Overall, this was a really fun build despite the marginal extra effort required by the DML kit design and engineering. As one might expect going in, the "double scheme" paint job requires much more effort than a normal paint scheme (as I mentioned there is a little more than some "back and forth clean up" required) but it is really worthwhile. After several months, I still find the camouflage scheme stunning enough that it grabs my attention and draws me in for my five-thousandth "closer look"!
The well versed among you will notice that there are no bomb racks on this aircraft. This is merely because I am as yet unsure whether the Wikingerschiff or ETC 504 racks were used on this particular bird. I think the Wikingerschiff racks are a safe bet, but any help from you experts would be greatly appreciated!
R e f e r e n c e s |
Me 262 Volume 1, Classic Publications #3, Smith and Creek.
Me 262 Volume 2, Classic Publications #4, Smith and Creek.
AeroDetail #9, Me 262, Model Graphix.
Back to HyperScale Main Page
Back to Features Page