 Home
| What's New |
Features |
Gallery |
Reviews |
Reference |
Forum |
Search
Home
| What's New |
Features |
Gallery |
Reviews |
Reference |
Forum |
Search
|
|
|
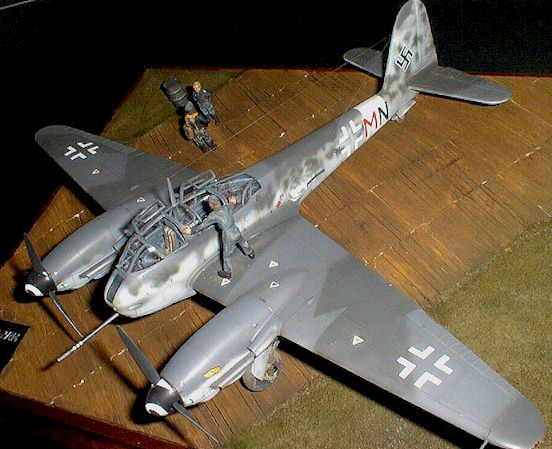
Messerschmitt Me 410B-6/U4 1/48th Revell-Monogram Me-410 and the CMK Interior Set by Floyd S. Werner Jr.
After viewing a friend's Me-410 I really wanted to build one. Alan Del Paggio decided he wanted one so that was all the encouragement I needed to start! Alan wanted a cannon armed 410 which I also really wanted to do. That would be an easy conversion by just adding the bulge under the fuselage.
Luckily for me (although in retrospect I am not sure if it really was lucky) CMK had just released an interior set for the Revell-Monogram 410. I decided to add it to Alan's model.
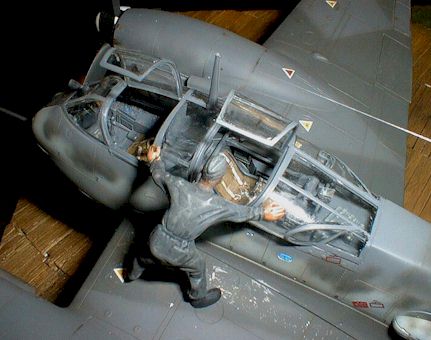
CMK's front cockpit, while nice looking, didn't really improve on the kit parts. Furthermore, there are major trimming problems when trying to get the resin tub to fit between the kit sidewalls. You have to dry fit the part a lot. Photo etched pedals would have been nice. Some of the parts in the Revell-Monogram kit are better - the armor plate behind the pilot for example. The kit part has relief on both sides and the CMK part only one. The photo-etched handles are nice and fit really well. The instrument panel is a sandwich of photo etch, film and resin backs. It looks nice and at is actually better than the original. The resin seat is a big improvement over the kit part and includes the harness. The problems really start in the aft cockpit. The sidewall detail must be removed. This
will help but there are many more items that must be trimmed away. The fuselage is the
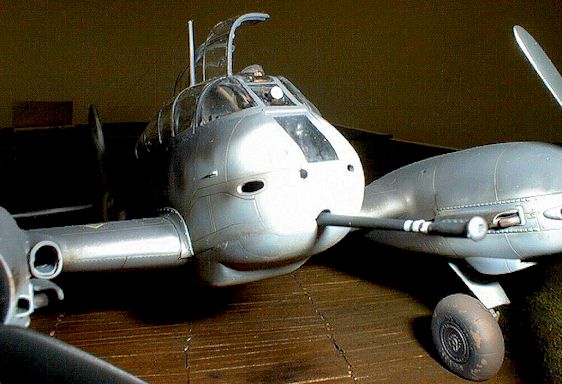
driving force here, so dry fit, dry fit, and dry fit - this will save a lot of The sidewalls are a real problem. They have to be trimmed to almost nothing and still have to be forced together with super glue and accelerator. Truth be known the sidewalls are barely visible when assembled and finished. Even after trimming I had to "hack" off a bunch of them at the front to get them to fit correctly. About this time I was debating whether or not to trash the kit and start again using the kit interior, but no kit has ever beaten me and my super glue/accelerator! There is no monetary reason that this interior wouldn't fit. I thought the kit canopy was much nicer than the CMK canopy and, in my opinion, looks more realistic. I didn't even try to cut it out. The ProModeler canopy fit like a glove.
Don't forget to check your aircraft and install the proper windscreen. Mine had the telescopic sight. Don't forget the armor panel inside of the canopy. I didn't install mine as I thought that it would have caused more problems than the addition was worth. Don't forget to paint the interior RLM 66 with a dry brush of 02. Pick out the details with yellow and red.
I painted the outside a mixture of paints that match the Monogram Painting Guide. The RLM 76 is the Polly-S, the RLM 75 is a mixture of Tamiya, and the RLM 74 is Polly-S, which are the best colors for the job. I used Aeromaster decals. They fit real well, as did the kit decals. The numbering of the fuselage stations in the Revell-Monogram instructions is incorrect so be careful. The ZG26 machine is quite despite its gray camouflage.
I did not correct the supercharger intakes as I thought they would be adequate. My radiator flaps also were too short. This brings the model to an end. I was happy with the kit, as a whole and I really like the finished product. The CMK is another situation.
I was very unhappy with the fit and poor instructions of the CMK detail set. If I had to do it again the kit cockpit is very nice and the additional sidewall detail wasn't worth the problems to fix. I can not recommend the CMK interior. I'm hoping that this was an isolated incident. I bought their 109K interior so we'll see this one last time. The Aeromaster decals, supplemented with the kit decals, fit great and settled down great with Mr. Mark Softener. Build this kit, but use the kit interior. If you want the engines and exterior set I can't say, but the interior is best left to experts.
|
 The CMK set comes
bubble free with a two piece clear piece canopy. The resin is crisp but the lines are not
always nice and clean. The instructions were very vague as to what kit parts should be
trimmed or removed, and what should stay. Let me say that the front cockpit sidewalls stay
and the aft cockpit detail is removed. It seems easy but the instructions let you believe
that all the detail stays.
The CMK set comes
bubble free with a two piece clear piece canopy. The resin is crisp but the lines are not
always nice and clean. The instructions were very vague as to what kit parts should be
trimmed or removed, and what should stay. Let me say that the front cockpit sidewalls stay
and the aft cockpit detail is removed. It seems easy but the instructions let you believe
that all the detail stays.  work that can't be fixed
later. The CMK set utilizes the upper deck of the kit, which fits real well. There are two
parts in the aft cockpit that confused me and caused lots of problems. Actually there is
only one piece, the compass panel. There is a photo etch part and a resin part, your
choice, IF you read the instructions. I tried to put them together and just couldn't
figure out why it wouldn't fit. STUPID me. Also put this part in before the fuselage is
put together. The radio rack is the kit part and when built is barely visible. The seat is
better in the CMK set but at what price? The supports from the kit don't fit requiring the
supports to be built. Doesn't sound hard but for me it was difficult to get the seat to
sit level and above the upper deck. There is a three-piece instrument panel that goes on
the forward edge of the aft cockpit, why I don't know. The canopy framing of the kit
obscures it so it wouldn't be seen. The instructions aren't very specific about it. One
thing I did like was the gunsights. I'm interested in how they work because there are 3 of
them. One on top in the center and two inverted on each side. This is why the bulge is
required in the canopy. The gunsights are attached to the kit part.
work that can't be fixed
later. The CMK set utilizes the upper deck of the kit, which fits real well. There are two
parts in the aft cockpit that confused me and caused lots of problems. Actually there is
only one piece, the compass panel. There is a photo etch part and a resin part, your
choice, IF you read the instructions. I tried to put them together and just couldn't
figure out why it wouldn't fit. STUPID me. Also put this part in before the fuselage is
put together. The radio rack is the kit part and when built is barely visible. The seat is
better in the CMK set but at what price? The supports from the kit don't fit requiring the
supports to be built. Doesn't sound hard but for me it was difficult to get the seat to
sit level and above the upper deck. There is a three-piece instrument panel that goes on
the forward edge of the aft cockpit, why I don't know. The canopy framing of the kit
obscures it so it wouldn't be seen. The instructions aren't very specific about it. One
thing I did like was the gunsights. I'm interested in how they work because there are 3 of
them. One on top in the center and two inverted on each side. This is why the bulge is
required in the canopy. The gunsights are attached to the kit part.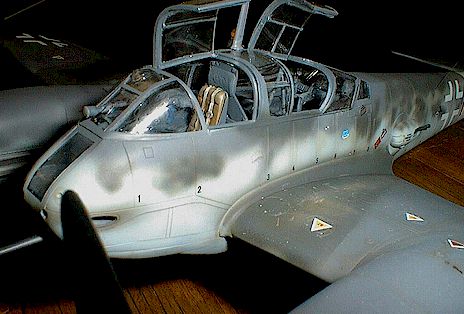 Modifying the kit
to the Me-410B-2/U4 was really quite straightforward. The BK50 cannon is in the kit, but
the gun bulge is not. It is easily made and doesn't consist of any compound curves. I used
a contour gauge to check my progress with A + B Epoxy. Smooth before drying with water and
dental spatula. Somebody told me that the bulge is available in the Revell kit in Europe,
but I can't confirm this. Now comes the part that takes nerves of steel. Attach the front
glass section and CAREFULLY drill a hole in the middle of it making sure that it goes
through detail set at the proper angle. When done correctly the conversion is over. I was
happy as a pig in slop with the results of my BK50.
Modifying the kit
to the Me-410B-2/U4 was really quite straightforward. The BK50 cannon is in the kit, but
the gun bulge is not. It is easily made and doesn't consist of any compound curves. I used
a contour gauge to check my progress with A + B Epoxy. Smooth before drying with water and
dental spatula. Somebody told me that the bulge is available in the Revell kit in Europe,
but I can't confirm this. Now comes the part that takes nerves of steel. Attach the front
glass section and CAREFULLY drill a hole in the middle of it making sure that it goes
through detail set at the proper angle. When done correctly the conversion is over. I was
happy as a pig in slop with the results of my BK50. 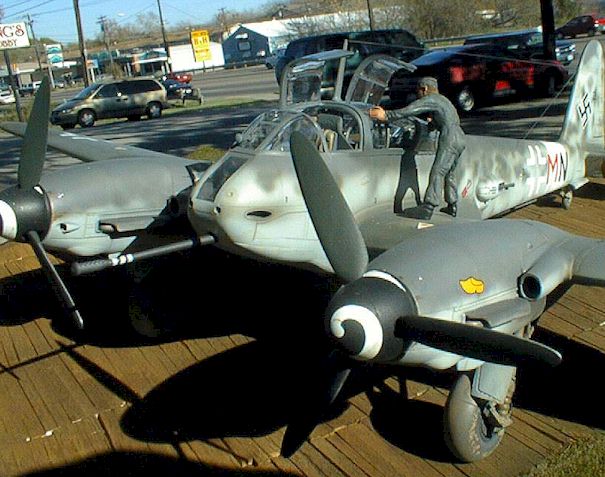
 Typical weathering
starts with burnt umber in the panel lines. Silver pen and pencil brings out worn areas. I
tried something different with the exhaust stains on this kit. I used pastels first. While
they looked good they weren't dark enough so then I mixed a batch of dark tan and black.
This worked out great and gave me the look I was after. There is a great photo of the
underside of a captured 410 flown by the British that was used for references.
Typical weathering
starts with burnt umber in the panel lines. Silver pen and pencil brings out worn areas. I
tried something different with the exhaust stains on this kit. I used pastels first. While
they looked good they weren't dark enough so then I mixed a batch of dark tan and black.
This worked out great and gave me the look I was after. There is a great photo of the
underside of a captured 410 flown by the British that was used for references. Models,
Description and Images Copyright © 1999 by
Models,
Description and Images Copyright © 1999 by