Home
| What's New |
Features |
Gallery |
Reviews |
Reference |
Forum |
Search
Home
| What's New |
Features |
Gallery |
Reviews |
Reference |
Forum |
Search
|
|
|
Gloster Meteor F.8 by Brett T. Green
For hints, tips and techniques on building vacform models, see "Building Vacform Models Part One - The Basics" in the Reference Library on HyperScale.
77 Squadron RAAF entered the Korean War equipped with Mustangs. These aircraft were adequate for the Squadron's prior occupation duties in Japan, but were totally outclassed by the new generation of jet fighters in Korea. 93 Meteor F.8 replacements were delivered direct to Korea from April 1951. The unit happily converted to the new jet on the front lines. However, the "Meatbox" was hardly a match for the scourge of the Korean skies, the MiG 15. The MiG 15 was designed as a modern jet fighter from inception. Its swept wings and stubby fuselage built around its powerful single Klimov engine (ironically, a copy of the Rolls-Royce Nene) was the most advanced design of its time. The "Meatbox" was old-fashioned by comparison. Its straight wings, conventional fuselage, and twin nacelle-mounted engines betrayed its World War Two design origins. The nimble MiG could out-climb, out-turn, out-run and, with its 37mm cannon, out-gun the Meteor. Nevertheless, pilots from 77 Squadron managed three victories over MiG 15s. The real forte of the "Meatbox" lay in its ground attack capabilities. Solid design provided a stable platform for bombs and up to 16 rockets. The nose mounted 20mm cannon were also well suited to strafing attacks. The cost of this deadly dangerous task was the loss of thirty-eight Meteor aircrew and a further seven imprisoned during the Korean War.
During March I shared a 1000km drive to a model show in Melbourne with Paul Gillen who serves with 77 Squadron, and his unit figured large in our conversation. At the end of our trip he gave me a book, "Swift To Destroy", an illustrated history of 77 Sqn. That was all the further inspiration I needed. I had to build a Meteor. But what kit?
No late-marque Meteor is available as an injection moulded kit in 1/48 scale. The differences between the Mk. 1/3 Meteor as produced by Tamiya and the Mk. 8 Meatbox are so extreme that the idea of conversion is laughable. The wings, fuselage, tailplanes, engine nacelles and canopies are totally different. I may have been able to use the undercarriage from the Tamiya kit but I'm not even certain of that! I did have an unbuilt 1/48-scale vacform Aeroclub Meteor in my collection, and finally plucked up the courage to build it. I have built a few vacforms over the years but I have never been totally satisfied with the results. My luck was about to change with Aeroclub's kit!
Aeroclub's 1/48 scale Meteor F.8 comes packed in a stout box. Aeroclub have thoughtfully kept vacform parts to a minimum. The two thick white vacform sheets contain the fuselage halves, wings, jet nozzles, nacelle blanking plates, optional wing tanks and ventral fuel tank. Surface detail looks a little soft and heavy on the white plastic but will look good under a coat of paint. This is a truly multi-media kit. Horizontal tail surfaces, the cockpit tub and main gear doors are supplied in caramel-coloured, short run injected plastic. Undercarriage gear, front gear doors and other small details are white metal. Forward nacelles are cast in resin. Markings are provided for two RAF and one RAAF aircraft. The instructions are quite good, with a written narrative, scale plans and two exploded views to assist assembly.
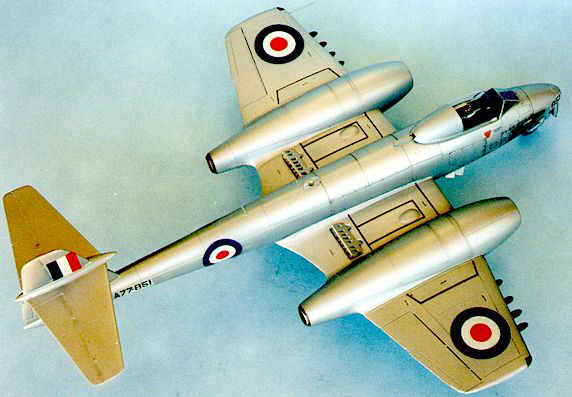
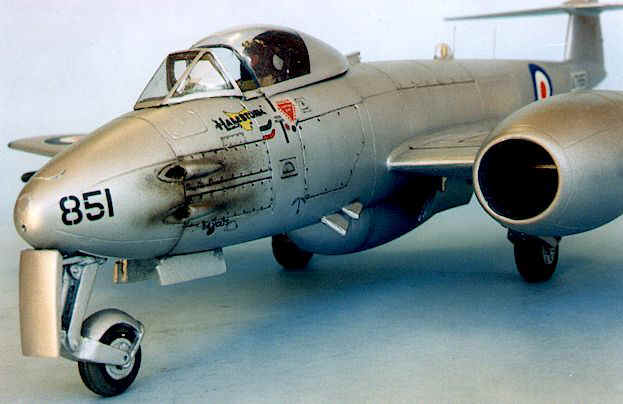
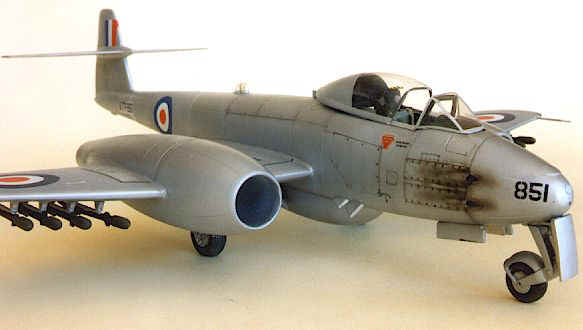
I decided to build this model as a 77 Squadron Meatbox in Korea. This presented a number of challenges. RAAF Meteors differed in a number of aspects from their RAF counterparts. I would have to scratchbuild some details. More importantly, RAAF Meteors were painted silver. This would be a very unforgiving finish if I left any gaps or blemishes on the soft vacform plastic!
Parts Preparation I always dread removing and cleaning up the parts on vacform sheets. I therefore decided to get this out of the way early. This task was completed in record time - no chore at all. I first traced around the parts with a black marker, then scored around the parts with a Tamiya scriber (P-Cutter). This allowed me to snap the pieces free from the backing sheet. Total time spent on removal - less than one hour.
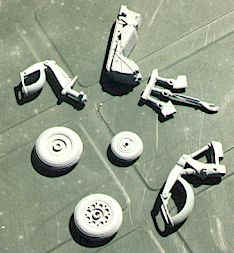
The metal parts looked a little rough in the box, but some attention with a sharp knife and a file improved them considerably. I sprayed all the metal parts with Tamiya Primer at this point - now they looked very good.
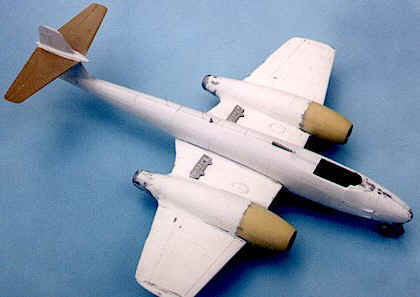
Assembly The cockpit is pretty basic. The real Meteor cockpit is a jumble of instruments, cables and quadrants. The main features are there though. I didn't spend too much extra time on the cockpit apart from adding seat cushions from Milliput and a basic harness from lead foil. The main assemblies are cleverly designed. The wing is designed as a full-span top half and bottom half, so dihedral is automatically set. The top wing also incorporates a raised saddle on which the fuselage sits. This is a very robust arrangement. I taped the fuselage halves and wing halves together. Test fitting looked promising, but I bevelled the inside of the fuselage wing root where it sat on the saddle just to be safe.
The second important construction consideration was the nacelle-to-wing fit. The resin nacelles matched the wing leading edge nicely, but I had sanded too much material off the trailing edge, leaving a wedge-shaped gap in front of the white metal tailpipe. The fuselage halves were now joined, trapping the cockpit and nose gear assemblies. The cockpit tub is designed to reinforce the forward fuselage. The white-metal nose gear bay doubles as a nose weight - this model was not destined to be a tail-sitter!
I cut a slot in the fin and attached the horizontal tail surfaces with two-part epoxy glue. The plastic tail parts are moulded with a locating tab, so this join was pretty solid too. I filled and sanded the gaps first using Milliput, then Gunze Mr Surfacer. Metal details were now added, including the undercarriage and shell ejector chutes.
RAAF Modifications
I thermoformed a blister from clear acetate using a shaped piece of styrene strip at the master. My third attempt gave me a satisfactory result. Rocket rails were borrowed from a Hasegawa Mustang, and the rockets themselves were adapted from items supplied in the Airfix Mosquito kit. Fine brass wire was used to represent the antennae. I also added a circular and an oval panel to the extreme nose of the aircraft. RAAF Meteors often wore the ventral fuel tank. This is supplied as a vacform part, and hides a large part of the forward fuselage to lower wing join. The last task before painting was to restore some panel line detail lost during sanding.
This proved to be a very straightforward and enjoyable project. I finished the model in a half-dozen sessions over a period of a month - faster than average for a model of this size.
Aeroclub's Meteor is a cleverly designed and well executed model that would suit a modeller looking for a new challenge. I am really looking forward to Aeroclub's Meteor NF.12! Model, Images and Article
Copyright © 1999 by Brett Green Back to HyperScale Main Page Back to Features Index
|
 Now it was time to
clean up the parts. I used a large, coarse nail file to remove the thin wedge of
plastic waste, taking care to sand straight and not to go above the bottom of
the black line drawn around the edges of the parts. The trailing edges of the
wings were scraped down to scale thickness with the back of a hobby knife. Total
time spent on cleanup - less than one hour.
Now it was time to
clean up the parts. I used a large, coarse nail file to remove the thin wedge of
plastic waste, taking care to sand straight and not to go above the bottom of
the black line drawn around the edges of the parts. The trailing edges of the
wings were scraped down to scale thickness with the back of a hobby knife. Total
time spent on cleanup - less than one hour.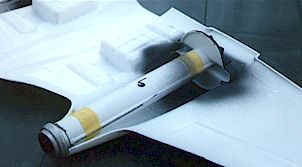 The wing
assembly was completed per the instructions, taking care to first test the fit
of the jet nozzles, blanking plate and detailed engine face. Gaps were filled as
required when the wing assembly had dried.
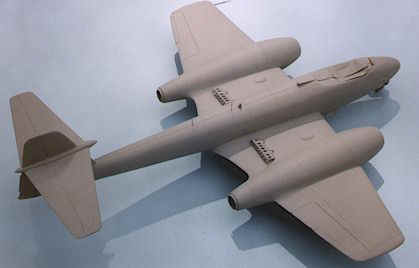
The wing
assembly was completed per the instructions, taking care to first test the fit
of the jet nozzles, blanking plate and detailed engine face. Gaps were filled as
required when the wing assembly had dried.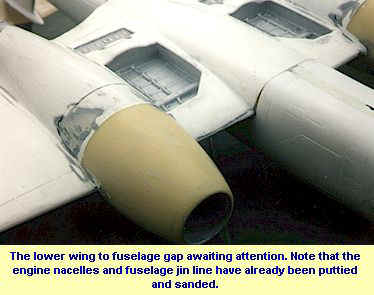 When the glue had
set, the fuselage was offered to the wing saddle. The fit was good, with no
filler required on the important wing root. The saddle mount also provided a
great deal of structural strength to the model.
When the glue had
set, the fuselage was offered to the wing saddle. The fit was good, with no
filler required on the important wing root. The saddle mount also provided a
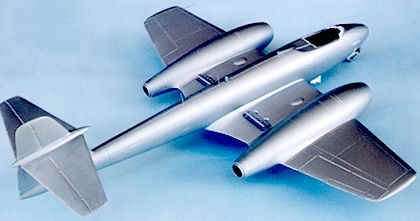
great deal of structural strength to the model.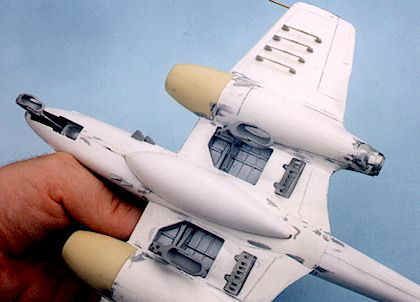 RAAF
Meteors had a different arrangement for antennae, a clear blister on the
upper-mid fuselage and were often equipped with rockets.
RAAF
Meteors had a different arrangement for antennae, a clear blister on the
upper-mid fuselage and were often equipped with rockets.