|
Mig 15 |
Mikoyan-Gurevich
Mig 15
by Richard Chafer
|
Mig 15 |
| B a c k g r o u n d |
First encountered in November of 1950, the MiG-15 was the end result of an evaluation of
advanced Axis aircraft designs around at the end of World War Two. The Soviets knew they
had to ‘keep-up’ with Western designs to stay in the technology race. The
‘one’ design that appears to have influenced the MiG team the most was the Focke
Wulf TA-183 swept wing fighter.
The Soviets made some changes and called it the S-01. First flown on December 1947 with a
British Nene Mach 1 turbojet engine the MiG-15 was soon to be very well known, especially
to United Nations pilots flying in combat against them during the Korean War.
| I n t h e B o x |
Consisting of approximately 81 parts, Tamiya’s MiG-15 is a great kit. Moulded in
blue/grey plastic with engraved panel and rivet detail. The fit of parts was very good
with only a small amount of superglue needed to fill areas around the wing-root and
fuselage join.( I use superglue because it doesn’t shrink like most fillers on the
market)
A reasonably well detailed jet engine is included and the model can be displayed with the
aft fuselage off, resting on it’s own trolley revealing the engine.
Decals are provided for four aircraft, two Chinese, a North Korean and a Soviet aircraft.
One of the Chinese aircraft is camouflaged the rest are silver.
| C o n s t r u c t i o n |
Starting-off with the cockpit I decided to use the kit cockpit and detail it with some
parts from the Eduard MiG-15 detail set (48-177). Other scratchbuilt details in the
cockpit include throttle control,various levers and wiring and gun sight lens. The KMC
ejection seat was also included.
I would recommend replacing the whole cockpit assembly with the KMC MiG-15 cockpit detail
set as the kit cockpit is a bit simple and the Eduard parts don’t help the situation
very much at all. There are other cockpit detail sets for this kit available from Neomega
and I believe Teckniks?
The rest of the kit went together without any major problems. I chose to disregard the kit
instructions when it came to the fuselage assembly. Instead of joining the forward
sections (parts A11 & A12) together then joining them to the rear sections (parts A20
& A19) I decided to join parts (A19 & A12) together and (A11 & A20) on a piece
of glass after cutting-off the alignment stubs.
Once dry these sections were then glued together giving me what I thought would be a
better join around the mid fuselage sections. Wrong! As I was building two kits at the
same time (not recommended) one using kit instructions the other as described here, I can
say that the kit is engineered so well that the mid fuselage join on the kit which I built
as per Tamiya instructions was so good it made my experiment with this kit an interesting
experiment but proved to be not necessary. The rest of the kit went together with no
problems encountered. All gun barrels were drilled-out too.
| P a i n t i n g , D e c a l s a n d W e a t h e r i n g |
Now this I knew was going to be entertaining. As you may or may not be aware there are a
number of decal sheets out there for the MiG-15 and a lot of these schemes are
camouflaged. The best of the bunch are the camo schemes used during the Korean War.
 I chose to do an aircraft flown by a Russian Commander I.P.Galyshevsky (on the
AeroMaster sheet 48-230) or Major I.P. Golshevskij (on the Cutting Edge sheet 48017) and
this leads to the beginning of a curious journey.
I chose to do an aircraft flown by a Russian Commander I.P.Galyshevsky (on the
AeroMaster sheet 48-230) or Major I.P. Golshevskij (on the Cutting Edge sheet 48017) and
this leads to the beginning of a curious journey.
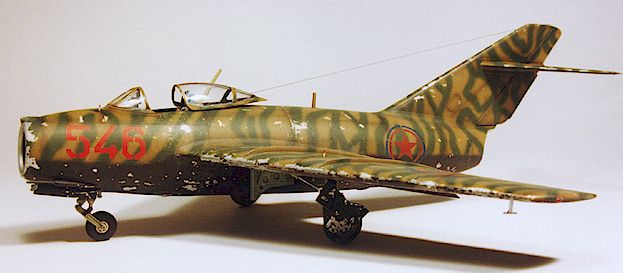
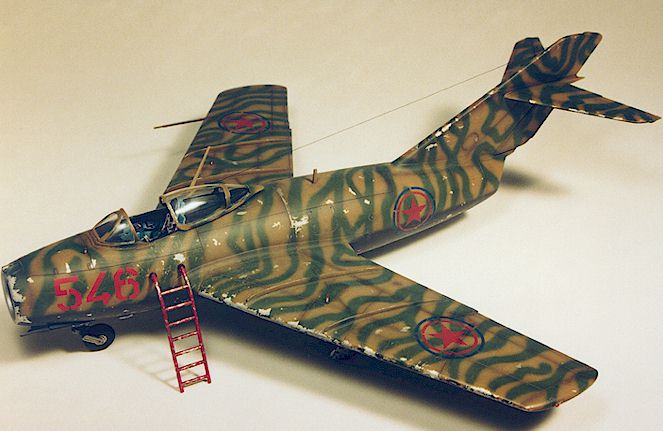
Aircraft number 546 is shown on both Aero Master and Cutting Edge sheets, both aircraft are shown with a black underside, red numbers and full colour roundels but that is where the similarities stop.
Which sheet is correct I wouldn’t have a clue. Using a mixture of both schemes and
taking into consideration that it is a night fighter I chose to show the roundels without
the white background. It is stated on the Cutting Edge sheet that this may have been the
case anyway.
So, after deciding which scheme I was doing it was time to decide how weathered I wanted
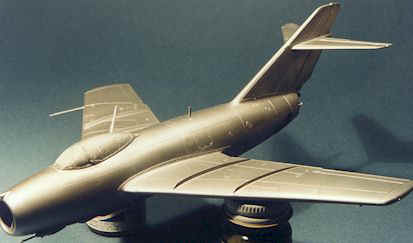
it to be. As is typical of me I wanted it VERY weathered. So, I began with a coat of
Floquil Bright Silver all over,(after masking-off the canopy, intake and exhaust of
course!).
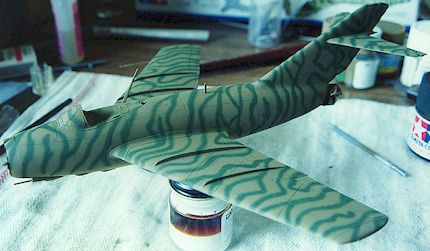 Leave to dry for a couple of days then begin the camouflage. I
started with Polly Scale Dark Earth (FS.30118)acrylic on the upper surfaces, over this
came a mix of Tamiya XF 5 Green acrylic and XF 11 J N Green acrylic. I had to spray this
colour three times ‘till I got the right tone which complemented the Brown. Meaning I
didn’t want it to look too bright a Green or too Blue/dark a Green in comparison to
the Brown. Then came the Black this time Aero Master acrylic.
Leave to dry for a couple of days then begin the camouflage. I
started with Polly Scale Dark Earth (FS.30118)acrylic on the upper surfaces, over this
came a mix of Tamiya XF 5 Green acrylic and XF 11 J N Green acrylic. I had to spray this
colour three times ‘till I got the right tone which complemented the Brown. Meaning I
didn’t want it to look too bright a Green or too Blue/dark a Green in comparison to
the Brown. Then came the Black this time Aero Master acrylic.
Once dry comes the fun part. Paint chipping. I used standard masking tape rolled into a
cone and then used various degrees of pressure to lift-off the acrylic paint to achieve
the effect. This is a trial and error process. If you manage to lift-off too much paint
you can respray the cam colours over the top. I did have to do this in various places. The
scratches around the cockpit were done carefully with a engineers scriber (not a panel
line scriber).
Once happy with the paint chipping a couple of coats of Aero master acrylic gloss were
sprayed with low pressure (15psi) over the entire model. Left to dry for a couple of days
the decals were then applied with assistance of Gunze  Sangyo Mr Mark Softer
decal softening liquid.
Sangyo Mr Mark Softer
decal softening liquid.
Next step was emphasising the panel lines with Burnet Umber Atelier Impasto artists acrylic watered down with a little dish washing liquid and water. (Don’t use this type of mix for general washes. Use oil paint and turpentine over a gloss varnish sealed surface.) Over this was sprayed a very thin mix of Tamiya X 19 Smoke which for some reason gave me a nice restrained brown effect along the panel lines and anywhere else I thought I needed a variation to the colour scheme. Aero Master matt acrylic was then sprayed to seal all this in.
Leave to dry for a day or two. I then masked-off around the undercarriage bays and sprayed them XF-23 Light Blue, gave them a wash of Burnt Umber oil paint thinned with turps and dry brushed with a lighter version of the undercarriage bay colour using Humbrol enamels.
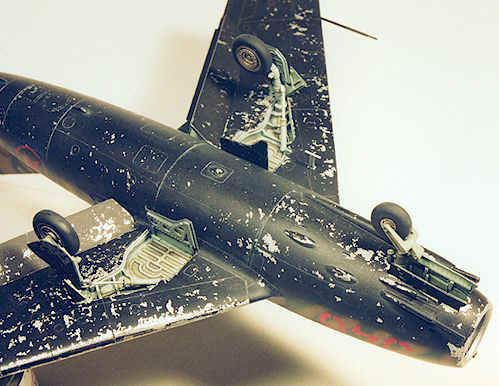 The undercarriage was the next step and to attach
these and the landing flaps, canopy and seat I used Aero Master matt acrylic varnish! Yes
with a little patience it does work and of coarse leaves no tell tale signs and is quite
strong. The aerial wire is from nylon string. Thanks to Brett for that tip!
The undercarriage was the next step and to attach
these and the landing flaps, canopy and seat I used Aero Master matt acrylic varnish! Yes
with a little patience it does work and of coarse leaves no tell tale signs and is quite
strong. The aerial wire is from nylon string. Thanks to Brett for that tip!
Conclusion
The model went together with no great problems encountered. I enjoyed the complicated
camouflage scheme and hope to do more of these Korean War schemes in the future.
| R e f e r e n c e s |
MiG-15 in action
Aircraft Number 116. By Hans-Heiri Stapfer
Squadron/Signal publications 1991
ISBN 0-89747-264-0
| A d d i t i o n a l I m a g e s |


Back to HyperScale Main Page
Back to Features Page