|
A
Modeler's Evolution
Part
One
by
Russell M. Field
|
1/72
P-40 |
I returned to modeling a little less than a year ago after a 25-year hiatus.
 My first
love in this hobby is WWII aircraft, and Hyperscale is one of the most valuable
resources I've found. I enjoy seeing the results many folks get, but I sometimes
feel overwhelmed and wonder if they ever had the problems I do and got the same
results I get. With that in mind, I thought some of the "readership"
might find it interesting to watch a relative novice progress, and maybe provide
a different frame of reference from someone with not-so-developed skills. My first
love in this hobby is WWII aircraft, and Hyperscale is one of the most valuable
resources I've found. I enjoy seeing the results many folks get, but I sometimes
feel overwhelmed and wonder if they ever had the problems I do and got the same
results I get. With that in mind, I thought some of the "readership"
might find it interesting to watch a relative novice progress, and maybe provide
a different frame of reference from someone with not-so-developed skills.
SO … here's the first project in one modeler's learning progression. This
is not a "how-to" or a kit review, but rather a chronicle of my
experience as an evolving amateur. I welcome questions, comments and advice on
both modeling and photographic techniques, as well as technical corrections.
Comparisons to your own work are freely encouraged.
A warning: don't take the colors in the photographs too literally; I am even
more of a novice photographer than a beginning modeler!
I re-entered this obsession by collecting some of the cast metal WWII
"toy" planes now available. I wanted a P-40, but couldn't find any, so
on a lark I picked up a Heller P-40E kit (Kittyhawk #79738), and a few small
bottles of Testor's paint & thinner. I thought "I used to do this all
the time - no prob!"
Even though the first one was strictly OOB, it was UGLY; I did a lousy paint
job, accidental glue smears, canopy contusions, the whole nine yards. It was
like I'd forgotten how to glue stuff together.
It was SO bad I turned it into a painting practice drone. I got another one;
I was determined to make THAT particular kit look good! Therein lies the
beginning of my journey toward more realistic modeling.
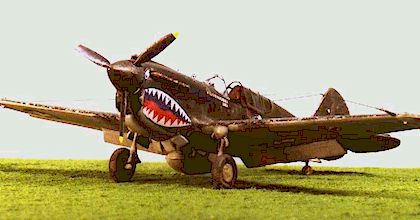
 The kit
subject is the AVG P-40E of Col. Scott. If you've ever seen or built one of
these kits, you'll recognize it as one not intended for a great deal of
detailing. The exhausts are solid and molded into the fuselage, the wings are
two uppers and two lowers that attach at some approximation of the wing root,
the canopy is thick, the interior largely nonexistent, and so on. But it looks
enough like a P-40 that it would likely not be taken for another aircraft. The kit
subject is the AVG P-40E of Col. Scott. If you've ever seen or built one of
these kits, you'll recognize it as one not intended for a great deal of
detailing. The exhausts are solid and molded into the fuselage, the wings are
two uppers and two lowers that attach at some approximation of the wing root,
the canopy is thick, the interior largely nonexistent, and so on. But it looks
enough like a P-40 that it would likely not be taken for another aircraft.
I tried to do too much to this kit, but was fairly pleased with the result.
There are some things I'd do differently. One of the "did-rights",
though, was learning how to use superglue. My standard practice now is to put a
drop on a piece of waxed paper (thank you, Mr. Greenland) and either use a
scribe point for application or lightly touch the part edge to the drop.
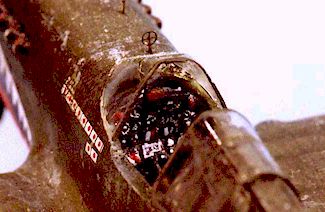
Some of the key modifications included:
 True
details wheels and cockpit set (painted under a magnifying glass with a
.010" stylus - went blind on this one! BTW, the TD set in 1/72 makes no
mention of the manual hydraulic pump handle on the starboard floor. Don't
forget to add this if using this set!); True
details wheels and cockpit set (painted under a magnifying glass with a
.010" stylus - went blind on this one! BTW, the TD set in 1/72 makes no
mention of the manual hydraulic pump handle on the starboard floor. Don't
forget to add this if using this set!); - Removed and reset all control surfaces (and matched the joystick position
- how retentive is that? Be sure to check the movement limits so you don't
exceed them …);
- Added wires behind the control panel (one reference states the wires are
visible viewed straight down through the windscreen - somebody's laughing
somewhere about that one, I'm sure!);
- Drilled out the exhausts, installed hypo-tube gun barrels, added
photo-etched external machine gun sights and a landing light (broke two #80
bits doing the exhausts, and the light is wildly out of scale);
 Reworked
the drop tank and its mounts (including a fuel line and cap); Reworked
the drop tank and its mounts (including a fuel line and cap); - Opened the front scoop up and added the intake throats (AFTER assembly -
one of those "Gee, that would look nice" things that you figure
out would have been a LOT easier to do BEFORE gluing the fuselage
together!);
- Replaced the pitot tube, added flap indicators and put some stringers in
the wheel well roofs;
- My first kit-bash: the landing gear legs looked too extended, so I robbed
some from a Minicraft P-40B kit that looked more compressed;
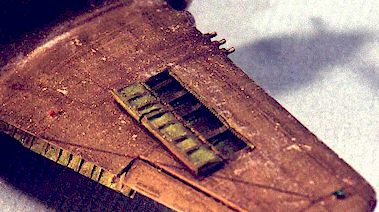
- Opened the cowl flaps, added antenna wires and brake lines (the brake wire
is too thick, another scale issue), installed my first vac-formed canopy,
and opened the starboard ammo bay (the piano hinge is .010" rod wrapped
with .008" wire);
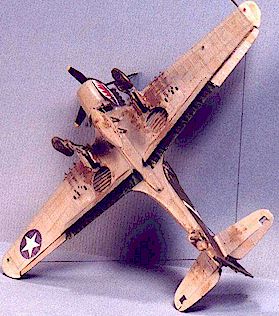
- And the biggie - dropped the flaps.
So why, you ask, is dropping the flaps a "biggie"? It wasn't, until
(after I had the wings glued on, of course) I realized that on a REAL P-40 the
flaps extend inboard of the wing root almost to the fuselage centerline. I had
removed the flap sections from only the lower WING halves. Got the @%$@! thing
together and suddenly saw that I had to remove the inboard portion of the flaps
from the fuselage, block off the resulting hole, and make the addition look
seamless to the wing portions! ya-HOO!
That's one reason it takes me 3 - 4 months to finish a model …
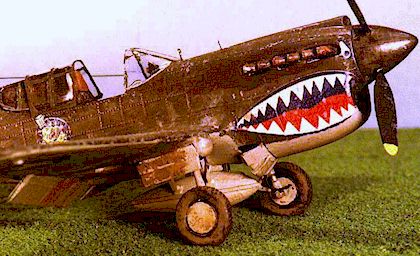
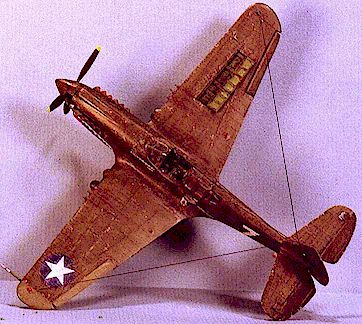 This plane
was olive drab over light gray; I hassled a while over exact shades, then picked
two. I usually hang my models on pegs stuck into the side of a cardboard box,
first with the bottom out then the top. This time, when I did the OD top, I had
the light gray bottom resting against the cardboard to further steady it. Sure
enough, I saw later that tiny bits of OD had bounced off the cardboard and hit
the underside. Fortunately, on this model it looked like light operational
grunge or dirt, so I left it. This plane
was olive drab over light gray; I hassled a while over exact shades, then picked
two. I usually hang my models on pegs stuck into the side of a cardboard box,
first with the bottom out then the top. This time, when I did the OD top, I had
the light gray bottom resting against the cardboard to further steady it. Sure
enough, I saw later that tiny bits of OD had bounced off the cardboard and hit
the underside. Fortunately, on this model it looked like light operational
grunge or dirt, so I left it.
P-40 historians will notice the incorrect kill markings; if you could read
the name, you'd also see that it calls out Olders as the pilot! This is because
I thought the decals from the aforementioned P-40B kit looked good. A lesson in
historical accuracy … live and learn …
This was my first foray into weathering. I learned to use colored pencils for
chipped paint and mud-colored putty, as well as post-shading panel lines and
drybrushing to fade the colors and decals. I also experimented with the use of
sponge-type eye shadow applicators and silver paint for simulating paint
chipping; this has become one of my favorites. The rudder and port elevator,
wingtip and aileron are slightly different shades than the rest of the craft.
This was intended to simulate replacement parts.
While I might have gotten a little carried away with the wear and tear, the
saving grace is that the subject operated in the CBI theater where logistic
lines were thin (if they existed at all), weather conditions were often messy
and maintenance concerns focused more on functionality than cosmetics.
 Here are a
few things I learned while working this kit: Here are a
few things I learned while working this kit:
- Kits are not always entirely accurate, physically or historically. This
can stem from manufacturing considerations or strategies, outright errors,
unclear characteristics or documentation, or poor sources.
- Reference material can be confusing. In war, priorities lean more toward
survival than ensuring future modelers will know EXACTLY the hue of (insert
color here) used. It is also common to find conflicting references; make a
decision and move on!
- I began to get a sense of the scale effect. For example, the cowl flaps
are made from the original kit cowl material - which at 1/72 scale appears
to be 4" - 5" thick! I'll thin these or use card stock next time
…
- Taking a multi-media approach can make your detailed modeling a little
easier and improve the overall effect of the finished product (especially if
your scratchbuilding skills are no more developed than mine); by the same
token, if you pick the right kits you don't HAVE to spend four times as much
on aftermarket trimmings as you did on the kit.
- Spend some extra time up front planning key features and modifications you
want. THEN, research those until you can make detailed plans. For example,
decide first if you WANT to drop the flaps, then decide HOW MUCH. Don't wait
'til you're halfway done; knowing these details ahead of time will greatly
simplify your life later on and avoid gross technical errors!
- Weather a model in layers. A little goes a long way, and it's usually
easier to add more than remove extra. I tend to make mine look pretty much
"factory fresh", and weather from there.
Next came a Mk I Spitfire and my excursion into the world of photoetched
interiors; after that, R-S Tuck's Mk I Hurricane. Let me know if you want more
"my tale" articles like this one, and thanks to all!
Article, Model and Images Copyright © 1999 by Russell
M. Field
Page Created 14 October, 1999
Last updated 26 July, 2007
Back to HyperScale Main Page
Back to Features Page
|
 Home
| What's New |
Features |
Gallery |
Reviews |
Reference |
Forum |
Search
Home
| What's New |
Features |
Gallery |
Reviews |
Reference |
Forum |
Search