Home
| What's New |
Features |
Gallery |
Reviews |
Reference |
Forum |
Search
Home
| What's New |
Features |
Gallery |
Reviews |
Reference |
Forum |
Search
|
|
|
A Modeler's Evolution Part Two by Russell M. Field
This is the second in a series of articles chronicling my re-entry into
plastic scale modeling. Like the
first piece, this is not a kit review nor a construction article.
The intent is to: 1)
give other novice modelers a different skill level and progress reference
than provided by viewing the works of more advanced “gurus”, and 2)
provide real-life illustration of some “lessons learned” about
techniques, research and the build process. This kit was my first serious experience with photo-etched interiors and
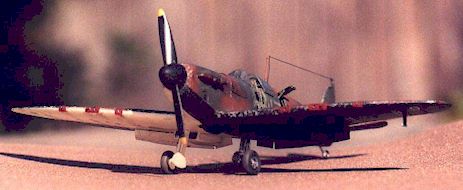
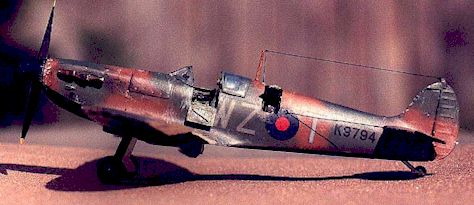
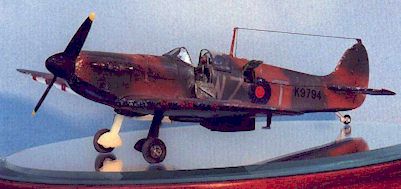
multi-colored camouflage paint schemes. It’s
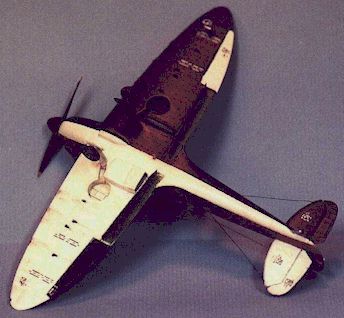
the older 1/72 Hasegawa Mk I Spitfire, featuring a 3-bladed Malcolm-hooded
version and a two-bladed flat-topped bird (#K9794, which IIRC was the eighth
production Mk I). I chose the
latter, with a white/black underside pattern.
Plenty of masking experience on this one … Once again, please excuse and bear with my evolving photographic skills.
Focus on the points the pictures illustrate, but any helpful hints will be
appreciated!
My primary published references included the Squadron-Signal Spitfire In
Action, “Spitfires and Polished Metal” (a must-get for Spit fans) and the
Arco-Aircam series.
It seems this kit provides a fairly accurate Mk I outline if you’re
not picky about the cowling; or the total absence of the gull wing shape.
The interior is dead simple and the panel lines are raised. The wheel
wells are completely open and devoid of detail, but the separate exhausts are
easier to work with. I made some “in-process” decisions that really should have been made
before starting. “Lessons learned” are often more like “experiences
repeated”! Some of the major features and modifications included: ·
Eduard photo-etch interior (with a little sheet styrene for dimension
and artists’ colored pencils for depth), flaps (full open) and flap actuators; ·
Reset all control surfaces (and matched the joystick position, of
course!); ·
Modified the exhausts with brass tubing (too big), installed hypo-tube
outboard gun barrels and scratch-built the reflector gunsight; ·
Plunge-formed a new flat canopy (THIS was a real joy … took around 20
tries to get “close enough”, but the kit canopy was too thick to pose open); ·
Added gear-down indicators (made from scrap photo-etch fret), a
gas-detection patch on the port wing and detailed the wheel wells (pretty
simple; a ring of flat sheet and a couple of shallow stringers in the roof); ·
Opened the cockpit door and added armor over the main fuel tank
(historically inaccurate and another lesson in relative scale – at 1/72, the
.010” sheet I used would be almost ľ “ thick on a real plane!); ·
Installed brake lines as well as both standard and IFF antennae; ·
And the biggie: opened the
radio hatch and installed the radio.
This task wasn’t all that hard, but it sure would have been easier to
do BEFORE gluing the little beastie together!
The radio is block styrene with a couple of True Details P/E radio faces
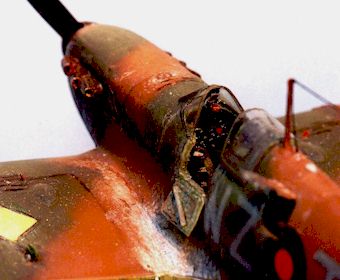
stuck on. The hatch door is .010” sheet. Why can’t I bang a kit out in a week? … Here’s a close-up of the office (wait’ll I get GOOD with this
camera!) and a view that illustrates several features:
the exhausts, the landing gear indicators, the gas patch, the flap
actuators and the cockpit. You can
see the scale problems with the exhausts and the fuel tank armor.
This was my first experience with multi-color camouflage schemes. I
practiced on some “painting drones” – cheap or discarded kits that I use
for technique practice – but actually “doing the deed” on a piece you’ve
put so much time and effort into still gives one pause (“paws”?).
I’m beginning to realize that a major chunk of my build time is working
up the courage to try new stuff! The challenges were the appearance of the top pattern, and getting crisp
demarcation between the black and white underside halves. I decided to go after
scale effect by post-shading and weathering, rather than lightening the paint.
I used Testor’s Model Master acrylics straight out of the bottle.
This worked OK, but now I thin with isopropyl alcohol, which lets me vary
the pressure more and gives me better control over the density of a coat.
I sprayed the black side, getting a little denser coverage than I
wanted. I had hoped to lessen the
intensity of the black by painting over white, but the unthinned paint covered a
bit too well. I masked the underside edges and sprayed Earth Red on the entire upper
surface, with the door and radio hatch temporarily attached in closed positions
and the cockpit masked off. When
dry, the green pattern areas were lightly outlined in pencil and sprayed. I was dismayed to find that the green areas showed “pooling” and
hard edges where the spray had been too wet; this resulted from moving too
slowly while following the pencilled guidelines.
This disrupted the smooth expanse of color I had been hoping for, so a
little light touch-up with a soft brush ensued. This helped, but pointed out the need for more airbrush
practice.
Next came the coat of Testor’s Dullcote, after which the weathering
began. This was an experiment with
oil paints and pastels; light
drybrushing with yellow ochre on the upper surfaces, drug lightly down the sides
produced a nice effect. The upper
surface decals were drybrushed with white.
The beauty of oils on a hard finish is that if the effect is not
acceptable, it’s easily modified or removed! A couple of errors I made were in drawing on the wing walkway line –
first, I drew it in a water soluble pen (oops!), then I discovered later it
should NOT go over the roundel! The
research gremlins again … oh, well… The weathering on this plane was limited to some fading of the
paintwork. I assumed that it operated from grass fields and wouldn’t really
get all that dirty. Exhaust and
gunpowder stains were accomplished with a compound of pastel dust and acrylic
paint, drybrushed on. The initial
coats were too thick, but in my panic I found that I could use the Acryl thinner
to remove it a little at a time. This let me get just the effect I wanted,
although going about it backward. The wing leading edges were “chipped” by drybrushing using a makeup
sponge dipped in light gray paint (more like dry-pressed).
The prop blades aren’t chipped because on the real planes the two-bladers
were wooden, and I didn’t know how to show chipping and wear on those!
Assuming frequent use, the wing walkway wear is fairly heavy. This degree of
wear is supported by several pictures I came across. Finally, the aerials and upper navigation light were installed and the
wingtip navigation lights painted with clear red and green over white.
The underside ID light is a scale-sized hole filled with International
Orange and covered with clear glue. Big sigh … another 3-month model …
Here are a few things I learned while working this kit:
Next Project: R-S Tuck’s Mk I Hurricane! Article, Model and Images Copyright © 1999 by Russell
M. Field
|
 I accumulated a lot of references for this project. I read a BUNCH (and
bought FAR more books than I could afford!), but my major information source was
responses to questions on sites like the “Remembering the Battle of Britain”
website (special thanks to Doug Tidy, Peter Weston and others) and Hyperscale.
I accumulated a lot of references for this project. I read a BUNCH (and
bought FAR more books than I could afford!), but my major information source was
responses to questions on sites like the “Remembering the Battle of Britain”
website (special thanks to Doug Tidy, Peter Weston and others) and Hyperscale.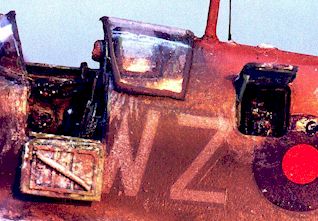 In the previous article, the “biggie” was dropping the P-40 flaps.
On this one, when I got the fuselage together it looked rather plain, so the
cure was to break it up a little.
In the previous article, the “biggie” was dropping the P-40 flaps.
On this one, when I got the fuselage together it looked rather plain, so the
cure was to break it up a little.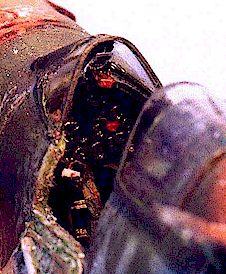
 The entire underside was painted white (cut with a little “Panzer
Interior Buff” to reduce starkness) and allowed to cure completely. I then
masked off the portion that was to remain white and the white sprayed again to
seal the edge of the tape and prevent bleed-under by the black paint.
The entire underside was painted white (cut with a little “Panzer
Interior Buff” to reduce starkness) and allowed to cure completely. I then
masked off the portion that was to remain white and the white sprayed again to
seal the edge of the tape and prevent bleed-under by the black paint.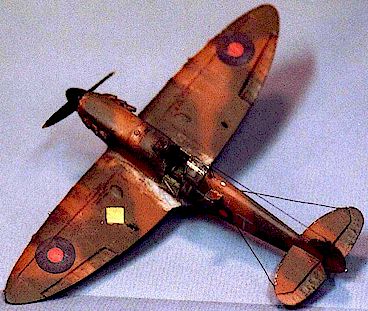 When I got it as good as I could (aka “I’m ready to move along on
this”), I clear glossed the whole plane with Testor’s spray (the can) and
applied the decals.
When I got it as good as I could (aka “I’m ready to move along on
this”), I clear glossed the whole plane with Testor’s spray (the can) and
applied the decals.