 Home
| What's New |
Features |
Gallery |
Reviews |
Reference |
Forum |
Search
Home
| What's New |
Features |
Gallery |
Reviews |
Reference |
Forum |
Search
|
|
|
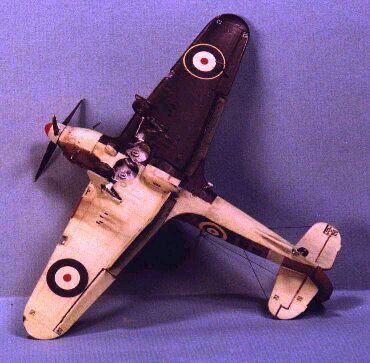
A Modeler's Evolution Part Three by Russell M. Field
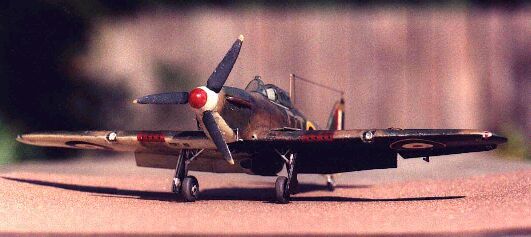
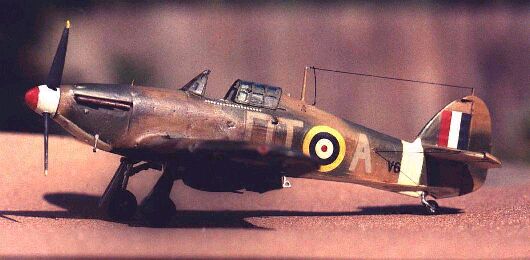
For those who haven't caught the first two in this series, these "Evolution" articles aren't kit reviews or construction pieces. They're intended to provide a non-expert perspective on technique and results for other novices like myself ... and this one was a goodie! This kit launched me further into the depths of detailed modeling. It's the 1/72 Hasegawa Battle of Britain Mk I Hurricane (kit #51338, AP38), giving a choice between R-S Tuck's mount or Arthur Clowes' bird. I chose Tuck's plane. My photography is improving, but still, please bear with me.
My primary published references included the Squadron-Signal Hurricane In Action, the S/S Walkaround, the KokuFan Hurricane book, and the Arco-Aircam series.
While most folks generally liked this kit, there was some controversy over a few details. The main issues were the length of the nose and the depth of the fabric representation on the aft fuselage. Some said Hasegawa got the noses switched between their Mk I and Mk II kits. I bought a Mk II to swap the noses as suggested, but when I put a steel rule to both I could discern no measurable difference. The Mk I kit nose comes without the oil ring, and since Tuck's plane was "ringless" I opted to stick with the original kit parts (of course, I now HAVE to build the Mk II nightfighter I HAD to buy …). I was much better this time about making a plan and sticking to it. The only "in-process" decision was to add the dual-handled starting crank (no big deal since the hole is easily accessible).
Some of the major features and modifications included:
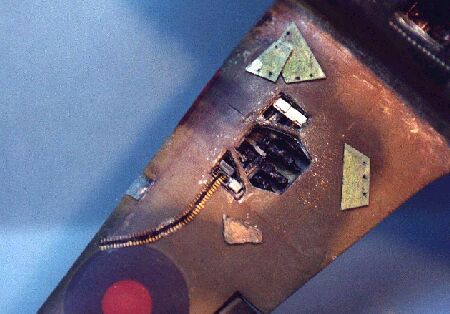
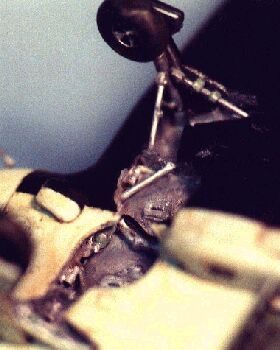
Actually, you could say there were two "whammies" in this project - that wheel well rebuild was no small deal! Actually, once I figured out how to do it, the process was rather quick. The gunbay was a different story. I had to add front and rear webs, barrel shrouds from aluminum tubing, make and fit the ammo cans and make the chutes. I used styrene sheet stock and channel extrusion for the cans and chutes, respectively. The biggie was fitting it into the wing; next time I'll thin the wing skins closer to scale before I get too deep into the task! I left 'em way too thick on this one. Here are the gunbay and the wheel wells. The ammo belt is from the Aries set; the wing panels are .010" sheet stock and the ammo containers and chutes are scratch-built. The wells are boxed in with sheet stock and detailed with rod and wire.
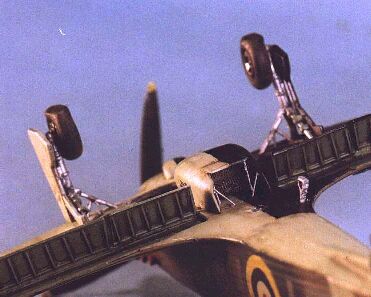
Below are pictures of the front and rear of the radiator. Note the support struts and screening; in the kit, the radiator screen appears to be a Mk II type with a circular insert.
All together now, for the third time, with feeling: "Why, oh why does it take Russ 3 months to build such a small airplane?" … I'd show you a close-up of the cockpit, but the sad fact is (add this to the "Lessons Learned" section) that when it's all buttoned up, even with the canopy open it's tough to see inside a 1/72 Hurricane. In person, with a flashlight, you can get a really neat view - but I've not been able to get a well-lit camera shot!
There were two major issues painting this little bugger. One was the primer I used: it was really too thick, and went a long way toward obliterating panel lines. The second was the aft fuselage stripe and the fact that I opted to paint it on rather than use the kit decal. The first decision was what color to paint the light portion of the underside. Some references said "white", others said "Sky", and still others didn't say. I finally went with RAF Sky, and the band to match. I sprayed the entire underside and the band area with Sky, lightened 4:1 Sky to white. When it had dried for a couple of days (I wanted it really cured), I masked the underside to protect the Sky part. I re-sprayed the tape edge with Sky to prevent bleeding of the black, let it dry a day and sprayed the black. Then the fun began. I masked the fuselage band and the underside edges and sprayed the Dark Earth topcoat; so far, so good. When it had dried for a day, I penciled in the Dark Green pattern and sprayed it on. Much better this time than the first run on the Spitfire, until I realized that - can you guess? - on the starboard wing I had sprayed the wrong areas of the pattern! A fairly easy fix, a quick respray with the Dark Earth in that area, but unnerving nonetheless. However, when I went to remove the masking tape from the fuselage band, I found that a significant paint ridge had built up along the tape edge. I don't know why I didn't have this problem on the underside, but this ridge required a little trimming, burnishing and touch-up. All better now …
The loss of many of the panel lines was unfortunate, but I was able to compensate to some degree with oil-paint post-shading. I used the same oil paints and pastels techniques as described in Part 2, minimizing dirt but depicting noticeable operational wear and grunge. The leading edges received a "chipping" treatment of silver Rub'N'Buff (a wax-based highlighting substance available in most craft stores) applied with an eye makeup sponge applicator. This has become one of my favorite techniques! Add the aerial and upper navigation light, buff the wingtip nav lights and we're ready to take off! Wheewww … 3 ˝ months after starting …
Lessons learned Tuck's bird taught me a few things:
Next time: Revell's 1/72 Focke Wulf 190A-8 with BV 246 Hagelkorn Glidebomb!
Article, Model and Images Copyright © 1999 by Russell
M. Field
|
 Like
the Spitfire in Part 2, I accumulated a lot of references on the Hurricane.
Again, however, my major information source was responses to questions on sites
like the "Remembering the Battle of Britain" website (and again,
special thanks to Doug Tidy and others) and Hyperscale folks. Another plane
"built by the Internet"!
Like
the Spitfire in Part 2, I accumulated a lot of references on the Hurricane.
Again, however, my major information source was responses to questions on sites
like the "Remembering the Battle of Britain" website (and again,
special thanks to Doug Tidy and others) and Hyperscale folks. Another plane
"built by the Internet"!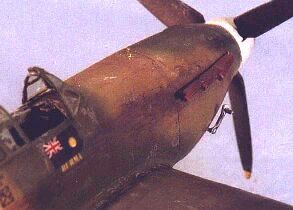


 The
only notable item on the underside, over the process described in Part 2, was
leaving the big radiator off, painting it separately and installing it just
before weathering. To install it before painting the underside would have made
masking for the half-&-half underside scheme more difficult, so I just left
it off.
The
only notable item on the underside, over the process described in Part 2, was
leaving the big radiator off, painting it separately and installing it just
before weathering. To install it before painting the underside would have made
masking for the half-&-half underside scheme more difficult, so I just left
it off.