Home
| What's New |
Features |
Gallery |
Reviews |
Reference |
Forum |
Search
Home
| What's New |
Features |
Gallery |
Reviews |
Reference |
Forum |
Search
|
|
|
DeHavilland Mosquito NF.XIII by Geoff McDonell
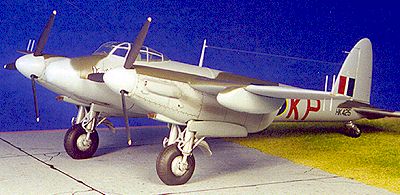
The elegant lines of the Mosquito and colourful RCAF nose art contained on Arrow Graphics sheet C-88-72 for 409 Squadron's "Lonesome Polecat" led me to blow the dust off one of my many Airfix FB VI kits on the shelf and begin collecting research material. A good photo of "Lonesome Polecat" was found in one of my books and the fun began.
On June 17th, 1941, 409 Squadron was formed as a Canadian Night Fighter unit, originally equipped with the Boulton Paul Defiant, then later upgraded with the radar equipped Bristol Beaufighter. In March of 1944, the squadron exchanged their Beaufighters for the Mosquito NF XIII. HK 425 was one of those Mosquitos and was later in action, destroying a JU-88 over Belgium in November, 1944. While flown by F/L Hermanson and F/O Hamm in February 1945, HK425 was badly damaged by enemy fire and required major repairs. Returned to action, this aircraft was generally flown by FL Ross Finlayson and P/O Al Webster. After the repairs, this aircraft was found to swerve to the right on takeoff - normally a Mosquito swerves to the left on takeoff. A few different 409 Sqn. crews attempted takeoffs in HK 425 only to shut the engines down halfway along the runway and abort the flight. Finlayson was the only pilot able to get comfortable with this strange "snag" and this Mosquito became his personal aircraft. July of 1945 saw "Lonesome Polecat" flown to Lansham, Kent in England where it was disposed of.
Airfix kit (#3019) of the Mosquito FB VI was used as the basis for the model, although elderly, it is still quite accurate and well detailed. Airfix released two Mosquito kits, but old #3019 is the one to look for - it contains a number of extra parts to create variants of the fighter version of the Mosquito, including paddle bladed propellers and underwing stores. The kit has a few raised panel lines and minimal interior and wheel well detail, but is an excellent starting point to add a bit of detailing. I happened to have the Eduard etched brass detail set for the Mosquito as well as a Falcon vacuformed canopy to replace the thick Airfix offering. While leafing through my collected file materials on RCAF Mosquitos, I also made a list of the specific configuration of 409 Squadron Mosquito NF XIII's. To accurately represent "Lonesome Polecat", the model needed to be configured with:
The thimble nose came from an old "Airframe" limited run injection molded plastic conversion kit, while some of the parts were found in the Airfix kit itself. The Eduard detail set does provide a lot of material, and I found the brass cockpit shell build-up required a great degree of patience and test fitting in order to get it properly installed into the open maw of the Airfix kit. In hindsight, I'd likely choose to build up the cockpit from sheet plastic and add the Eduard details to it, rather than trying to use the bent-up brass shell.
The cockpit was painted in the appropriate colours (British Interior grey/green, black equipment and tan/khaki seat belts). The fuselage was glued together and set aside while I sanded off all the raised panel lines on the wings and engine nacelles, and then re-scribed them with a combination of self adhesive Dymo tape and etched metal templates. The basic model built up quite quickly after the initial preparation work. I also added the reinforcing strip around the central fuselage area using a strip of 0.005" sheet plastic, as well as the gun camera fairing on the side of the nose. I also spent the better part of an evening trimming, sanding and test fitting the vacuformed canopy to get a good even fit around the mating surfaces. So much concentration was involved in this, that it led to me gluing on the canopy in a fit of enthusiasm, realizing later that I had neglected to add the gunsight! (They removed the gunsight for maintenance, OK!?).
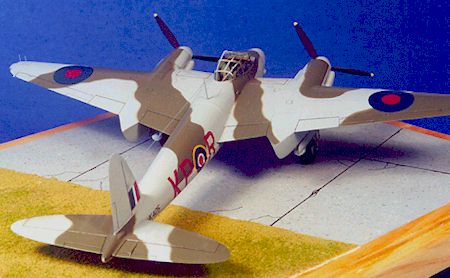
I left the undercarriage off during the painting process in order to be able to mount the model on a wire frame "stand" to allow me to paint it without handling it. XtraColour medium sea grey with a few drops of white was used as the overall colour with XtraColour's British dark green sprayed on through my Badger 200 airbrush. I used stiff paper masking mats to allow the fine feathered edge camouflage pattern. Bare Metal foil was used to cover the canopy and most of an evening was needed to carefully cut out the framing with a sharp #11 X-ACTO knife blade.
Getting the landing gear together straight, and aligned, while trapping the wheels on the axle shafts, took a few tries, but a few well placed drops of Zap-a-Gap set every thing up nicely. I applied some watercolour weathering using a mix of grey's and browns to pick out the landing gear and tire details. Brake lines were added with some 1/25 scale auto ignition wiring material (Detail Master).
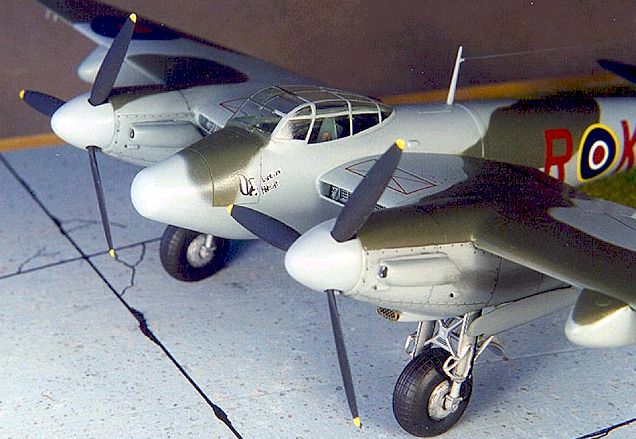
The wheel wells and inner gear door faces were painted interior grey/green and the Eduard parts again were used to bring some life to these areas. The props and spinners were refined a bit by adding some small sections of sheet plastic to the prop blade openings in the spinners to create a more accurate appearance. The spinners were sprayed with XtraColour sea grey medium with a bit more white added to match photos of the actual aircraft as they seemed brighter than the rest of the camouflage. I also threw a small amount of the lightened grey on the nose radome to match the photo I used as reference. I polished off some of the usual "dusties" in the paint using 4000 grit polishing cloth (LMG auto model polishing kit) and then applied the Arrow Graphics decals. A small amount of a Solvaset and white glue mixture was needed on the one code letter on the starboard side of the fuselage to get it to snuggle down over the longitudinal bump on that side. This same decal setting solution was used on the red "no step" area demarcation decal on top of the wing radiators to insure that no silvering would occur.
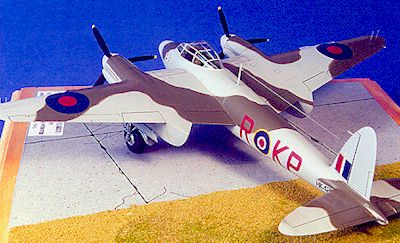
Once that was dry, on went the little fiddly bits like the landing gear, windshield wiper, antennae and weathering. Chalk pastels were used to create the exhaust stains, while additional washes of water paint was run into panel lines and other areas to enhance the surface detail. I always like to display my models on a base of some kind to give them a better sense of "space" and interest. Once placed on my simulated tarmac and grass apron, the model really comes to life, and celebrates the activities of 409 "Nighthawk" Squadron in WW2.
Click the thumbnails below
to view images full-sized.
Article, Images and Model Copyright © 2000 by Geoff
McDonell
|
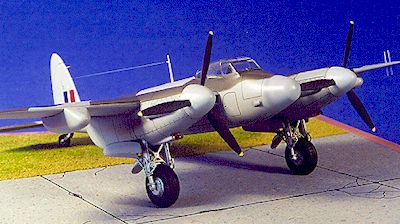
 The
subject of this modelling exercise is HK 425, an early Mosquito NF XIII equipped
with the thimble nose rather than the later universal "bull nose".
Built in November of 1943, the Mosquito was assigned to 96 Squadron, RAF and in
January of 1944, it shot down a Junkers 88 over England. Later, in April of the
same year this aircraft shot down a Focke Wulf 190 over the North Sea.
The
subject of this modelling exercise is HK 425, an early Mosquito NF XIII equipped
with the thimble nose rather than the later universal "bull nose".
Built in November of 1943, the Mosquito was assigned to 96 Squadron, RAF and in
January of 1944, it shot down a Junkers 88 over England. Later, in April of the
same year this aircraft shot down a Focke Wulf 190 over the North Sea.
 While
the paint dried, I turned my attention to the undercarriage. Airfix is to be
congratulated on the fine, detailed molding of the landing gear legs, something
even Hasegawa didn't manage to achieve in their recent release of their Mosquito
FB IV. I airbrushed on a blend of Humbrol aluminum and semi-gloss grey enamel to
all of the basic parts after cleaning up mold lines, and then put them aside to
dry while I prepared the tire assemblies. The Airfix wheels are poor - smooth,
no tread pattern, and poorly detailed wheel hubs. I chose the Airwaves brand
resin cast solid hub wheel/tire set (SC7257), cleaned them up and painted them
with a mixture of flat black, tinted with a small amount of grey.
While
the paint dried, I turned my attention to the undercarriage. Airfix is to be
congratulated on the fine, detailed molding of the landing gear legs, something
even Hasegawa didn't manage to achieve in their recent release of their Mosquito
FB IV. I airbrushed on a blend of Humbrol aluminum and semi-gloss grey enamel to
all of the basic parts after cleaning up mold lines, and then put them aside to
dry while I prepared the tire assemblies. The Airfix wheels are poor - smooth,
no tread pattern, and poorly detailed wheel hubs. I chose the Airwaves brand
resin cast solid hub wheel/tire set (SC7257), cleaned them up and painted them
with a mixture of flat black, tinted with a small amount of grey.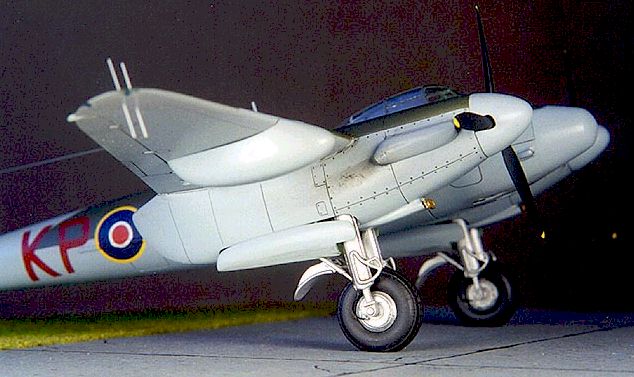
 Allowing
a week for the decals to dry, I masked off the canopy once again (whew!) and
sprayed on a semi gloss over coat of Testors Dullcote with some Glosscote mixed
into it.
Allowing
a week for the decals to dry, I masked off the canopy once again (whew!) and
sprayed on a semi gloss over coat of Testors Dullcote with some Glosscote mixed
into it.