|
De
Havilland Mosquito NF XIX |
Mosquito
NF XIX
from the Monogram 1/48
Kit
by
Mike Still
images by Terry Ketron
|
De
Havilland Mosquito NF XIX |
I n t r o d u c t i o n |
The first time I built the Monogram 1/48 Mosquito was around 1974. Twenty-four years later, I’ve never built an Airfix FB VI but I’ve built two more Monogram kits and I'm on a third. And Tamiya now has released its FB VI . . . As Homer Simpson would say, "Doh!!"
Anyway, this project was an exercise in making a quick night fighter conversion other than the NF Mk. II in the kit, and to demonstrate that the Monogram kit can still be a decent basis for such a project.
K i t s a n d R e f e r e n c e |
The Monogram kit is long in the tooth and, other than some fair armament options, a bit of a bear to convert into the FB/NF marks allowed in the kit. The kit also suffers from two major dimensional errors - the vertical fin/rudder is 1/4" too tall and fuselage is too narrow. Those with access to the old Airfix Magazine Guide on RAF a/c conversions can read all the gory details in depth.
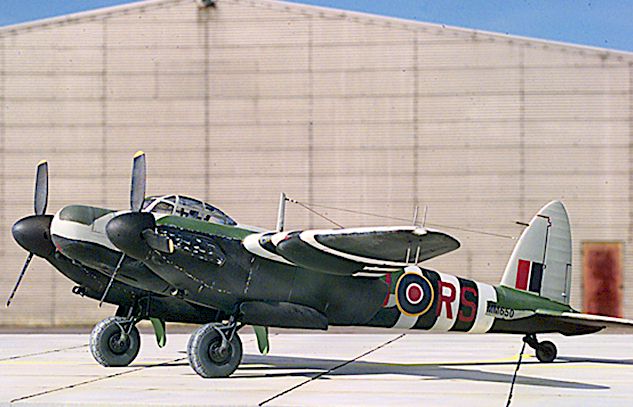
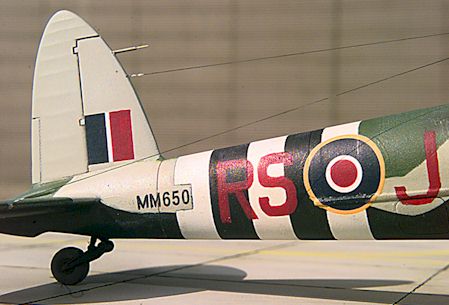
My NF XIX is based on information found in Watanabe and Sweetman’s illustrated monograph on the Mosquito, Martin Streetly’s "Aircraft of 100 Group," and Barry Wheeler’s "Military Aircraft Markings and Profiles." Watanabe and Wheeler each depict RS-J (MM650) of No. 157 Squadron in standard RAF Mosquito night fighter camouflage (Medium Sea Gray with Dark Green pattern on the upper surfaces) with black undersides and D-Day invasion striping all around the wings and fuselage.
No. 157, according to Streetly, served in the Bomber Support role with 100 Group, probably the first dedicated airborne electronic warfare formation in history. The "universal" or "bullnose" radome attracted me to this version since it also kept the single-stage Merlin engines, making conversion of the Monogram kit that much easier.
M o d i f i c a t i o n s |
 This is a
partial correction of the Monogram kit, since I didn’t want to press my luck in one
shot. I cut the vertical tail from the fuselage halves at the fillet fairing. I then cut
1/4" from the base of each part, parallel to the first cut, filed a notch in each
half for the pitot, and glued the halves together before filing the base smooth.
This is a
partial correction of the Monogram kit, since I didn’t want to press my luck in one
shot. I cut the vertical tail from the fuselage halves at the fillet fairing. I then cut
1/4" from the base of each part, parallel to the first cut, filed a notch in each
half for the pitot, and glued the halves together before filing the base smooth.
Cockpit work was minimal, even though the kit cockpit bears little resemblance to a real Mosquito front office. I added a radar scope hood to the panel, added headrests to the seats from round sprue, and used the fighter stick provided in the kit. After cleaning up the tailwheel assembly and cutting away the bomber nose sections, I assembled the fuselage and cockpit floor with Tenax cement. Sandpaper and jeweler’s files brought the fin fillet down to the size of the "new" fin/rudder, and the two were butt-joined with Tenax and pressure. I left the instrument panel and seats out until later in the process, so I could airbrush the gray-green primer after major assembly.
In a later short feature, I’ll do the fuselage widening with my BOAC FB VI - it’s not as hard as you think, although I chose not to do the myriad manipulations to adjust the wingspan by the necessary .040 inch. And yes, it’s in the works as you read.
 Assembling the
main gear legs was easy enough, but I cut away the axle and drilled out the axle sockets
so I could install the wheels later in the project. The wings require some work
(considering the age of the molds, it’s not surprising), especially around the
nacelles, but care, super glue and accelerator, and files do the trick. I also milled out
the carburetor intakes with a Dremel tool.
Assembling the
main gear legs was easy enough, but I cut away the axle and drilled out the axle sockets
so I could install the wheels later in the project. The wings require some work
(considering the age of the molds, it’s not surprising), especially around the
nacelles, but care, super glue and accelerator, and files do the trick. I also milled out
the carburetor intakes with a Dremel tool.
The only really good feature of the stock kit it the positive location of the wings in the fuselage. Otherwise the joints need puttying, and the forward wing root is visible in the cockpit walls. But this was an external demo project . . .
The nose was easier than it looks, but probably as long to do as you think. I didn’t have good profile drawings of the radome, only Watanabe and Wheeler’s drawings and a photo from William Green’s "Fighters of the Second World War." But using what I had, I razor-sawed a deep cross in the kit fighter nose back to the front of the blast plate for the 20 mm ventral guns and roughly to the same area on the sides of the nose. I inserted .020 styrene sheet in the horizontal cut to form the planform of the radome. Sections of .020 sheet in the upper and lower vertical cuts formed the basis for the profile. Carving and sanding formed the necessary outlines, and I began filling in the armature with Elmer’s Carpenter’s Wood Filler.
Carpenter’s Wood Filler is a water-soluble putty that actually adheres quite well to styrene. It carves and files easily, sands to a plastic-smooth finish, and takes enamels, lacquers and acrylics equally well. Just don’t wet sand the bare material. Thin applications dry within a half-hour - use several thin applications, or about 1/16" per layer, to build up shapes. Thick applications are likely to crack as they dry, although the cracks patch well with more filler. The material feathers out fairly well, but an application of Squadron Green or White Putty can improve that.
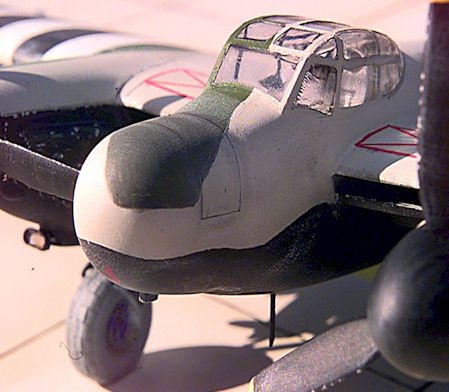 After building
up the nose, file and sand to shape and smooth with 800 and 1,000 grit sandpaper. I added
a small block of plastic under the radome for a radar homer (Perfectos or Monica? I wasn’t
sure at the time.) Another block of styrene cut and filed to shape and installed on the
starboard side makes the gun camera fairing.
After building
up the nose, file and sand to shape and smooth with 800 and 1,000 grit sandpaper. I added
a small block of plastic under the radome for a radar homer (Perfectos or Monica? I wasn’t
sure at the time.) Another block of styrene cut and filed to shape and installed on the
starboard side makes the gun camera fairing.
I replaced the dorsal antenna mast with a length of brass rod filed to a sharp leading edge. Strip styrene super glued to the rear and sanded made the trailing edge.
The instrument panel was installed through the cockpit opening, along with the seats and stick, after Testors Model Master Pale Green was airbrushed inside the cockpit and wheel wells. The kit fighter canopy was attached with Tenax (It evaporates so fast that solvent vapor doesn’t seem to form inside the canopy), and the seams puttied.
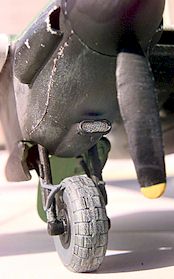
The kit tires are fattened with a layer of .020 styrene between the wheel halves, and styrene rod axles hold them in place in the main gear legs.
The NF XIX (and many FB VI’s) also used paddle-blade propellers. I pirated units from a Monogram B-17G kit, trimming the roots to kit the kit spinners. The kit carburetor ice guards were drilled out and glued onto fine brass mesh. Attachment brackets were made from uncoated floral wire, and the guards attached after final painting.
Finally, I turned a new pitot tube from brass rod in my Dremel tool and glued it in the fin notch.
F i n i s h i n g |
Painting was done with plenty of masking tape, patience, and Parafilm M on the canopy. I used Testors Model Master enamel for the main camouflage and (dirty little secret time) Wal-mart house brand spray flat black and flat white enamels for the night camouflage and invasion stripes. Save some money - the Wal-mart brand stuff works every bit was well as Testors or Pactra paints! The camouflage was done with Flat Gull Gray and USAF Medium Green for a faded effect. Washes of India ink and brown ink for fantasy figures were applied to the panel and control surface lines. after all painting but before clear coats.
|
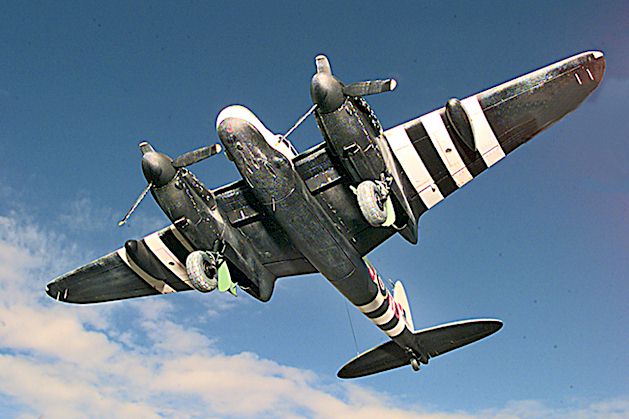
Mike has labelled this clever photo "Dead Stick". Better feather those props! |
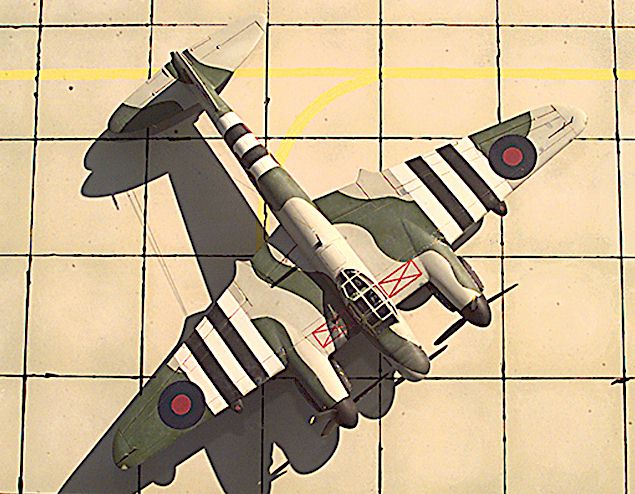
Invasion stripes are a scale 2’ per strip (1/2") on wings and fuselage, with insets masked for the fuselage serial numbers. The model was spayed with two coats of Testors Glosscote, and Future Wax brushed onto areas to be decalled. Kit decals were used (I started with a Monogram commemorative release) for the roundels and fin flashes, and the serials were made with blank decal film, computer-generated serials, a photocopier and clear lacquer. I prefer Solvaset for decaling (in most cases!).
Squadron codes were done by cutting letters from card stock, attaching them to the fuselage with 3M Post-It adhesive (it comes in a glue stick and leaves little or no residue). I penciled around the masks, removed them, and filled in the outlines with home-mixed Dull Red. The roundel centers and red sections of the fin flashes also were overpainted with the same Dull Red mix. The entire model was then sprayed with two coats of Testors Dullcote, and the canopy masking was removed.
The sea gray areas were drybrushed with lightened color and raw white, while lightened Medium Green was used on the green areas. The black undersurfaces were drybrushed with Testors Euro I Dark Gray, Gunship Gray and Flat Gull Gray, while light gray was used sparingly to make the invasion stripes look less than perfect. The propeller blades and joints of the airframe's metal panels were "chipped" with Testors Aluminum and a 000 brush. White patches were applied to the exhaust shrouds to simulate the black paint flaking away from the asbestos outer layers.
Rigging was stretched Evergreen styrene tubing, attached to the fin and starboard stabilizer (I goofed at first and ran it to the port stab!) with super glue. Thickened white paint made the insulators. Tip - I've found that stretched tubing is stronger than stretched solid sprue, since it retains a tubular (although unnoticeable) hollow section, and basic mechanics has proven the strength of hollow tubes over solid rods.
The nose changed the character of this Mossie, but shortening the tail dramatically improved the overall look as well, even without widening the fuselage. In a later short piece, I’ll go over the ins and outs of that with a Mosquito airliner!
Back to HyperScale Main Page
Back to Features Page