Home
| What's New |
Features |
Gallery |
Reviews |
Reference |
Forum |
Search
Home
| What's New |
Features |
Gallery |
Reviews |
Reference |
Forum |
Search
|
|
|
Dassault
MD.450 "Ouragan"
by Forest Dalton
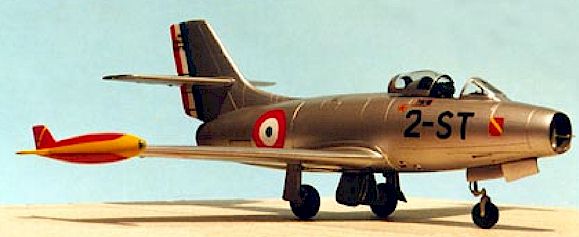
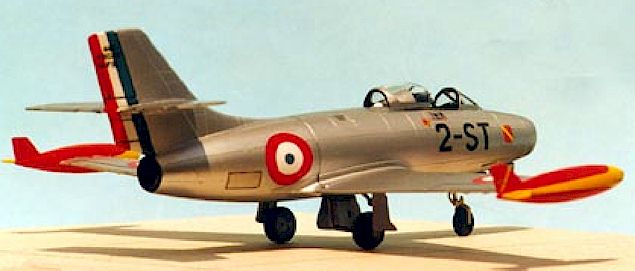
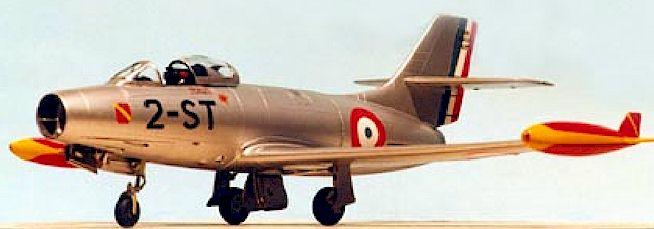
Subject Modeled: Dassault MD.450 "Ouragan" Kit Used: Heller, kit number Ref. 201
Founded during the early 1930s, the Société des Avions Marcel Bloch was one of the leading French aviation companies until 1937, when it became SNASCO (Société Nationale de Constructions Aéronautiques du Sud-Ouest) as the French aircraft industry was nationalized. Bloch's company was combined with Blériot-Aéronautiques and Marcel Bloch was named as the managing director. During the German occupation of France, Bloch was deported and SNASCO was forced by the Germans to produce He-111 bombers and Focke-Wulf Fw-189 reconnaissance aircraft. Following the end of the war, Marcel Bloch return to take over the beleaguered French aviation industry, but used his brother's French underground code name of Dassault instead of Bloch as his last name and set up the Société des Avions Marcel Dassault, which has become the premier private French aviation company. In September 1947 the French Armée de l'Air (Air Force) was equipped with obsolete aircraft. While awaiting modern fighter aircraft of French design and manufacture, the Armée De L'Air used British built De Havilland DH Mk 5 Vampires, which were also licensed built by SNASCE (Société Nationale de Constructions Aéronautiques du Sud-Est), which was a merger of Dewoitine and SNASCO and is today known as Sud-Aviation. The Chief of the Air Staff commissioned Dassault to design a French fighter built around a Rolls-Royce Nene engine and equipped with four 20-mm cannon.
The "Ouragan" was a single-seat, low-wing monoplane powered by the Hispano Suiza built copy of the Rolls-Royce Nene, the engine mounted within the circular-section fuselage with a frontal air intake. It had a pressurized cockpit and a Messier retractable tricycle landing gear. Armament consisted of four 20-mm cannon in the lower fuselage nose section and provisions were made to carry 16 rockets or two 1,000-lb bombs under the wings. The Ouragan was inspired by American designs, and had a vague resemblance to the Republic F-84 Thunderjet: essentially a "stovepipe" design with intake in the nose, low-set straight wing, bubble canopy, and tricycle landing gear. It was smaller than the Thunderjet, however, weighing about a ton less, and used a thin wing much like that of the Lockheed F-80 Shooting Star, as well as a swept-back tailplane. Following completion of the prototypes and twelve pre-series aircraft, the first of 350 production "Ouragan"s for the Armée de l'Air flew in 1951. The Indian Air Force acquired 104 MD.450s in 1953-54, which were called by the Indians "Toofanis" and in 1955 the Israeli Air Force was supplied with 12 new production aircraft and 42 more from French surplus stock. The "Ouragan" served with several Armée de l'Air squadrons until replaced by its swept wing cousin, the MD.452, or "Mystčre" from 1954-56. My model represents an "Ouragan" that flew with Escadrille (Squadron) 3/Flight 2 out of Dijon, France in 1953/54. The plaque's title "ARDENT VENT" means "HOT WIND".
Interior:
All parts of the cockpit were painted Polly Scale Steam Power Black and gloss coated for the above mentioned decals. The ejection seat was first painted Polly Scale Light Gray (FS36440). The seat, back pad, and headrest were brushed olive drab, with the remainder of the seat brushed steam power black. The intake splitter plate was cemented and sanded and the pitot tube was cut to aid in the sanding. I replaced the pitot with hypo tubing and fine wire in the final assembly. I drilled and reamed out a small oval hole at the top of the splitter plate for the gun camera lens port. This was filled with Kristal Kleer in the final assembly. A small drop of Krystal Kleer was used for the navigation light seen in photos of Ouragan splitter plates.
Exterior: This kit fit very well indeed, with the only problem being the warp in the port wing, that I could not coax out in any heat treatments I use. The fit was still okay, but that slightly curved wing is very prominent. I cut the center canopy section from the forward and rear sections with a very fine razor saw made to fit an X-Acto #11 blade handle. They were sanded and the forward and rear sections permanently cemented in place. I drilled out the cannon ports, but did not add any barrels because I could not see them in references. The tip tank navigation lights were cut out with an X-Acto #11 blade and cleaned up with a micro file and sanding grit. These were painted silver in the final assembly and Kristal Kleer added for the lens. After the Krystal Kleer had dried I painted the port light clear red and the starboard clear blue. The rudder navigation light was lightly sanded, painted silver in the final assembly and given a drop of Krystal Kleer. This was paint clear white after the glue had set.
I cut the nose wheel away from its strut, drilled and .025-in hole in the strut, and attached a .025 wire to the wheel. The wheel was inserted through the strut and a small washer made and cement to the wire, so that the wheel now castors for photo reasons. The actual wheel did not turn, but did castor. It was a simple process and made cleaning up the two-piece wheel much easier. I lightly drill out a concave in the nose gear strut's landing light. This was painted chrome silver in the final assembly and given a drop of Krystal Kleer. No other modifications were made to the kit. The nose wheel strut and main struts were painted Light Gull Gray with the oleo picked out in Model Master Chrome Silver and the tires painted AeroMaster Tire Black. Retraction struts for the main gear struts were pained chrome silver, with the linking rod on it painted Polly Scale Graphite. Black washes were used on all.
The forward and sliding center canopy sections were masked with Bare-metal foil, with the center section temporarily attached between the front and rear section. The intake was previously painted Bright Silver and was masked with a circular template cut from index card. The exhaust nozzle was pre-painted black, followed by burnt iron, and masked with a piece of tubing constructed from index card. All canopy sections were paint Steam Power Black before priming the entire model in Flat White. The tip tanks were given two coats of Model Master Acryl Guards Red after masking the area near them to remain primer white. I masked the rudder area on the vertical tail to remain white and the red tip tanks with masking tape strips. I then gave the entire model, horizontal tail planes, and gear doors three lights coats of Polly Scale Bright Silver allowing each coat to tack for ten minutes. After the silver had dried for a day, I polished it with SNJ Silver polishing powder and removed the masking from the vertical tail and tip tanks. After brushing each horizontal fin on the tip tanks reefer yellow. I gave the model two light coats of Polly Scale Clear Gloss.
The kit decals were for the most part useless. I only used the Avions Dassault MD.450 seen on the vertical tail stripes after cutting the serial numbers from each. The serial numbers were replaced with new serials for the aircraft built from ModelDecal set number 68. The particular aircraft I was modeling did not have the small yellow surround featured in my French post-war roundel sheet. I found suitable replacements from a SuperScale French World War One sheet, that had been lingering in my stock for over twenty years. This proved a problem when I attempted to apply the first red tail stripe on the vertical tail. The decal fractured from the twenty plus years of non-use. I consigned myself to coat the entire sheet with Micro SuperFilm and cut the roundels and stripes to be used as close as possible leaving only the slightest of clear SuperFilm to show. This is good stuff for saving old decals and strengthening new ones that prove fragile, but it will make the clear cover a little thicker. I recommend it for all Propagtem decals to keep them from curling at the edge. The remainder of the decals came from ModelDecal sheet number 68 courtesy of Chris Bucholtz from Internet Modeler (Thanks Chris). These had very excessive adhesive like old Monogram decals and this had to be removed as much as possible, but otherwise proved no problem. After the decals had dried completely, I cleaned the adhesive residue and gave the model another two light coats of clear gloss. The horizontal tails were attached with Krystal Kleer as this fills the seam and looks great when touched up with bright silver after the glue has set up. A lot of models that I see on the contest tables today seem to have the seam in their horizontal tails sanded completely smooth, but this old method was only necessary on older models, which didn't mold the tailplanes at the seam lines like kits from the mid 1970s on. In other words don't sand them smooth unless you have proof that they were that way. All subassemblies were now attached the F-84 look-alike was done!
Models, Description and Images Copyright © 1999 by Forest Dalton
|
 To meet this
specification, Dassault initiated the MD.450 "Ouragan" (Hurricane) project and
in December 1947 detail design was begun at St-Cloud by the engineers. Construction began
in April 1948 and the first flight of the prototype MD.450 was made on February 28, 1949.
To meet this
specification, Dassault initiated the MD.450 "Ouragan" (Hurricane) project and
in December 1947 detail design was begun at St-Cloud by the engineers. Construction began
in April 1948 and the first flight of the prototype MD.450 was made on February 28, 1949.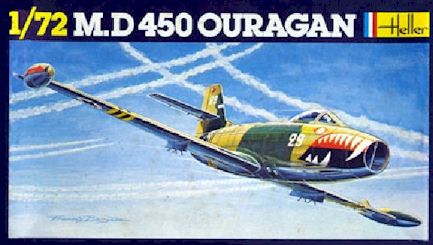 The cockpit was complete
enough for me in this scale, but I did add some seat belts and shoulder harnesses from
strips of masking tape, with the belts and harnesses painted Polly Scale French Olive and
the buckles and latches painted silver. I added a couple of ejection rails to the seat
from Plastistrut channel strip, as well as a firing handle from fine wire. The kit's
instrument panel had very oversized gauges molded on it, so I sanded the panel smooth and
replaced the gauges with an instrument panel decal from ModelDecal set number 68, which
featured the correct layout for an "Ouragan" panel. Data placards and control
panel boxes were done with Reheat Models decals.
The cockpit was complete
enough for me in this scale, but I did add some seat belts and shoulder harnesses from
strips of masking tape, with the belts and harnesses painted Polly Scale French Olive and
the buckles and latches painted silver. I added a couple of ejection rails to the seat
from Plastistrut channel strip, as well as a firing handle from fine wire. The kit's
instrument panel had very oversized gauges molded on it, so I sanded the panel smooth and
replaced the gauges with an instrument panel decal from ModelDecal set number 68, which
featured the correct layout for an "Ouragan" panel. Data placards and control
panel boxes were done with Reheat Models decals.