Home
| What's New |
Features |
Gallery |
Reviews |
Reference |
Forum |
Search
Home
| What's New |
Features |
Gallery |
Reviews |
Reference |
Forum |
Search
|
|
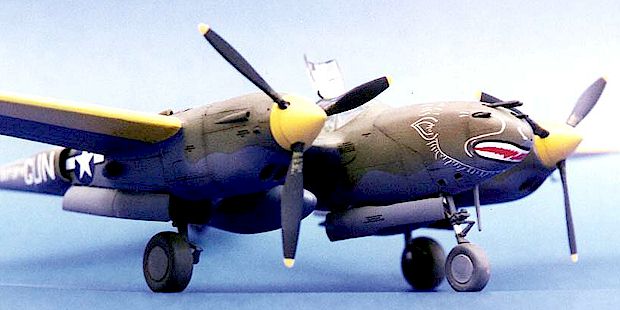
P-38F Lightning by Lee Kolosna
Lockheed’s P-38 Lightning, one of the most famous aircraft ever made, almost needs no introduction. A mainstay of the Pacific Theater, it excelled as a long-range fighter. Its deployment in Europe and the Mediterranean arenas was less spectacular. Generally outclassed by more maneuverable German fighters, the Lightning still was able to perform adequately with careful adherence to tactics that did not allow it to get into a turning dogfight at low altitudes. With the advantage of high speed, exceptional range, and heavy armament, the Lightning was able to contribute significantly to the Allied war effort.
I’ve always preferred the lines of the earlier model P-38s, and Hasegawa’s attempt at this subject is quite good. It is the only kit in this scale that has the proper upturned wing tips. Molded in the usual medium gray plastic, it has recessed panel lines. The clear parts are of excellent quality, being thin and transparent. Hasegawa practically forces the modeler to fix the canopy in the open position, with separate parts provided for the windscreen, rear bubble, both side windows, and the top hatch. Aligning all those parts properly to depict a closed canopy is a difficult job.
The cockpit is adequately detailed but I elected to use the Kendall Model Corporation’s resin cockpit 48-6012 set to spruce up my model. While it is technically made for the later J model, I made the appropriate modifications (like keeping the steering wheel control column) to reflect an H model aircraft. It took quite a bit of filing and sanding and cutting to get the resin cockpit to fit properly. The instrument panel coaming obscures any view of the nicely detailed instruments. Most P-38s pilots left the coaming in the closed position or took it out of the aircraft entirely, so some plastic will need to be removed accordingly. The propellers are individually attached to the hubs, so careful alignment is required. The nose guns are separately molded, which makes for a high likelihood of feeding these teeny parts to the monster that lives beneath your workbench. I sacrificed one of the machine guns to this beast and had to fabricate a new one from stretched sprue.
I first painted the cockpit with Polly Scale Interior Green. E-mail discussions with color expert and P-38 fanatic John Clements led me to believe that this is the correct color. I’ve also talked about this at length with the National Air and Space Museum’s Dana Bell. He told me that the early P-38s found under the ice in Greenland were painted Dull Dark Green. There are enough close-up color photographs of Lightnings to state that either color is appropriate. The cockpit interior was enhanced with a wash of oil paints, then drybrushed with light gray to highlight the details. Instruments were highlighted with a white color pencil, and a drop of Future to represent the glass. I made a roll bar for the rear decking with a piece of sprue. Weight in the form of BBs was added to the nose area to prevent tail sitting.
Gluing the major components together revealed the first problem with the kit: large gaps are present at the joint between each engine boom and the wing. I filled the gaps with thick CA glue, and restored the lost detail by rescribing. The second problem turned out to be the most troublesome: the alignment of the right boom was decidedly off from vertical, as much as 15 degrees. I checked for warpage, and there didn’t appear to be any. My only conclusion is that there is a flaw in Hasegawa’s engineering of the parts. This has been corroborated by other modelers' comments in various forums, as well as in Bert Kinzey’s P-38 Lightning in Detail and Scale. I corrected the alignment by dipping the aft end of the boom in very hot (not boiling) water and gently twisted it back to the proper orientation. This operation was successful and I was able to proceed with the rest of the construction. I attached the landing gear before painting, as most Lightnings had Neutral Gray wheel wells as well as gear struts. John Clements informed me that the wheel wells were finished in aluminum lacquer at the factory, but corrosion incurred on the way to the war zone usually required attention at the staging depot where Neutral Gray paint was applied. The fit of the landing gear in not positive. The way Hasegawa engineered the fit of the windscreen requires some filling of a large seam between the front of the canopy and the fuselage pod. I had to be careful not to scratch the clear parts while sanding the seam. I wasn’t entirely successful so some repolishing was necessary.
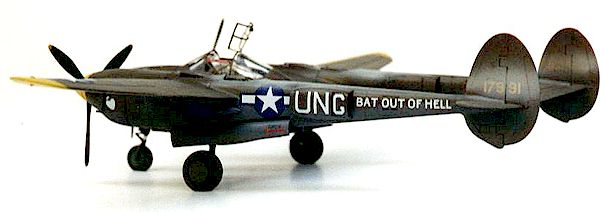
Polly Scale paints were used almost exclusively. The aircraft in question, "Bat Out of Hell", a P-38F from the 94th Fighter Squadron on Sardinia in early 1944, was flown by Capt. James Hagenback. Both AeroMaster and Super Scale produce markings for this particular aircraft. As usual, they disagree on how to paint it. The area of conflict involves the yellow leading edges of the outer wings. Super Scale has no mention of it, as they depict a plain Olive Drab over Neutral Gray aircraft with yellow spinners only. AeroMaster instructs the modeler to paint the yellow edge halfway from the wing tips to the engine nacelle. Once again, John Clements helped me analyze photographs of the actual aircraft (Squadron’s P-38 Lightning in Action book has a picture of it), and we determined that the yellow extended all the way to the nacelle.
The demarcation line between the upper and lower colors is a hard one. I used masks cut from masking tape and Parafilm M to make the transition. The turbo-superchargers were painted with Testors Metallizer, using the burnt metal shade.
A coat of Future floor polish was applied to prepare the model surfaces for decals. The Super Scale decals from sheet 48-494 were disappointing. The blue of the national insignia is too light. Also, the printing of the colors (offset printed versus silk-screened?) reminded me of a comic book. Instead of being a solid white, a cartoonish density made of tiny dots is seen. The boom insignia are too large for the space between the trailing edge of the wing and the front of the outboard radiator intake. I strongly suggest that the national insignia be replaced. I didn’t have alternatives handy when I made my model (since the insignia are so small, 1/48 scale sheets don’t include the size needed – a 1/72 sheet will do the job), so I pressed on. A second problem cropped up on the wing insignia. The translucence of the white stars is very apparent when applied over the yellow areas of the wings. I doubled up the decals, but it still is detectable. For all the problems I encountered with the national insignia, the rest of the markings went on perfectly, including the complicated demon’s face. I used some of the Hasegawa-provided stencils, and they worked well too. Two foil ovals, attached to the inside of the engine nacelles and used by the pilot to check if the nose gear is down and locked, are thoughtfully included. I highlighted the recessed panel lines with a wash of burnt umber oil paint thinned with Turpenoid. The lines then received an additional brushing of pastels. The Olive Drab paint was faded on the upper surface with a light coat of Polly Scale’s Dust. P-38 turbo-superchargers left a very noticeable stain all along the top of each engine boom and the vertical stabilizers. On "Bat Out of Hell", photographs show that the staining was so severe that the aircraft serial number was obliterated by the exhaust residue. I simulated this using my airbrush to spray a thin coat of light gray paint in all the affected areas. Polly Scale Dirt was sprayed on the undersurfaces to depict the wear and tear imparted by operations from bare earth runways. Finally, Testors Dullcote Lacquer was used to seal the finish.
This aircraft, like most in the MTO, did not have external aerial wires. I attached the remainder of the canopy pieces with crystal watch cement. The top hatch was glued at the appropriate angle with a tiny blob of rubber cement. This is sticky enough to keep the piece on the model, while allowing it to give a bit under gentle handling. The formation lights were painted the appropriate colors, and the lenses glued in. These pieces are even smaller than the machine guns, so protect them from the monster if you can. To finish the project, the wheels went on, as did the gun barrels, landing lights, pitot tube, and propellers.
The Hasegawa P-38 Lightning is a good but flawed model. The alignment of the twin booms needs careful attention due to Hasegawa’s engineering of the parts. Quite a bit of seam filling will be required as well. I thought that the windscreen attachment was needlessly complicated, again, due to choices in how the parts were engineered. But the finished product looks good, and the beautiful lines of the early P-38 are captured quite well. I can recommend it to other modelers, providing they understand the work involved to correct the problem areas. For anyone with intermediate skills, this should not be an insurmountable task.
Larry Davis: P-38 Lightning in Action Jeff Ethell and Warren Bodie: Pacific War Eagles Bert Kinzey: P-38 Lightning in Detail and Scale, Part 1 John Clements: E-mail conversations Model, Photographs and Article Text Copyright © 1999 by Lee Kolosna
Back to HyperScale Main Page Back to Features Index |