|
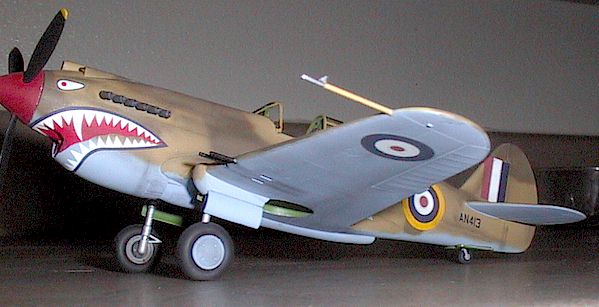
Curtiss P-40B "Tomahawk" |
"Improving the Breed"
Curtiss
P-40B/C Tomahawk
Correcting the 1/48 Scale
Hobbycraft Kit
by
Rick Barnds
|
Curtiss P-40B "Tomahawk" |
| I n t r o d u c t i o n |
After seeing the quality of the Hobby Craft P-36 and Corsair series I was very excited to
get my hands on the new P-40B. Upon opening the box and doing some dry fitting something
struck me as odd. The gap for the radiator exit area was huge! The wings also seemed to
have too much angle of attack. Since the kit was pretty good from a construction viewpoint
I decided to correct the wing and radiator gap problem.
 Armed with a couple of
sets of drawings, a few of references, and some measuring tools I set out to find the
problem. After comparing all the dimensions, I discovered that Hobby Craft had molded the
entire wing/wing fillets too high on the fuselage at the front and that the ventral
fairing was too shallow at the front. This, combined with some odd-looking contours on the
underside of the wing/radiator junction, gave the plane some rather ungraceful lines. This
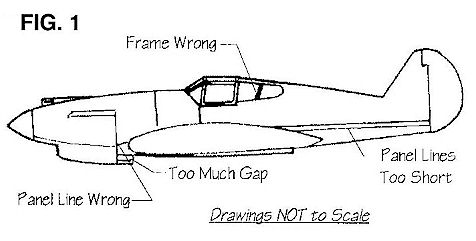
error also threw some panel lines off as well (see Fig 1.)
Armed with a couple of
sets of drawings, a few of references, and some measuring tools I set out to find the
problem. After comparing all the dimensions, I discovered that Hobby Craft had molded the
entire wing/wing fillets too high on the fuselage at the front and that the ventral
fairing was too shallow at the front. This, combined with some odd-looking contours on the
underside of the wing/radiator junction, gave the plane some rather ungraceful lines. This
error also threw some panel lines off as well (see Fig 1.)
| S t e p - B y - S t e p |
Simply shimming the wing to lower it would not work since the wing fillets would no longer match up and would have to be reworked. The solution was to re-engineer the kit a bit. At first my solution may seem extreme and difficult to perform but it was really quite easy.
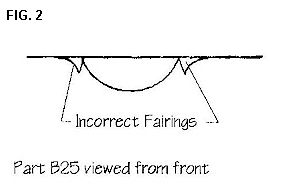
Step 1: Remove the fairings from the lower wing (see Fig 2.) The lower wing should be smooth all the way up to the ventral fairing. Apparently Hobbycraft copied the look of the P-40E for the underside. I ground mine away with a motor tool then sanded the wing smooth.
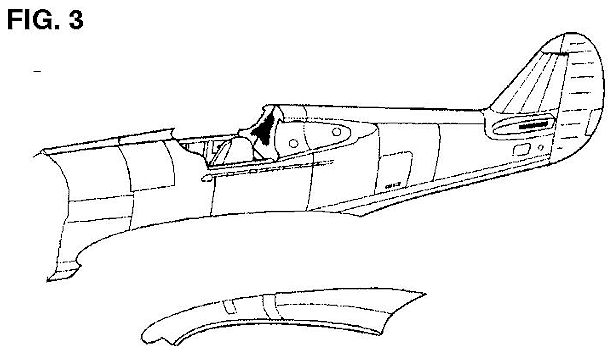
Step 2: Remove the wing fillets from the fuselage halves. I used a scribing tool and followed the fillet line all the way to the rear end then made a cut straight across to free it (see Fig 3.) You will have to grind away some of the cockpit details inside as they extend down onto the fillets.
Step 3: Assemble the wing and attach the wing fillets to the assembled wing. Thin the edges on the fillets with a motor tool and sand paper until they are paper thin especially at the front. Reshape the front edges for a more round appearance.
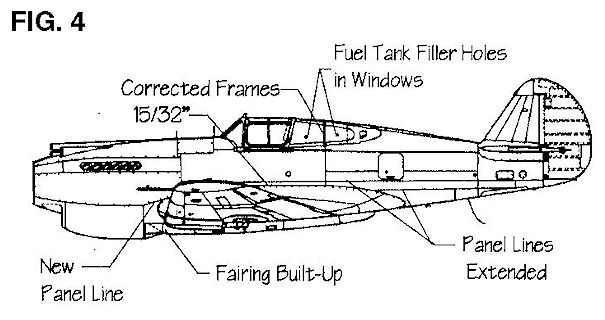
Step 4: Fill the holes left from the wing fillets with .010 sheet styrene. I prefer the thinner styrene so that I can bend it a little to match the contours of the fuselage. I used Tenax for the assembly and filled gaps with super glue. Extend the lower fuselage panel lines and correct the front panel lines as shown in Fig 4. Assemble the fuselage and add in the cockpit detail. I combined a True Details photoetch set with scratch built details for my cockpit. I’m sure one of the resin sets would work just as well (Meteor Productions and KMC both do a resin cockpit for the P-40B.)
Step 5: Now the moment of truth! Dry fit the wing assembly to the fuselage. Check for large gaps in the wing fillets and any clearance problems. The wing assembly will attach at the rear the same and will pivot down so that the distance from the top of the wing fillet to the cockpit sill is 15/32" measured at the panel line at the front of the cockpit (see Fig 4.)
Before attaching the wing, build up the front end of the ventral fairing. The fairing should also extend up into the radiator housing. I used the front end of a P-39 drop tank for this and smoothed everything out with putty and super glue. The radiator flaps are molded partially closed so there should be a small gap. Keep dry fitting the wing to check the gap and make sure it is even all the way around.
Step 6: The fuselage sides just above the top radiator flap should extend in a straight line until the meet the wing. Cut small triangles from .010 styrene for these (see Fig 5.)
| O t h e r C o r r e c t i o n s |
Hobbycraft got the angle of the rear glass frames wrong. You can either sand them off and polish out the plastic or cut new windows from .020 acetate like I did then simply mask off the correct frames. A row of raised rivets in the window wells will show you where to put the new frames. There should also be two holes for the gas tank filler caps in the left rear window. Position the glass and mark where the holes should be using the caps as a guide then drill them out and smooth the edges.
Of course there are many other things that can be done with this kit but this at least
gives you the basics to get a reasonably accurate P-40B/C. I’m sure the debate will
rage on as to whether it is easier to rescribe and correct the Monogram kit or correct the
wing on the Hobbycraft kit.
For me, I like the Hobbycraft kit and found that correcting the wing was quite simple. So dust off that Hobbycraft P-40 and get building!
| A d d i t i o n a l I m a g e s |
Click on the thumbnail images below to view the image full sized. Use the "Back" arrow on your browser to return to this page.

![]()
Back to HyperScale Main Page
Back to Features Page