|
Republic
P-47D Thunderbolt |
"Circus Rosarius" P-47
by
Floyd S. Werner, Jr.
|
Republic
P-47D Thunderbolt |
B a c k g r o u n d |
The only way to defeat your enemy is to know him. This was the premise behind the Circus
Rosarius. Take enemy airplanes and fly them against your own airplanes to discover how to
exploit the weaknesses of the enemy.
Utilizing three P-47Ds and many other allied fighters the Circus toured the Channel Front units from 1942 until the end of the war.
C o n s t r u c t i o n |
 In 1995 I purchased
the Medallion interior set for the Monogram P-47.
In 1995 I purchased
the Medallion interior set for the Monogram P-47.
I wanted to build the Otaki kit as it had recessed panel lines. I originally wanted to build Don Gentile's P-47 "Donny Boy" but only had some old 1/32 decals from SuperScale. I was going to shrink them down and make my own decals but never got around to it. I stopped building the P-47 when I got to the wheel wells, which required lots of filling and sanding. But as if to prove the build it and they will come out with it theory, I recently decided to finish the kit. So here are my findings in what has to be one of the longest in progress build in my history.
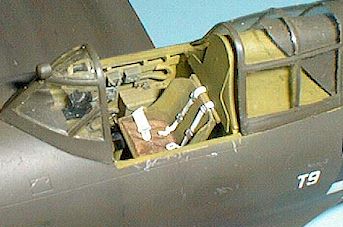
Building the Medallion interior is real easy. Painting is straightforward with Model Master Interior Green. Weathered with burnt umber oils and with a silver pencil. The Instrument panel was painted black with future in the dial faces. The fit inside the fuselage was good and tight, almost like it was designed for it. Filling the seams on the fuselage was easy.
 The engine was next.
Here is where there was some change from the basic kit. I cut the scoops from the engine
intakes off of a Monogram kit and built up the Otaki engine assembly with wire and tubing.
This was done because the Otaki scoops didn't reach the front of the engine cowlings as on
the real one. You can't even tell the change on my kit. Mating these in the engine halves
was easy. Drill a hole for a tubing piece through the nose cone and the firewall to aid in
painting and as a mount for the prop.
The engine was next.
Here is where there was some change from the basic kit. I cut the scoops from the engine
intakes off of a Monogram kit and built up the Otaki engine assembly with wire and tubing.
This was done because the Otaki scoops didn't reach the front of the engine cowlings as on
the real one. You can't even tell the change on my kit. Mating these in the engine halves
was easy. Drill a hole for a tubing piece through the nose cone and the firewall to aid in
painting and as a mount for the prop.
I attach the horizontals next, as usual. This makes getting them straight easier than when the wings are on. The fit here was okay with just a little filler needed.
The wings went together well except for the gun area in the leading edge. Here I had to fill with super glue to build the area up. I cut all the guns off and drilled holes for some 1.2 mm tubing in the proper set up, parallel to the ground not the wing dihedral. Attaching the wings to the fuselage was a long process. To get the dihedral correct you open up huge seams in the wheel wells, not the best place to work.
After filling about a 1/8 inch gap in the wing bottom side with super glue I knew that this aircraft wouldn't fall apart. I also noticed how much bigger this airplane was than the Bf-109. No wonder the 4th Fighter Group complained about getting the Jug.
 Filling the wheel
wells turned out to be no real big problem, but I stopped at this point in 1995 and
shelved the model. Cleaning off the shelf in 1998 prompted me to finally scratch build the
wheel well interior and I was quite happy with the results. I had to decide whether I
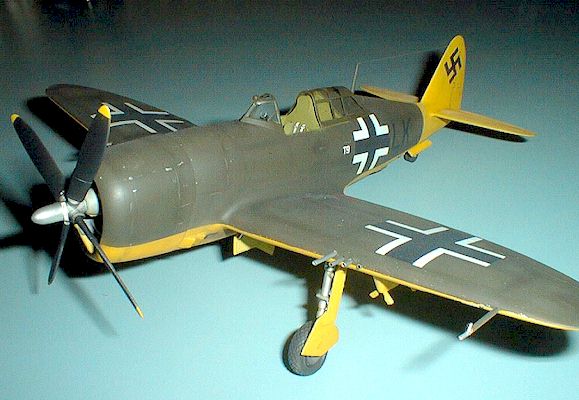
would build Gentile's aircraft, which would require shrinking decals, or to play with
people's minds and build a German P-47. Well I want to see where the judges put this
model, Axis or Allies?
Filling the wheel
wells turned out to be no real big problem, but I stopped at this point in 1995 and
shelved the model. Cleaning off the shelf in 1998 prompted me to finally scratch build the
wheel well interior and I was quite happy with the results. I had to decide whether I
would build Gentile's aircraft, which would require shrinking decals, or to play with
people's minds and build a German P-47. Well I want to see where the judges put this
model, Axis or Allies?
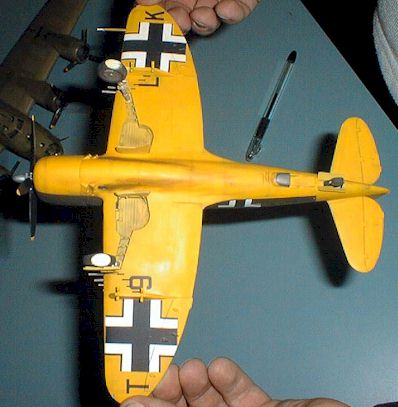
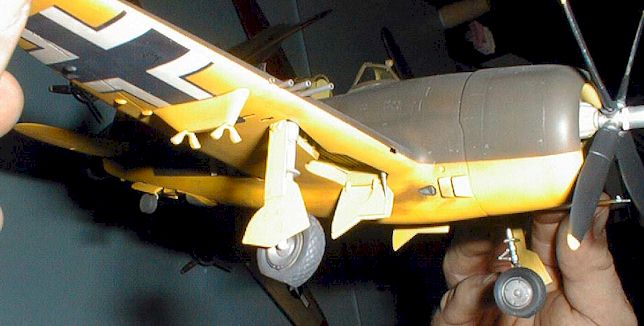
Finishing up the wheel wells you can't even find the gap. I painted the wheel wells with Model Master Zinc Chromate to contrast slightly with the bottom. Paint the bottom of model first with RLM 66 on the panel lines then paint with Aeromaster Yellow without thinning, this is important as you can get opaque coverage with one coat (works with their White too). The pre-shading will give you a great look, especially for a monochromatic finish. Start at the center of the panel and airbrush your way out to the RLM 66. Do the next panel. After the panels are painted then start to cover the Dark Grey. You don't want to fully over it, but allow it to show through a little bit. Experiment with his. It works better on light colors than on dark ones, which I needto find a better technique. I painted the top color a Tamiya Olive rab. It is dark and all the photos I see of these airplanes shows it a ery dark color. The Aeromaster seems too light on my P-51 so I wanted t darker. I think this is my color of choice for Olive Drab. Next ime I may over spray lightly with Aeromaster to fade panels.
Attaching the landing gear and other small things made the model ready or the Future. I like to attach the landing gear prior to Future ecause it helps hold it all together and hides any glue marks. After wo coats of Future I applied the decals. The top decals are from a 1/24th scale FW-190 and the lower ones are from a 1/24th Stuka. The bottom decals shattered as they are so old but with a light paintbrush I was able to save them. The other decals came from various sources such as "In Enemy Hands" from Three Guys. A quick coat of Future and then Polly-S flat about a day later seals the decals and prepares you for weathering.
A word about weathering, if you want the wash to go only in the panel lines then put your wash on the gloss coat, really effective for metal finishes. If you want it to flow onto to the panels, like I usually do then flat coat the model let it dry a day and then wash with the oils.
After this dries a day then seal it with another flat coat. You can use a combo of these techniques. I do my control surfaces with the gloss and my panels with the flat. Of course, a dry brush with a lighter color is built up easier on a flat coat than a gloss coat. I always flat after a dry brush to remove the sheen. If you decide to use pastels the effect will be muted with a flat coat overcoat. So do it before and after for dramatic effect. After the pastels be careful where you hold it.
Using the kit front canopy and a Squadron rear canopy allowed me to have the canopy open. The Squadron canopy was made for the Monogram kit and attached differently in front, plus the kit canopy fits like a champ. Attaching the canopies with Elmer's glue and the antenna with super glue brings this kit to a conclusion.
C o n c l u s i o n |
It definitely looks different in my collection and takes up lots of room. Of course,
two days after finishing the kit my IPMS Journal comes in the mail and Aeromaster
advertises Don Gentile's "Donnie Boy" in 1/48th scale. So now I guess it is time
to start a Hasegawa P-47. I am interested to see this kit next to a new one and see the
differences.
Floyd S. Werner, Jr.
IPMS # 26266
HORRIDO!
Remember modeling is fun!
Back to HyperScale Main Page
Back to Features Page