Home
| What's New |
Features |
Gallery |
Reviews |
Reference |
Forum |
Search
Home
| What's New |
Features |
Gallery |
Reviews |
Reference |
Forum |
Search
|
|
|
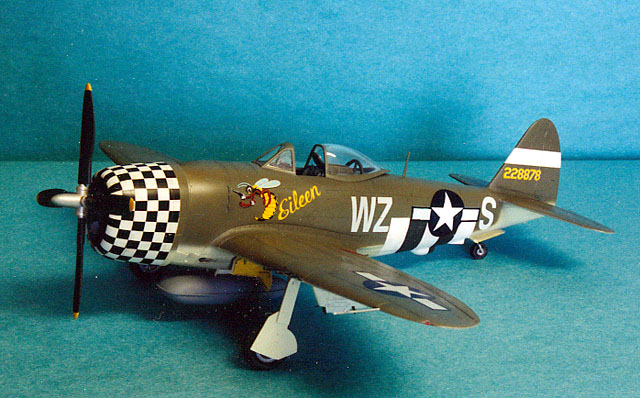
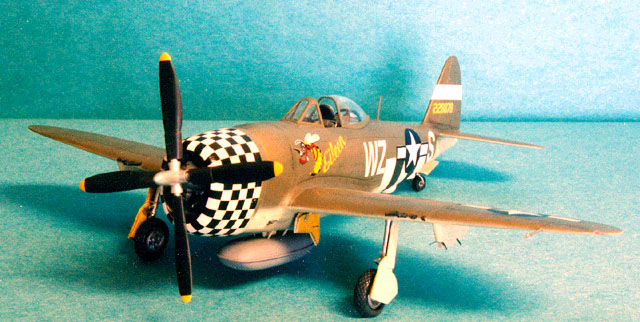
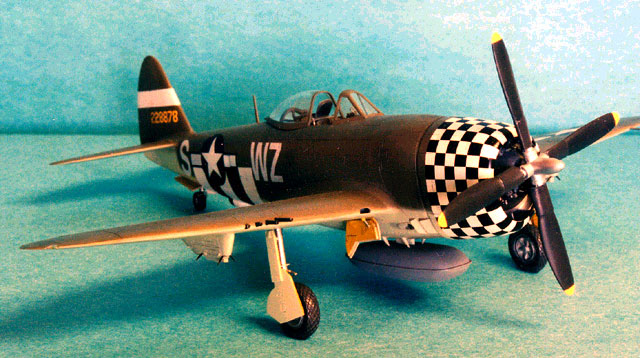
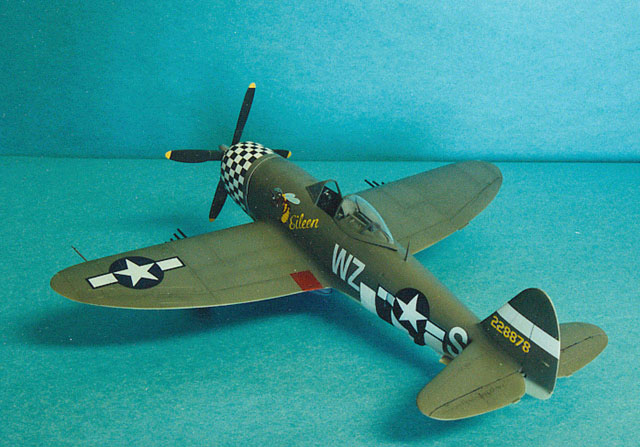
Republic P-47D Thunderbolt by Rick Marshall
There has been a considerable amount of research done on the Republic P-47. I can recommend a good guide that can be used by the modeler. This is Bert Kinzey's "Detail and Scale" on the P-47. If you are interested in building a P-47, regardless of kit or scale I would recommend this book. All that I will say about the history of P-47 was that it was big, fast and powerful. Regardless of the theatre the P-47 served well. The P-47D was the most prolific variant with over 12,000 being built.
It is obvious that the 1/48 scale Academy P-47D was derived from their P-47N kit because several of the trees are same for both kits. The important point to remember is that the N Model had 8 spoke wheels and that the D had 6 spoke wheels. Both are in the kit and would be easy to mix up. My kit was well molded and there was no flash or sink holes in the entire kit. The clear pieces were nice and thin and very clear. In the box this looks like a nice model.
I looked over the instructions and the parts trees and decided that the interior could use with a little more detail, I rectified this with the Eduard fast detail set. It included a corrugated cockpit floor that was used in early P-47's, some side panels and the Eduard photo etched clear film instrument panel. Other useful parts were also included. For the five or so dollars this was a real nice addition to the project. The other area I wanted to improve was the engine. The P-47 has a huge cowling and no propeller spinner, which makes the engine very visible from the front. I had the Early Aires R2800 resin engine in the parts box I decided to use it. The engines construction will be described later. While the model was still in the box I noticed a couple of other things. First was the aileron trim tabs. Unlike Hasagawa, Academy got the aileron trim tabs correct. On the P-47 the right wing had a fixed aileron tab. The left wing has a moveable trim tab. Something else that stood out in the box was the raised access doors on the fuselage and wings. Slightly raised access doors helps make them stand out, these however really protruded from the model to remedy this I sanded them down before starting construction. The last in the box observation was the wing fuselage joint - it runs right through the landing gear bay. This was not going to be an easy seam to fix, but as attaching the wing was a ways off I had some time to thing about it. Last but not least are the decals. Academy gives you decals for two aircraft. I chose Eileen of the 78th fighter group, the other choice is a natural metal aircraft of the 86th fighter group.
Unlike most of my models I did not start with the cockpit. To be different I started with the engine and the cowling. The reason for this was I wanted to sure that the Aires engine would fit in the cowling. The Aires engine is a kit in itself, it is comprised of resin and photo etch parts. The cylinders have the best cooling fins of any 1/48 engine I have seen and the parts kit together easily. I painted the crankcase and magnetos grey and the cylinders steel. Once the cylinders were attached to the crankcase the engine was test fitted into the taped together halves of the cowling, the good news was the engine slipped in nicely. Once satisfied that the resin engine would fit in without any surgery I started on the cockpit. As mentioned earlier I had the Eduard fast set for the P-47 it was a simple photo etch set to work with and didn't require any bending for the cockpit parts. A new floor for the cockpit fit on the kit parts and some of the cockpit sidewalls received new fronts and a new instrument panel was attached to the front of the kit part. None of these modifications required any extra work other than removing the kits detail. This work went fast. Once the cockpit was completed it was test fitted into the fuselage. This is when I noticed a problem with the instrument panel. There was a large gap behind the panel and front of the cockpit - it simply didn't look right. To fix this gap I did a couple of things. I added a piece of plastic card to the front of the cockpit tub as the gap would be visible from the cockpit. Secondly I added two pieces of plastic card to the fuselage sides, this was to square off the top of the fuselage/dash board to the instrument panel. This took quite a bit of test fitting to get a tight fit around the gunsight. I made one other modification to the cockpit area this was to add another piece of plastic card to the back of the armor plate behind the cockpit to block the view through the canopy open/close mechanism into the rear of the fuselage. Now that the cockpit was ready the it was placed into the right fuselage half and then the fuselage was glued together, the fit was perfect and no filler was required.
Now it is time for the wings. Academy includes gun bays on this model, after looking the guns, and gun bays over I decided to glue the covers to the upper surface of the wing. They weren't bad but Academy didn't include the ammo chutes and I couldn't find any photos of the gun bays open without the ammo doors open. Out came the Testors liquid cement. The rest of the wings were pretty standard, except that I chose to substitute stainless steel tubing for the guns blast tubes. I rarely put any model together without messing something up, this models goof was the gun barrels. Acaedemy thoughtfully made a leading edge insert that the gun barrels were glued into, well not all of the gun barrels. The shortest one is molded in. To replace all the blast tubes with tubing this short tube needs to be drilled out. The first was easy and nice and straight. God knows what I was thinking when I did the second, talk about crooked! To straighten out this mess I had a large oval shaped slot in which to place the tubing, of coarse this meant some filler. Once I had completed one of my best filling and contouring jobs to date I found a little surprise on one of the sprues - yep you guessed, it another set of gun inserts! So if you are afraid to attempt replacing the blast tubes go for it, if you mess up you have a spare. As with the fuselage halves the wings fit well and required no filler. This was also true of the horizontal stabilizers. In fact the overall fit of the kit was very good. Although there were no problems with the fit, the only puzzling item was with the wing fuselage joint. It runs right through the nicely detailed main landing gear bay. There was no way this seam could be cleaned up without wiping out the detail. My solution was to clean the joint along the vertical surfaces and then place a 10 thou strip of styrene over the joint. Once done the extra bit of styrene looked liked it belonged on the model. The remainder of the model went together well with no further problems.
I used Bert Kinzey's "Detail and Scale" as my primary reference source. This book was augmented by the October 97 issue of Fine Scale Modeler. This issue of Fine Scale has piece on WWII aircraft interior colours and was useful for getting the colour of Dull Dark Green, that I used for the cockpit. The colour is a bit darker than FS 34092. I found the colour too dark to see much detail in the lower part of the cockpit so l lightened it up with some white, after a dark wash was applied the colour darkened a bit and a light dry brushing really brought the cockpit to life.
The landing gear doors were painted yellow chromate and interior of the cowling was painted natural metal. For the exterior colours I used British dark green over sky. This may seem wrong but according to some sources is correct. As the 78th fighter group is having its reunion just a few miles down the road this year, and this model will be displayed at one of the gatherings. I hope to be able to find out if dark green over sky is correct, or if they were OD over neutral grey. The kit's painting instructions tell you to use dark green over neutral grey.
The kits decals were slightly out of register and were quite translucent. I painted both the theatre band on the tail and the invasion stripes thee wer then masked off to paint rest of the model. When the stars and bars were placed on the fuselage sides the invasion stripes were clearly visible through the decals, bummer. To fix this I put a coat of Future over the decals and let it dry over night. The next day I used Tamiya masking tape to mask off the white portion of the decal and sprayed gloss white over the decal. The good news is the Tamiya tape did not pull up any of the decal and my masking job surprised me, this actually worked! Bottom line regarding the decals is get some after-market items and throw the kit decals away. The model was weathered by using a sharp pencil to highlight the panel lines. The pencil was augmented with a light oil wash that was placed in the panel lines, as opposed to over the model. I used a heavier general wash on the engine cylinders and crankcase. Finally I used pastels to post shade the some of the wing panels. Overall I liked this model and am looking forward to Acadmey's P-47N.
Text and Images Copyright © 2000 by Rick
Marshall
|