Home
| What's New |
Features |
Gallery |
Reviews |
Reference |
Forum |
Search
Home
| What's New |
Features |
Gallery |
Reviews |
Reference |
Forum |
Search
|
|
|
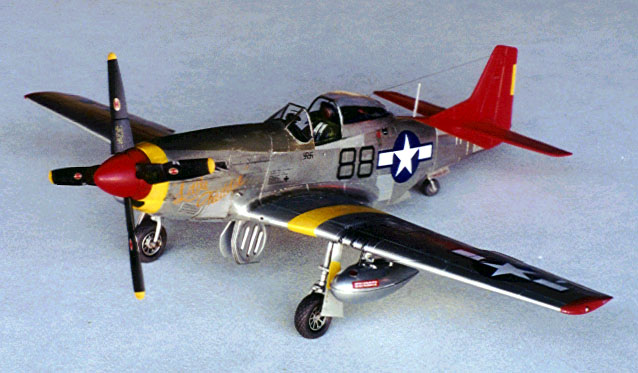
North American P-51D Mustang by John Trueblood
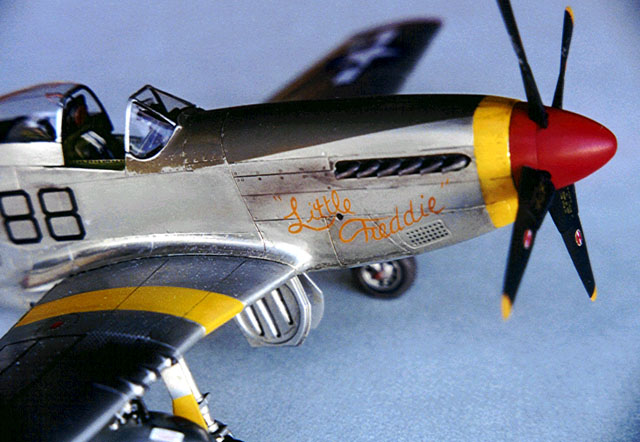
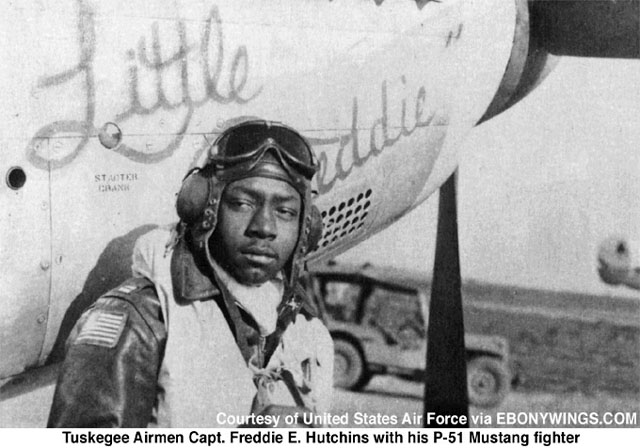
The story of the Tuskegee Airmen is a compelling human drama. During World War II, many white Americans both civilian and military believed that blacks could not learn to operate any sort of complicated machinery, let alone a combat fighter plane. The Tuskegee Airmen were to prove them wrong! Under the strong leadership of Colonel Benjamin O. Davis the "Red Tails" became, by the most important standard for a fighter escort group, (protecting the bombers in its care) the best unit in the USAAF. Uniquely, among the USAAF’s fighter groups, the 332nd could claim…to have never lost a bomber in its charge! P-51D "Little Freddie" was built using Tamiya's excellent 1/48th scale offering. "Little Freddie" was assigned to the 302nd FS, 332nd FG, 15th AF. The aircraft's namesake was Captain Freddie Hutchins who scored 2 kills, both Me 109s.
The 332nd FG operated P-51D Mustangs at Ramitelli, Italy during late 1944 and early 45. Captain Hutchins was a native of Blakely, Georgia and graduated in the Tuskegee Airmen class 43-D. He later served in Korea and Vietnam. During his Wartime service Freddie Hutchins was awarded the DFC and Purple Heart. For those who desire more information on the Tuskegee Airmen, I would recommend visiting the site, http://www.ebonywings.com
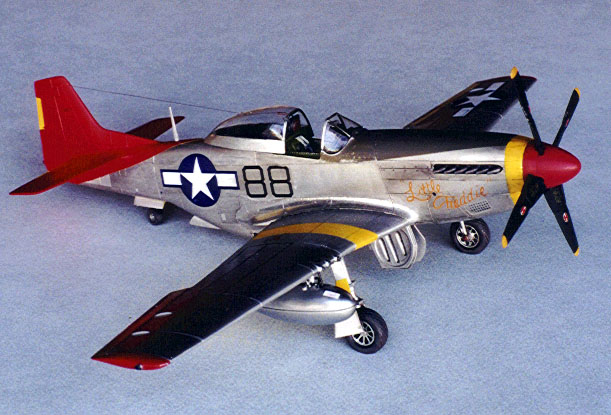
Although, the Tamiya kit builds up nicely out of the box, I got in the "mood to modify". The cockpit was replaced with a combination of Verlinden, Teknics and scratch building. The Teknics and Verlinden sets were designed for the Hasegawa Mustang and it proved rather challenging to get them into the Tamiya kit. I bought the Teknics and Verlinden detail sets year's ago and was determined not to let them go to waste! The radio and battery were wired, the seat modified, and Waldron cockpit placards applied. The canopy rails, center guide and internal structure were added. The aerial and retention spring were added and wired. The fuel filler line was added. The gun sight was replaced with a resin and photo-etch K-14 gyroscopic type from Teknics. The kit canopy was replaced with a "Clear View" Dallas hood. The Tamiya canopy suffers from poor engineering of the sprue attachment which when removed creates a blemish on the clear portion.
The top of the kit-supplied joystick was used. The landing gear wells were detailed, plumbed and wired. The tail wheel well was fared in and the tail wheel linkage added. Wheels and tires were replaced with the True Details resin set. Brake lines and tow bar rings were added. The exhausts and 50 caliber machine guns were drilled out. Tail warning radar aerials were added. The 75-gallon drop tanks were plumbed. The drop tank mounts were corrected; forward and rear sway stoppers added. Actuator and side stiffeners were added to the radiator shutter. The center vane was added to the air intake. Internal detail was added to the carburetor intake. Plastic toothbrush position lights were added. My wife sometimes wonders why all toothbrushes used at our house must be red, green, amber or clear.
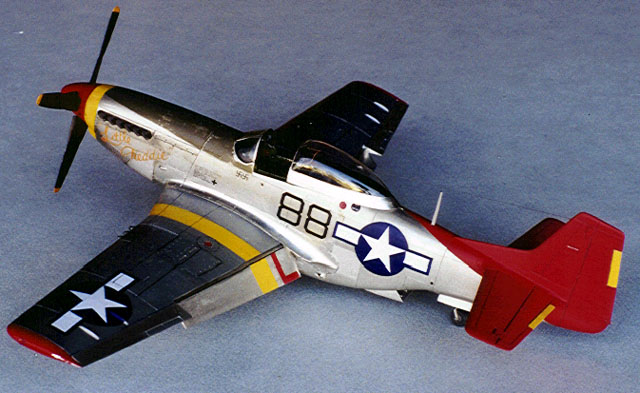
I decided to finish the model using similar materials as the full size Mustang. The wing was painted with SNJ aluminum lacquer except for those portions (flaps, ailerons, lower fuel tank cover) that should be natural metal. I lightly buffed the SNJ but did not polish it to a shine. All natural metal portions of the aircraft were covered with Bare-Metal foil. I prepared the model as though I was going to use a metalizer paint; that is, I filled all seams completely and then polished the model with plastic polish and a buffing wheel attached to a Dremel tool. Using a variety of Bare-Metal sheets including the dull Aluminum type, I covered each panel individually. By varying the foil sheets and the direction of the Aluminum's grain I got an effect of subtle differences between panels. If I got dust under a panel or a wrinkle developed that I could not burnish out, I removed the foil and cleaned the area with Gunze Sangyo Mr. Thinner. This is a very powerful solvent, that does not attack styrene, (even clear). I then reapplied a new piece of foil.
I darkened some of the foil panels by applying a chemical called Blacken-it from the A-West company. The product label specifically states that it is not to be used on Aluminum - but who follows instructions anyway! This product can be found at hobby stores with railroad departments. The chemical will turn the Aluminum a dark gray, almost black. A little AJAX or Comet cleanser on a moistened Q-tip can be used to scrub the dark color to a lighter shade. On a side note, Bare-Metal foil can also be sprayed with metalizer paints, polished and carefully applied. In my opinion, the problem with most "foil jobs" is that the aluminum foil gives the model an unrealistic shiny, chrome like look. In order to deal with this problem I lightly sanded the overall foiled model with an assortment of abrasives including, Flex-a-Grit, toothpaste, steel wool, and Comet cleanser. All of these products gave about the same result; a realistic Aluminum finish. Roughing up the surface is also important if you want to paint over the foil and have the paint stick. "Little Freddie" was a very colorful P-51. I used Model Master enamels, thinned with AeroMaster solvent for the red and yellow markings. The olive drab anti-glare panel is Polly Scale acrylic thinned with Scope mouthwash. For painting I used Tamiya's masking tape over the foil. I first reduced the tape's stickiness by applying it to the inside of my forearm before laying it down on the foil. You need to be a little careful with the masking tape in order not to pull up the foil panels, but it can be done.
The final step was to apply the decals. To prepare the model, I polished it with Model Wax made by The Final Detail company. The wax job provides two benefits. First, it produces a smooth surface for the decals and prevents silvering. Second, waxing the Bare-Metal foil removes some surface oxidation and conveniently and artistically places the dark Aluminum oxide into the recessed panel lines, just like on a real Aluminum airplane.
I used the excellent AeroMaster Tuskegee Airman decals with no problems at all. A little Micro Sol helped them snuggle down perfectly. The decals were sealed with a very light coat of semi-matt Polly Scale acrylic finish. I kept weathering to a minimum. Wartime photos show "Little Freddie" to be a low-time Mustang that was well maintained. Captain Hutchins had flown 5 previous mustangs before he received "Little Freddie", his final P-51. I used a soft lead drafting pencil to lightly outline some of the wing panels, a dark brown/gray water color wash to highlight the control surface separations, a bit of paint chipping here and there, a little oil and fuel residue in the appropriate spots and some pastel chalks for the exhaust and cordite stains as well as a little mud and dust on the undercarriage.
"Little Freddie" won a Gold and a special award for "Best WW2 Prop Aircraft" at the 2000 Gathering. He's currently part of a modeling display at a Denver History Museum highlighting the contributions of the Tuskegee Airmen. Models, Text and Photography Copyright ©
2001 by
John Trueblood
|