Home
| What's New |
Features |
Gallery |
Reviews |
Reference |
Forum |
Search
Home
| What's New |
Features |
Gallery |
Reviews |
Reference |
Forum |
Search
|
|
|
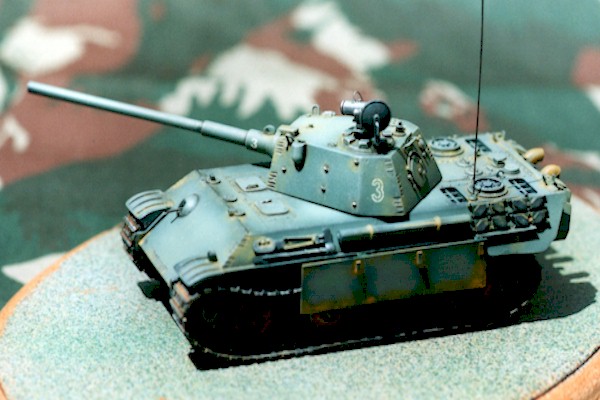
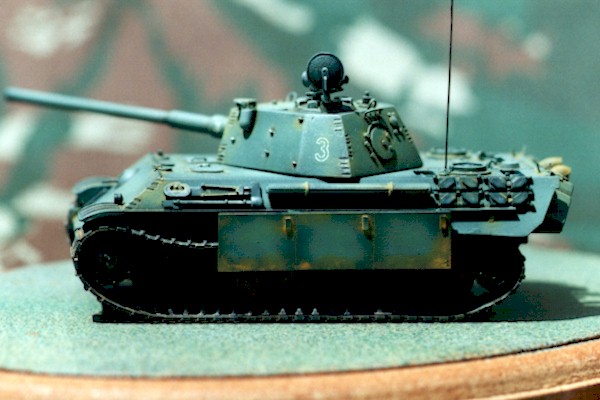
Panther II in 1/76 Scale by William Marshall
We in the IPMS Pretoria-Centurion club have as saying that goes something like this - "1/48 aircraft kits are made for those who can not airbrush 1/72 scale colour schemes". I would like to use and adapt this saying some-what for this article. It should now read "1/35 armour kits are for those who can not convert and build 1/72 or 1/76 scale kits". Take that and smoke it in your pipe ! I have always been a keen small scale armour modeller. Some of you may have seen my 1/76 scale Israeli M51 Sherman on HyperScale. I think my Merkava was also on the Internet in the IPMS/RSA website. This project started when I saw the article in Military In Scale (see references) and decided that this was the odd one out. Only one of these Panthers were built and it was to be an interim vehicle until the E50 project became available. This never happened as the end of the war came before the Panther II could be put into production. The only existing example is in the Patton Museum in the USA (with the wrong turret). The only existing example of the small turret was destroyed during gunnery practice in the UK (only they will know why?) This tank would look great with the 8.8cm gun, new suspension and small turret with plenty of detail added. I was also keen on the Infrared equipment as this would make it that much more special. OK so let's start, first to get a kit. Go from shop to shop. None on the market? Don't give up, as we should be able to convert an available kit. Which one? Wrong. Not one, but at least two, idiot, but which kits? The grin on my friend Piet's face is getting bigger by the day because I have put my foot into this one again. How come I always choose the most complicated and difficult project to do. Piet really enjoys this.
The magazine "Military in Scale", November 1998, has a very nice article in of the Panther II. This article supplied quite a lot of usable detail, and all in colour. The author, is seems, has got the rear engine deck of the Panther II wrong. He has used the version with the raised engine air intake. The Panther II, according to Tony Greenland's model and the Jentz drawings, has the flat version. This looked right to me. There was plenty of usable detail is available in the colour photographs.
The old Airfix magazines (Sept/Oct 1985) give good details with Part I supplying the suspension details. The author did not use his own references, his Panther II model has the incorrect suspension. The drawing of the exhaust system helped me a lot when doing mine. Part II has useful turret and gun details; I opted for the 8,8cm version. The engine deck drawing is given as similar to the plan of the Panther F, this seems suspect to me and until I see a photograph of the actual Panther II engine deck I will stay with the Greenland and Jentz option. The article also gives some detail of the E50. Available on the Internet is various articles of the Panther II. (See references at the end of this article) A very helpful drawing is available by Jentz showing the engine deck and suspension as similar to the version used by Greenland as mentioned earlier. That is why I have backed the Greenland horse. The Internet supplied all of the Infrared details with some great drawings of this equipment. Lastly the Tony Greenland book "Panzer Modelling Masterclass" supplied a lot of detail regarding the turret and hull. A great colour scheme is also shown, if only I could reproduce this scheme in 1/72 scale, what a winner!
After getting all the references together I decided that the best bet would be to start off with the 1/72 scale Hasegawa PzKpfw V Panther ausf G "steel wheel version" kit no MT 37:700. This would supply the bulk of the model as it had the correct type of roadwheels. I also made use of the Fujimi 1/76 scale Tiger II: German Heavy Tank kit no WA1, this kit will be used for some detail parts with the rest going into the spares box. This kit supplied me with a number of critical components for the project. (See Table 1 for a brake down of components).
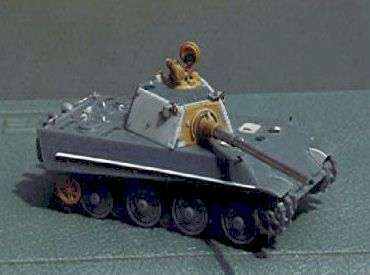
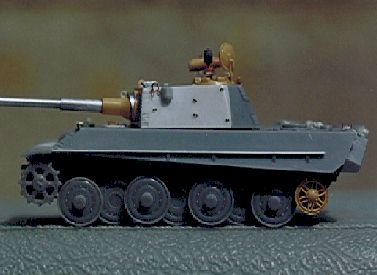
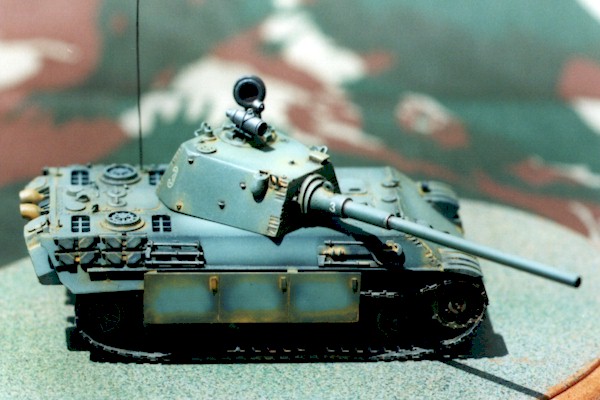
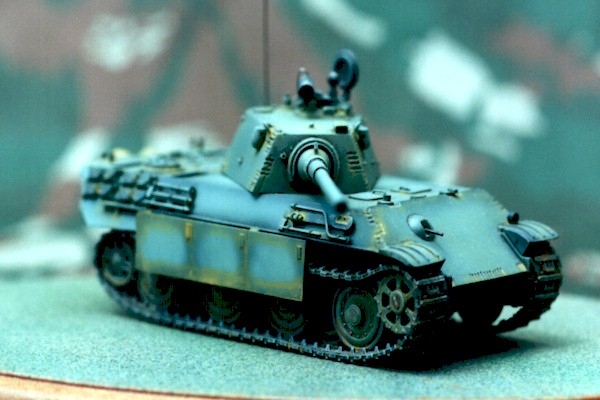
Turret Construction started with the turret. The commander's cupola was cut off and replaced by the Fujimi one. The Fujimi one replaced the front turret glacis plate, as this seemed to be the correct size. The turret sides were cut by means of a Dremel and repositioned to incorporate the front Fujimi glacis plate. Once the basic shape of the turret had been established detail work could now begin.
The gun mantlet from Fujimi could now be glued to the front turret glacis plate. I only used the shaped part, with the rest of the barrel being scratchbuilt from aluminium tube. This was all super glued and attached to the Fujimi mantle. A hoisting eye was added and the gun was complete. Aluminium plate from a shaving cream tube was used for the mantle cover and this was superglued to the glacis plate. The Frog-eye range finders were made from sprue and attached, to either side of the front turret, a small hole was drilled in front to reproduce the lens. The turret hoisting points were made from copper wire and attached with superglue. The rear escape hatch was made from styrene and attached. Joint and weld marks were made by engraving the turret with a Dremel tool using a sharp pointed dentist drill bit. Attachment hooks were made by drilling small holes into the sides if the turret and inserting bent copper wire. The Infrared equipment was made from small pieces of sprue, styrene strip and copper wire. An old 1/48-scale car headlamp, from the spares box, was used to make up the infrared light. Kristal Clear was used to complete the infra red lens.
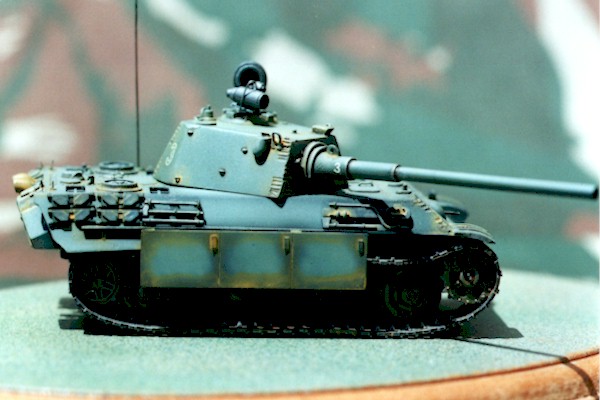
Hull The hull can be used as-is. I replaced the side skirt attachment rail with stryrene strip as this gave me the correct look in scale. Styrene card was used to close the gap between the front hull and the sand skirts.
The detail in front of the turret was removed by using the Dremel; this was necessary due to the kit having the barrel-locking clamp moulded onto the hull. All detail in this area was removed and replaced with styrene card hatches and engraved panel lines. The engine deck has the correct outlay and also the correct engine vents. Both are of the flat type. Small rear deck hooks were made from styrene and attached to the engine deck with MEK glue. The correct type of engine exhaust were made and attached to the hull. Small rear hatches were attached to the rear stowage bins. Fujimi towing hooks no 25 were attached to the bottom rear engine compartment.
Suspension
This is, were the fun and games are to start. The Panther II uses a unique combination of steel wheels, similar to the Tiger II. The difference being that it has a 4/3 combination with sprocket and return roller. The 4/3 combination starts off from the front with four wheels on the outside and three on the inside. I could only get this combination with the removal of each and every torsion bar attachment point. Deleting one and repositioning the torsion bar attachments. The return roller is one from the Fujimi kit. It has the correct look regarding size and construction. This is the most crucial part of the conversion as the look of the Panther II with the 4/3-combination roadwheels and return roller gives this tank the look it has, and makes it unique.
I started off by giving the complete model an undercoat of Humbrol 29 Grey. I then pre-shaded the model with black. I then used Testors Dark Green FS 34079 mixed with some white to lighten up the colour. The model was then coated with Future. Decals were then added. The wash that followed was Burnt Sienna. Some subtle metal drybrushing was also added to parts which would show areas of high wear and use.
I have not dealt with the history of the vehicle in any great depth as this is well documented in the reference material mentioned at the end of the article and should be available to most modellers.
The model was placed first in the IPMS Pretoria-Centurion Model of the Year competition (1999) for small-scale armour. It also came first for armour models at the South Africa Air Force open competition in November 1999. It just goes to show that with small-scale armour one can not only achieve something but also enjoy the journey.
Fujimi
Parts Used
[1] Greenland, Tony. Panzer Modelling Masterclass, Windrow & Green. [2] Murphy, John. Panther II, Military in Scale November 1998. [3] Barbic, Vasco. The Other Panthers Part 1 and 2, Airfix Magazine, September and October 1985. [4] Internet: Various sites with German armour. [5] My email for comments : mechinf@netactive.co.za
Model, Images and Article Copyright
© 2000 by William Marshall Back to HyperScale Main Page Back to Features Page |