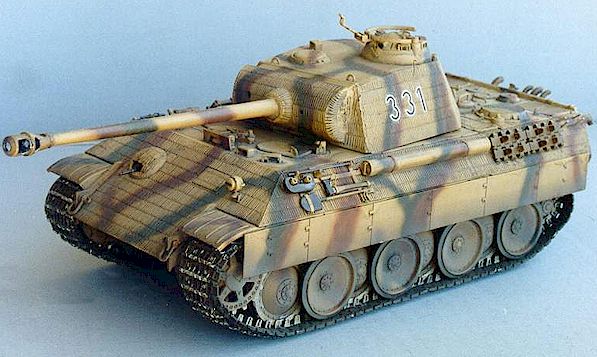
There have been a lot of nasty things said about Italeri’s 1/35 scale Panther Ausf. D
and Ausf. A, much of which is unjustified or plain wrong. Here are my conclusions after
comparing the kit to both Hillary Doyle’s and John Rule’s Drawings.
The frequent complaints are first. The answers I found are beneath them.
The Wheels are wrong on the D...
Well, yes and no. The Ausf D was initially fitted with 16 bolt rims. Due to frequent failures, these wheels were often reinforced with an additional 16 bolts. However, Ausf Ds were sometimes retrofitted with the "Ausf A" wheel which featured 24 bolts. If you really want 16 bolt rims, you can either buy the very accurate (but expensive) set from Model Kasten, or file all the bolts off and start again!.
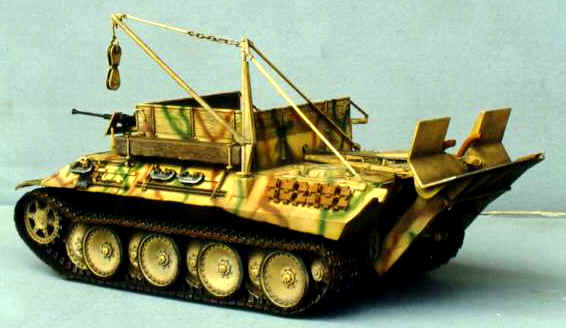
The biggest problems with the wheels on all the Italeri Panthers are that the rim between tyre and wheel is way too high and the tyre is slightly too wide or the wheel itself slightly undersize. Either way it looks slightly odd. On my Bergpanther, I used the spare standard Tamiya roadwheels left over from the Steel Wheel Panther. This makes one heck of a difference, but I’m not going to finish my remaining 4 Tamiya Steelwheels kits as Steelwheels, so I’ll be using the Italeri wheels on all future projects involving the Ausf D and A… The wheels are very slightly undersize, but not so far as to be noticeable.
The Turret is Wrong / In the Wrong Position / Too Large / Too Small on Both the Ausf A and D
The turret is about 2mm too short on both variant which, in my opinion, isn’t enough to be noticeable to the naked eye. Its centreline is right where it should be on the hull mountings, so it is positioned correctly. What is wrong with it is that it doesn’t sit right down flush on the hull and when it does, it then fouls the front hatches. It is an easy matter to cure the high sit by cutting the seat under the turret away with a razor saw (making sure you don’t slice off the vertical turret ring), then grinding away the seat moulded onto the upper hull, and finally shimming the tops of the vertical turret ring lugs with plastic card so it doesn’t wobble about and does stay in the seated position.
 |
|
|
You also have the choice of a couple of excellent replacement turrets from Aires and Chesapeake Model Designs, but you'll still have to remove the raised ring moulded onto the hull.
The turret fouls the drivers hatches on both the Ausf D and A, even if you modify it to sit flush on the hull
True and its not the turret at fault here. The hatch covers are way too large. If you turn one of them over, you’ll see some interior detail moulded on. Using that as a guide, cut the hatches back to within 1mm of the interior detail, then use a knife or file to open the hatch holes out so the hatches sit flush. Voila! The turret no longer fouls the hatches! On the Ausf D, there is a second alternative. The Ausf. D turret had the front corners cut away at the bottom edge, rather like a PzKpfW IV turret. When these corners are trimmed back the turret won’t fould the hatches, even if you do leave them oversize. There is also a third solution, which is to affix them in the open position and crew the vehicle…
The Gun Barrel is Too Short...
True, its about 4 - 5mm too short on both variants. It is noticeable if you park a D or an A beside one of the Tamiya G versions (and the Barrel on the Tamiya ones is about 2mm short as well !). The rearmost secton of the Italeri muzzle brake has a collar standing proud of the barrel. This must be filed or sanded down to match the height of the forward section. I’m lucky enough to have 3 spare Tamiya Ausf G barrels. The Italeri Panthers look the goods when the Tamiya barrel is adapted to the Italeri kits.
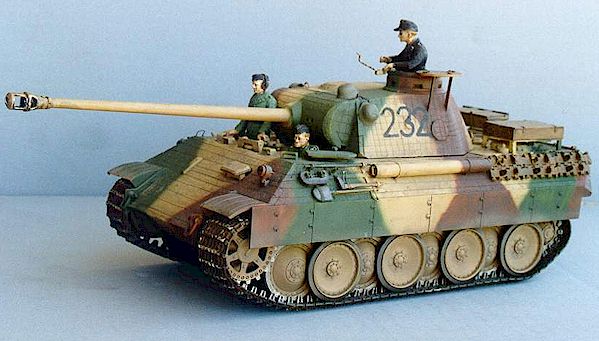
The Ausf A Looks "Chunky" if you use the Zimmerit in the Kit...
Well… it does and I don’t know why. As Cookie Sewell mentioned in his review, the kit is pretty accurate dimensionally if you use the zimmerit. My guess is that the zimmerit panels are too thick and the join line shows around hull and turret edges, creating the optical illusion that it is too wide. My cure for this was to fill the zimmerit join line on the hull and turret tops and rescribe it just in from the textured edge of the panels. It looks fine to me and I’m happy with it.
There are other niggles with both kits. My particular favourite is that MG hole in the gun mantle is in the correct place just above centre the on the Ausf. A zimmerited mantlet, yet on the unzimmeritted mantle, it is below centre. The hole is also below centre in the Ausf. D kit. It is an easy thing to rectify but why did Italeri not fix it for the Ausf D does not have the zimmerit option? Most of the Ausf As were zimmeritted, so in that kit I don’t see it as a major issue. The zimmerit itself is a bit too neat for my liking – most Panther zimmerit applications were fairly rough from what I have seen in photos.
Other annoyances for me about both kits include:
1) The Panther series (all marks) had a rather prominent mantle travel stop behind the top centre of the mantlet. It is there on the Tamiya kits and it is an easy matter to put it on the Italeri kits (a square cut from the evergreen 3mm strip does the job), but why couldn’t Italeri have done it themselves ?
2) On the Ausf A, Italeri have used a vertical slot in the glacis plate for the MG – even though its in a circular mount that should have had a square hole – again easy to rectify, but why ? I suppose it may be because the Ausf. A was the first kit released, and they may have been planning for the D.
3) Both versions should have vision blocks in the cupolas – especially the D, where the apertures for them are moulded in the fully open popsition. This can be simply rectified if you have a heap of Tamiya spares. The driver and MG gunners ‘scopes are also missing…
4) On all 3 versions (Ausf. D, Ausf. A and Bergpanther), the driver’s hatch cover fits flush with the glacis plate. It should sit slightly above and the sides should be angled inwards to the top. This effect may be acheived by gluing a rectangle of 2mm plastic card onto the cover and then filing the edges of the plastic card to shape before you affix the hatch cover…
5) The track crossbars could (should) have been wider, I’ve used Tamiya tracks (Elastic bands) from the G kits on all my Italeri Panthers except the first Ausf D, which I built straight from the box. The Tamiya tracks fit the Italeri drive sprockets perfectly and give the appearance a lift. (The Tamiya kits will all be finished with Tamiya’s seperately available individual links…). And, of course, the Ausf. D kit is supplied only with the later style of cleated track. Although this track was often retrofitted to Panther Ds, it would have been nice to see an accurate track pattern.
6) The centre engine deck panel, containing the engine access hatch was a fractionally "too wide" and needed judicious filing on its long sides to fit without a slight upward bend.
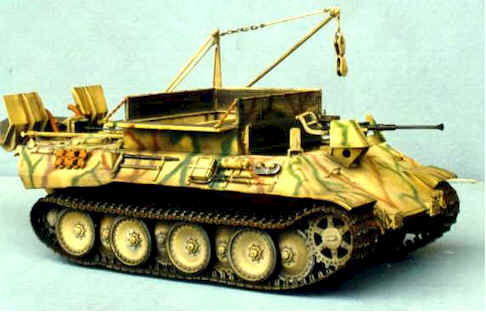
7) The muzzle brake on the 20mm supplied with the Bergpanther could be a bit longer and more gently tapered. It could always be replaced with a Tamiya 20mmm or simply don’t fit the 20mm. A lot of Bergpanthers didn’t carry the gun.
8) The covers for the turret side pistol ports on the Italeir Ausf. D are too domed and sit too high for my liking – fit and file them flat ! Not all D versions carried the rain gutters over them or the shell ejection port on the turret side either.
9) The Barrel cleaning tools tube is about 4mm too long outside the mounting racks. This means you have to remove 2mm off both ends before assembly; or use the Tamiya item as a replacement.
The Italeri kits do score over the Tamiya G’s in a couple of areas. Italeri supply the 6 small lifting hooks on the engine decks, as well as some attempt at engine bay detailing. They also provide blanking sections under the rectangular grills on the engine deck
If you (like me),have a problem getting the detail sets for the engine deck grilles, you may find (as I did), that the Tamiya Kingtiger sets are the answer. The circular grills fit perfectly on the Panthers, and the rectangular ones fit well once you cut the lugs almost flush on the ends of the Tamiya grilles.
 |
|
|
In my opinion, the kits are worth getting because at present they are the only injection moulded kits of these particular versions of the Panther on the market. There are rumours of an early model Panther coming from Tamiya, and it may materialise in the fullness of time. For the moment, though, the Italeri kits are the way to go - even if they are good examples of a "good ship ruined for a happ’orth of tar"…
Matthew Ward
Back to HyperScale Main Page
Back to Features Index