Home
| What's New |
Features |
Gallery |
Reviews |
Reference |
Forum |
Search
Home
| What's New |
Features |
Gallery |
Reviews |
Reference |
Forum |
Search
|
|
|
"Pokemon
Mobile" by John Chung
About two years ago the Japanese cartoon anime "Pokemon" invaded North America and was an immediate hit among large number of fans as it was in so many different places around the world. "Pokemon" is a story based around many different creatures called "Pokemon", or "Pocket Monsters" because they're usually stored in a pocket size ball called "Pokeball" when captured by a "pokemon trainer", people specialized in capturing and training pokemons for battle. There are a total of 151 different Pokemons like "Pikachu" (the main pokemon character of the story) "charmander"; "bulbasaur" and "Kangaskan" etc, although many are evolutionary stages of other as all of them evolve into different pokemon of their own specie a few times in their life in their life. Pokemons have special powers including "fire spin", "paralize", hydro blast" and "solar beam" etc. Originally released as TV series cartoon, "Pokemon" have since had comics, drawing books, board games, dolls...you name it! Interactive computer/TV games were (and still are) a big hit, very popular among many game freaks. "Pikachu N-64" system and "Pikachu iMAC computer" were specially made to look like Pikachu on the outside. "Pokemon Airplanes" of the Japanese airline carrier All Nippon Airways were very popular among tourists who are willing to pay extra money to get an all flight of pokemon flight with specialised pokemon material everywhere on board the plane, including washroom soaps and toilet papers!
About two years ago (as far as I know) Nintendo America decided to buy a couple dozen of VW New Beetle cars and have them converted to "Pokemon Mobiles" painted remarkably like the pokemon "Pikachu" for the sole purpose of driving around city streets as a means of promotion. What's unique about the car is its sharp appearance, a TV game system fitted to the back of the car so people can play Pokemon games, loads of pokemon promotion stuff in the car as well as its popularity among the general public everywhere it goes!
It was about a year ago when I first saw a picture of this car (I first thought it was probably some kind of "one of a kind" car, but I later learned that there were a LOT more) The picture fascinated me and I immediately wanted to make a model of this very car. Since I've already heard some pretty good things about the (back then) Tamiya's new 1/24 VW New Beetle model and wanted to do one, the base for the conversion is undoubtedly Tamiya's New Beetle kit . The main thing that had put me off for a while was the price of the kit as well as my frustration on just how to convert the kit into a acceptable model of the pokebug. About the end of July this year, for some unknown reason, I suddenly had the urge to build a model of the pokebug again. Faced with the decision of whether or not to spend that $32.99 on the kit had me thinking for a while before I made a final decision on buying the kit before the price goes up even more (it was 26.99).
I have already read a few different reviews on the kit when it first came out about an year ago so I had a pretty good idea of what I was buying before I opened the box. Upon opening the box you're faced with a beautifully moulded main body shell (cream yellow) two sprues (cream yellow and black), one chrome plated sprue, one clear sprue, one rubber sprue, a poly sprue, a sheet of pre-cut masking for the windows as well as one TINY (from an aircraft modeler's point of view) decal sheet. At first glance it looks like I was ripped off since just about all 1/72 aircraft models I have ever build had just about, if not more parts then this kit has to offer! but after close inspection one is stunned at the level of detail, the quality of moulding and the intricate engineering this kit has to offer, it looks like Tamiya had out-done it self once again! As one would expected from Tamiya, all parts are beautifully moulded and flash-free with no flow marks detectable. A number of sinkholes are evident but none are really visible once the model is finished. The clear part is just amazing and its REALLY clear. There are no engine bay detail like one would expect from a Monogram kit, but that does not make this kit any less amazing.
As with most car models, the model starts off with the wheel discs. I have previously sprayed all the parts call for semi-glass black the night before and painted all the other necessary colours to those parts, so building was pretty fast and straight forward the next day. One thing worth mentioning is while the Tamiya supplied clear part masking sheet looks quite ok when applied, it becomes very evidently over sized (about 2-3mm) width wise. It is not a big problem since it can be easily fixed with a fine brush and a little bit of paint. You'll also need to tuck down all sides of the masking sheet REAL TIGHT or the paint will flow under the masking and give you a real big mess!! (just don't ask me how I found this out) The parts fits together surprisingly well and the only place I had to go back and do more touch up on was gluing the disc and the shock piece together, because I had previously put too little glue on for the fear of gluing the poly tubes that goes in between which allows the wheel to turn to be glued in as well. Construction goes very smoothly. In fact, it was so smooth, that I finished the entire chassis in less then three hours! thank to the superb engineering by Tamiya who moulded this area with as little parts as possible while not decreasing even a slight bit in the level of detail all around. The interior of the car are build per kit instruction, with a slight exception on part A3, the passenger cabin tub piece. The upper all around edge of the part call for the body colour, but I have painted this with semi-gloss black instead as all photos of the Pokebug I have seen seems to support this point. One complaint I do have about this kit is the lack of decal or some kind of dry transfer which prevented it to show off all the superbly moulded dials and knobs under the dash board! The passenger cabin was finished without problem and was glued on to the chassis.
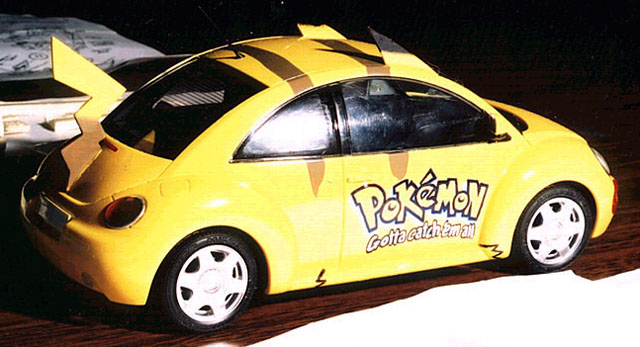
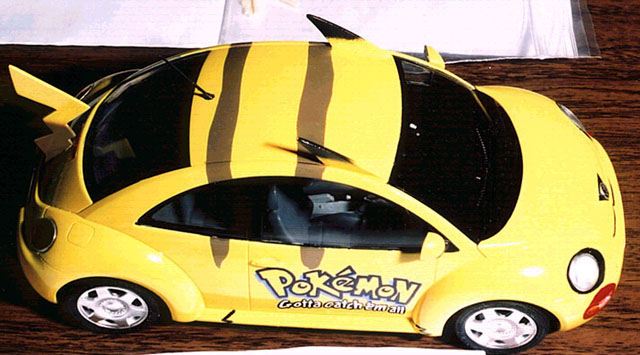
There aren't many differences between the original VW New Beetle body and the Pokebug body. The most noticeable is the addition of the two ears on the roof and the tail at the back.
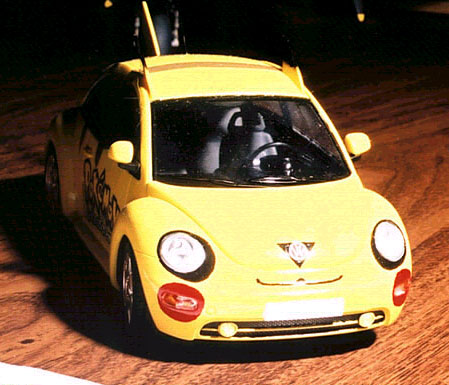
The pokebug was painted to mimic the appearance of the pokemon "Pikachu". The car had an over all yellow finish with two stripes over the top as well as well as the base of the tail in medium brown. The ear had its top half in black, the "hands" and "feet" were painted on zigzags on the bumpers under the door on both sides. The head of the car were uniquely painted to simulate the face of "Pikachu" with black paint around the headlights as eyes, a triangle painted in black around the VW logo simulating the nose, an oval shape painted in red around the signalling lights as cheeks and a slightly curved line just above the licence plate as mouth. The body and the rear view mirror parts were first sprayed with about four coats of Tamiya acrylic lemon yellow mixed with 15-20% of white to tone it down a bit. This was left overnight to dry. The next day the brown strips on the top of the car as well as the base of the tail (the brown had an soft-edge on the tail where it splits with the yellow on the top therefore it was not completely masked) were taped over with Tamiya masking tape and sprayed with Tamiya Kaki mixed with about 25-30% white. I then masked the face where appropriate (namely the "nose" and the "eyes" and sprayed glossed black along with the top half of the ears (the ear also call for an soft edge therefore I also did not mask it). I realised afterward that I forgot to mask the top of the car while doing this therefore a few black dots got onto the roof but its not really noticeable) After the black the "cheeks" were masked and sprayed red. The mouth was drawn on afterward with a thin paint brush. All of these were left dry overnight once again before the decals were applied.
Since before I started this project I have been undecided about just how am I going to be able to paint the Pokemon Logo sign on the door. Hand draw them on at the end was just way too risky and the idea was dropped right away, this left room for only one other option - decals. The original idea was to get someone to custom print them for me as there were a few companies as well as fellow modelers over the net who were doing these kind of stuff, but after failing to find anyone who is able to do it for me in time, I then decided to try and paint them on to a clear decal film my self. This was very difficult since even trying to draw just two decals as identical as possible was hard enough, I have to draw them to look like the real ones and in-scale! I have never done this kind of thing before so it took a while before I made up my mind on just what I was going to do.
I was lucky enough to be able to find a picture of a pokebug taken almost straight on from the left, this allows me to use it as a scale template of the logo art. I first scale up the photo to as close as I can get to 1/24 scale by the method of trial and error. When I got the proportion right, I then printed off a copy and cut off the door section. I then test fitted the picture to the kit door. After making sure they're about the right size, I then have a perfect template of just how big I'm supposed to make the logo!! I took some overhead clear sheets and taped it over the sheet of paper I printed off and traced over the logo with a fine black marker. After that was done I carefully trimmed the logo out as accurately and precisely as possible - right down to the edge of the marker line. I then took the logo cut out from the overhead film, placed it over a clear decal film and lightly traced it around the edge with a pencil, just enough to let me see where the imprint of the edges were and everything. I then, with a REAL fine brush and a really steady hand (this is where all those detail cockpit painting finally pays off!!!) I painted the logo on with Tamiya, Gunze and Aeromaster acrylics (no specific reason for the different brands, I just happen to have all the colours I needed in different brands!!). I took me about an average of an hour just to do one logo, but the result was well worth it and looks better then I originally anticipated. I had only made one copy of the logo decal at first just to see how it work out and everything. I then took a piece of sheet styrene, sprayed it with yellow and placed the test decal on. The decal went on with only a slight trouble due to the very thin film, but I knew I had my decal! In the end I managed to make three copies of the logo with one as a backup. The decal went on so well in the end that the need to use the back up decal never came into my mind. This was a surprise to me since the test decal performed somewhat differently while applying. The other decals were kit-supplied. I applied the ones for the dash board and the wheel hub as well as a few others. The hub decal were destroyed during handling right after it was applied with decal solution so I had to take them off, which gives the wheel hub a slight naked feel, but it looks ok. I gave the entire body a coat of Gunze Clear afterwards and were left to dry.
While waiting for the clear coat to dry, all subsequent final assembly parts were painted according to the instructions. All the light pieces were paints with different shades of clear red and orange, and the black part of the rear-view mirror where painted also. After the body were dry, the windshields were glued to the body. The fit here is a bit tricky, and because I don't have much experience in doing this, I managed to get a little bit of glue onto the clear pieces which I still regret up till this very day. The lights and rear view mirrors were installed and so were the antennas and windshield wipers and a few other little parts here and there. The mirrors were made out of tin foil in favour of the kit-supplied part which in no means look reflective at all. At last, the Pokebug model is finally finished!
This was a easy and relaxing built with a fair amount of scratch building in it to satisfy the "never-make-out-of-box-model" modelers. The entire project took only less then a week to complete (!) and really stands out in my collection of aircraft models. I recommend intermediate to advanced modelers with at lease some experience in scratch building to try this conversion, and I would certainly recommend the Tamiya VW New Beetle to modelers who just want to build a nice little kit of the car. Until then, happy modeling to all. Model, Text and Images Copyright © 2000 by John
Chung
|
 First
the kit part A9 (engine hood) and A10 (trunk door) were glued on with no
fit problems at all. The only thing I did was apply a bit of surface 500
between the aft end of the engine hood where it meets the vertical strut
as the gap between them looks slightly too big to me.
First
the kit part A9 (engine hood) and A10 (trunk door) were glued on with no
fit problems at all. The only thing I did was apply a bit of surface 500
between the aft end of the engine hood where it meets the vertical strut
as the gap between them looks slightly too big to me.