|
Panzer IV Ausf. H |
Panzer
IV Ausf. H
by Ian Wright
photographs by Richard
Chafer
|
Panzer IV Ausf. H |
| B a c k g r o u n d |
 There are times in a modeler's life when
one decides to build something different and expand on his/her skills.
There are times in a modeler's life when
one decides to build something different and expand on his/her skills.
Despite principally modelling aircraft, I decided to enter unfamiliar territory and build a 1/72 scale tank. I received plenty of assistance from my armour modeler club mates, and learnt some of the techniques that they use. They also helped in my research of the Panzer IV and armour in general.
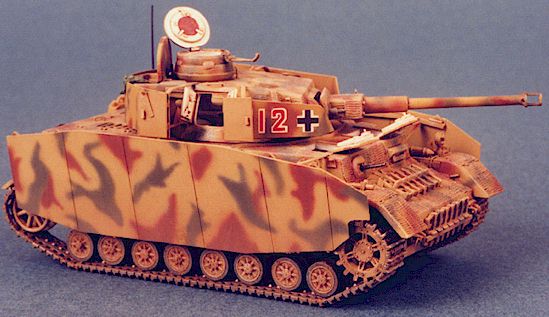
The particular vehicle I wanted to make was based on a photo on page 45 of "Panzer
IV" by Squadron Signal, showing an "H" model Panzer IV undergoing
maintenance. The vehicle numbers applied to the model associate it to the platoon of
vehicles in the photo. As usual, after deciding what I wanted to make, I discovered that
the only kit available in the local hobby shops was an "F" model Panzer IV
(ausf.F). Now the project was going to involve conversion work too!
Photos of similar Panzer IV's were used to locate any details not apparent in this photo,
i.e. extent of zimmerit coating, or markings. This reference also allowed a degree of
flexibility on the attachment of stores.
| I n t h e B o x |
The kit used is an Esci 1/72nd scale Panzer IV Ausf. F and is molded in a beige colour.
The kit goes together with no difficulties, but the upper hull seems to be 1mm shorter
than the assembled lower hull section. The gun barrel/muzzle was also deformed in my
sample. The length and link tracks are fiddly in this scale, but the resulting effect is
pleasing.
| C o n s t r u c t i o n |
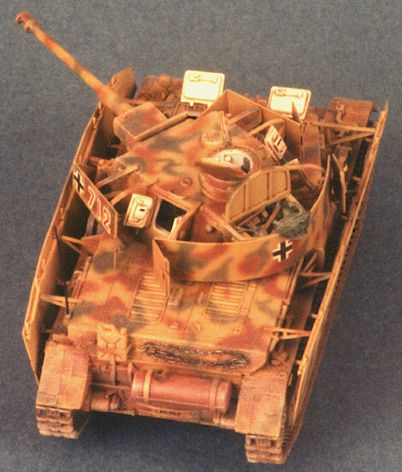
 The interior of the tank is completely built from
scratch. So that this work was visible, all available hatches were left open. This meant
opening up the sides of the turret and creating the doors for these hatches. The details
for the interior and the rest of the vehicle were mostly made with plastic strip, rod and
card. Where necessary this was carved into the required shape. NO after market items were
used!
The interior of the tank is completely built from
scratch. So that this work was visible, all available hatches were left open. This meant
opening up the sides of the turret and creating the doors for these hatches. The details
for the interior and the rest of the vehicle were mostly made with plastic strip, rod and
card. Where necessary this was carved into the required shape. NO after market items were
used!
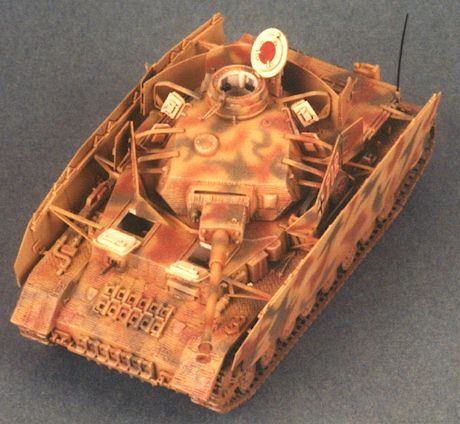
Most moulded detail on the kit was removed and replaced with scratchbuilt alternatives.
The moulded details on the track guard remained as per kit, with some extra detailing
added. The exact detailing work performed is too numerous to list, but include handles,
straps brackets, springs, etc.
One of the features of the detailing work involved cutting open the turret bin, which
then required a lid and contents. The lower hull shape was also modified and most of the
kit items to be attached to the hull (excluding the running gear) were replaced. A mount
for the turret cupola gun was also made.
The work required to convert the tank involved the scratch building of
the following items.
- Auxiliary exhaust system.
- double barrel air filter for the right hand guard.
- An aerial trough and mounting point.
- side skirts and braces.
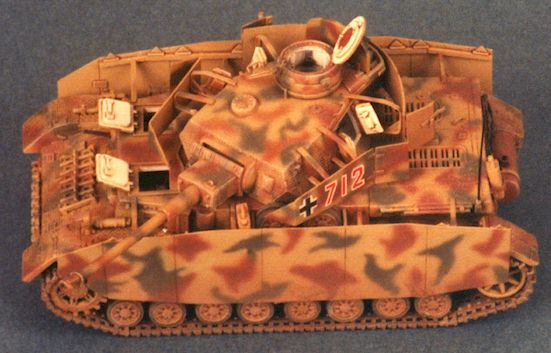
One feature of the tank which provided the greatest challenge in this scale was the
application of zimmerit. From discussions in the club, I decided to use Milliput and a
stamp. The stamp was made from the side of a 'singles' CD cover. After a quick test, the
application of the zimmerit did not present any big problems.
| P a i n t i n g a n d D e c a l s |
The value of talking to fellow modelers was proven again when Richard Chafer (featured on
this site) provided some introductory lessons on the art of tightly defined airbrushing.
Consequently I was able to paint the tank's camouflage after a short period of practicing.
The paint used was Tamiya Dark Yellow, and Red Brown. Gunze Sangyo paint was used for the
green.
The decaling process is remarkably short thanks to the scarcity of markings (unlike
most aircraft). Decals were scrounged from the spares boxes of a number of club members.
The Micro Sol/Set solutions were used to snug the decals down.
| C o m p l e t i o n |
After matt varnishing the decals the weathering process was next. This consisted of
applying "mud" to the tracks. A very diluted earth colour was then discretely
sprayed over parts of the model, with the depth of colour being built up by repeated
applications. An oil paint wash was then applied, followed by dry brushing.
The sub-components were now joined to complete the model.
This model taught me many new skills and improved the ones I already had. I therefore
feel that the exercise was a success, even if a number of 1/35 scale armour modelers make
cynical comments while shaking there heads in disbelief!
This model did however inspire me to make a 1/72 scale Ausf N model Panzer III which
involved even more work!
| R e f e r e n c e s |
"Pzkpfw IV in action" by Bruce Culver
Armour Number 12
Squadron/Signal publications
ISBN 0-89747-045-1
"The Panzerkampfwagen IV" by Bryan Perrett
Vanguard 18
Oseprey Publishing Ltd
ISBN 0-85045-371-2
Model and Text Copyright 1998 by Ian Wright
Photographs Copyright 1998 by Richard Chafer
Visit Track-Link for the best of
Armour Modelling.
Page Created 30 May 1998
Last updated 26 July 2007
Back to HyperScale Main Page
Back to Feature Articles