Home
| What's New |
Features |
Gallery |
Reviews |
Reference |
Forum |
Search
Home
| What's New |
Features |
Gallery |
Reviews |
Reference |
Forum |
Search
|
|
Modelling
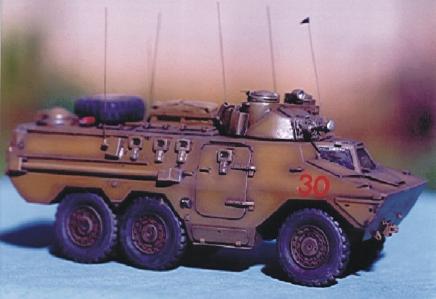
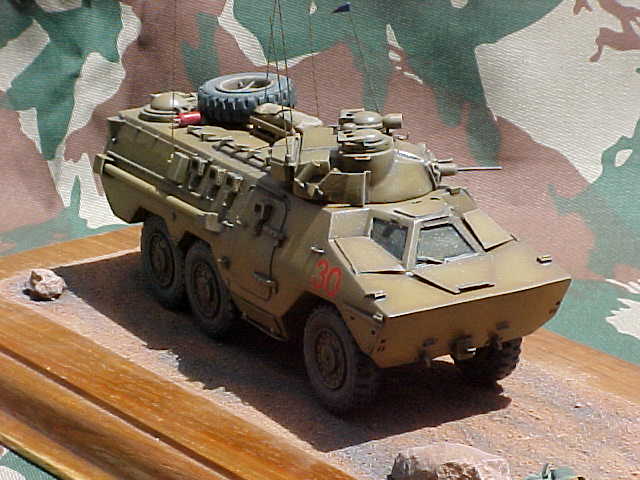
The South African by William S. Marshall
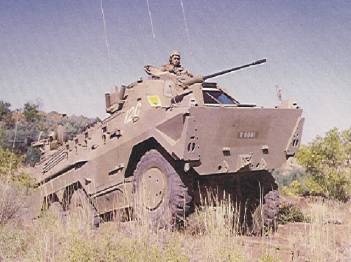
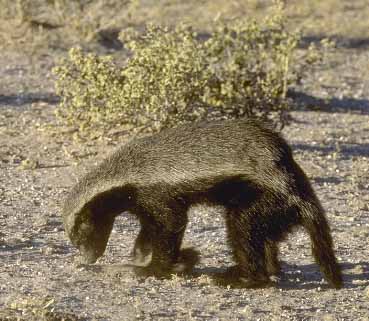
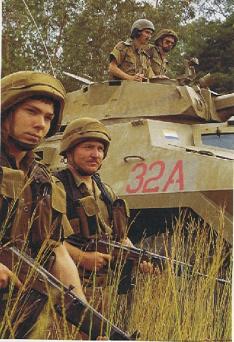
Ratel
is the Afrikaans name for the Honey Badger, a small aggressive African animal
that does not seem to know the word fear, and which is capable of absorbing a
great deal of injury and still continue fighting. The
Ratel Infantry Combat Vehicle (ICV) was designed to meet the requirement of
the SA Infantry Corps in the mechanised role. The vehicle was also adopted for
use by the SA Armoured Corps in the anti-tank role. The
Ratel replaced the British-supplied Saracen 6X6 armoured personnel carrier as
the Mechanised Infantry's main means of transport. It is classified as a
Infantry Combat Vehicle (ICV). Infantry can fight from inside the vehicle by
using the firing ports or be dismounted on or near their objective. The
vehicle was designed for use in Africa and is equipped with wheels rather than
tracks for mobility and reliability over long distances. The Ratel is expected
to cover 80000 km before major repairs are needed. Design work on the Ratel started in 1968 with the first prototypes being completed in 1974 and the first production series vehicles being delivered in 1976. The Mk II entered service in 1979 and the improved version, the Mk III, was already in production in 1988.
The
Ratel was developed into the following variants:
a. Ratel
20mm ICV.
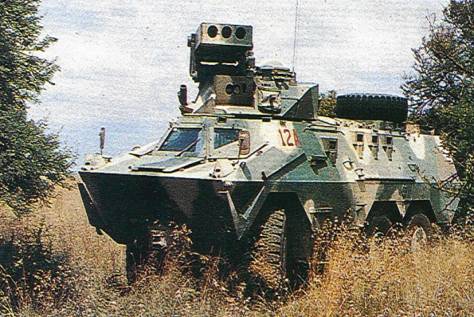
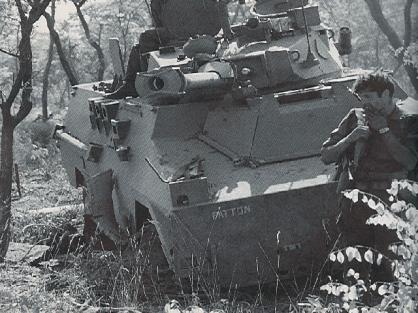
The
Ratel ZT-3 127mm anti-tank (Photo: Armscor)
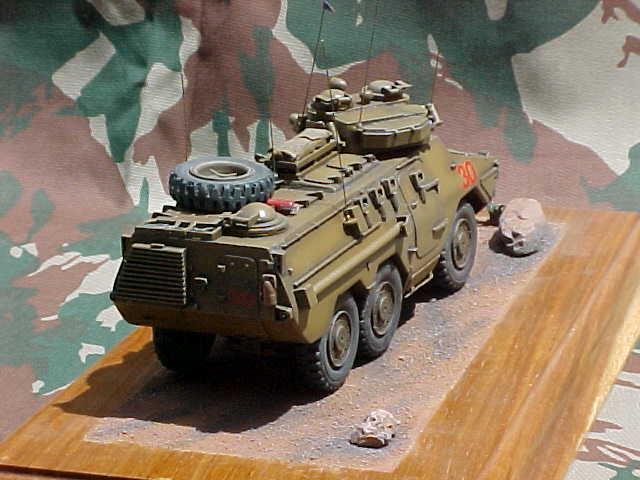
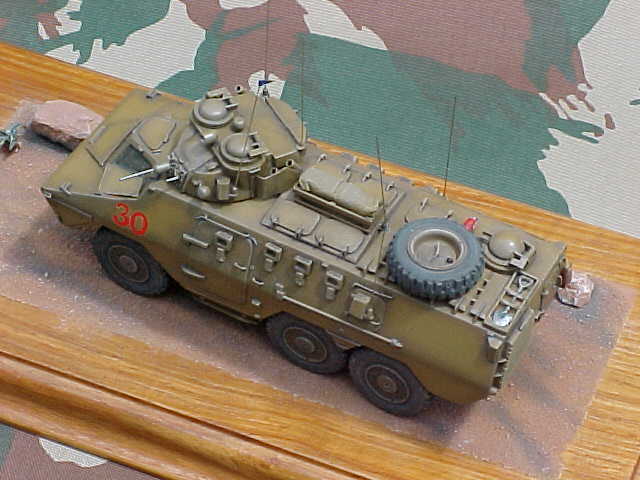
The Ratel is based on an armoured hull provides protection against landmines, small arms fire (7,62mm) and artillery shrapnel. The front glacis plate provides protection against 12,7mm armoured piercing projectiles. The driver is seated centrally in front of the turret and front wheels. The turret may differ depending on the type of vehicle. It is generally accepted that the gunner fills the right hand seat and the commander the left seat of the turret. The main fighting compartment houses a infantry section consisting of six to eight men. Access to the main compartment is through two pneumatically operated doors on the side of the vehicle. The vehicle also has a small rear hatch which is connected to the main compartment by means of a small tunnel. In the tunnel is a dome-type hatch in the hull roof fitted with a anti-aircraft machine-gun mounting. The 282hp diesel engine is located in the left rear of the hull with access through the top hull engine hatches. The Ratel has a fuel capacity of 430 litres of diesel giving a range of about 1000km at 90kph on normal roads. The
vehicle also has 100 litres of fresh drinking water for the crew.
Communications is via VHF radio (between vehicles) and HF radio (for longer
distances) with EW secure and frequency hopping capabilities. Internally the
communications is done via the intercom between the crew. The vehicle also has
an audio-speaker in the crew compartment for the infantrymen to follow all
communications.
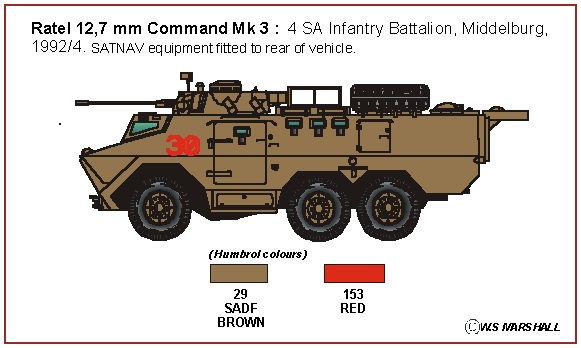
All Ratels were delivered in SADF brown. Number plates were in two colours. The early R-number plates being in black with white numbers and the later M-type plates being in yellow with black numbers.
No
specific guidelines were followed regarding markings, where they were to be
applied, sizes and colours. Units seemed to use their own initiative. The only known Ratels to be camouflaged were those of the anti-tank platoon of 32 Battalion (Ratel 90) during the SWA/Namibia war. These were camouflaged to test paint and colours for the Rooikat armoured car, G5 and G6 artillery systems. It is of interest to notice that these Ratels also had red callsigns.
The
full time units mainly added their unit flashes or emblems on the front
armoured plate to the right of the drivers window. Units that did this are 1
SAI and 4 SAI. 61 Mech added their emblem to the left of the window. Part
time formations like 7 Division added their formation emblem to the right
front glacis plate and their unit emblem to the left side Tactical
emblems were also added to vehicles from time to time. During
exercises at the Army Battle School it is known that abbreviated unit names
were added to vehicles above the front wheel arch. Examples like RWP (Regiment
Western Province) and RNT (Regiment Northern Transvaal) do exist. Company
(sub-unit) emblems were added to 1 SAI Bn vehicles to the right
front armoured plate next to the drivers window. These were in the form
of animal silhouettes : Buffalo, Rhino and a Garfield cat being used. A
Ratel logistics vehicles was developed up to the prototype stage with the
result that no callsigns was added to this vehicles. Two versions were built.
The first being a flatbed containerised cargo type of vehicle and the second a
technical type for the transportation of containerised engine and transmission
components. Both vehicles were equipped with a hoist to load and unload the
equipment. The R-number of the cargo vehicle was R37374 in the black and white
style.
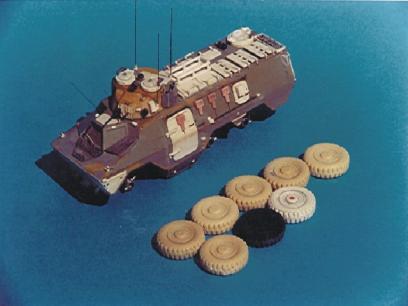
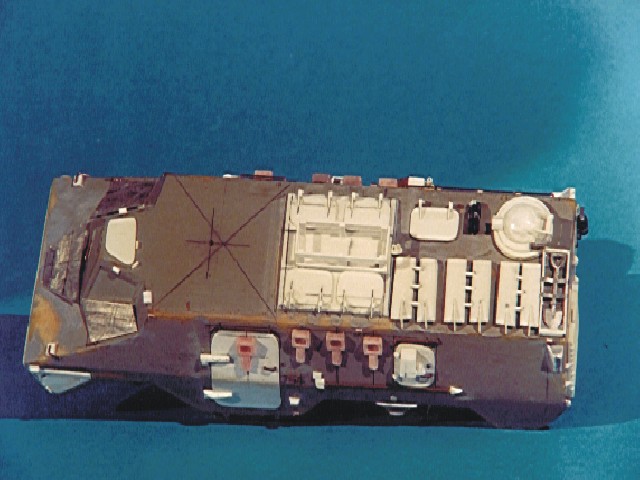
Looking
at the model I decided on the following basic components: the hull, the turret
and the seven wheels. The hull would be usable if a sanded off all details and
replaced them with scratchbuilt items. The turret would also need detailing
and the replacement of all items. The wheels were of a poor quality and needed
replacing together with the suspension. Once
the basic outlay had been decided on I could start with the modelling. THE
HULL All
details were ground off, gaps filled and the millions of air bubbles (resin
kit) filled and sanded smooth. Now details could be added.
All
hatches and doors were represented with plastic card glued with superglue to
the hull after marking out their position. The main door hinges were made from
plastic strip and attached to the hull doors with superglue. Small holes were
drilled into the hinges to represent the attachment bolts in their counter
sunk holes. A
single gunport was made from plastic card and castings in dental acrylic were
made and added to the hull. Various
foot and hand grips were added from thin copper electrical wire, these were
inserted into holes drilled into the hull. The
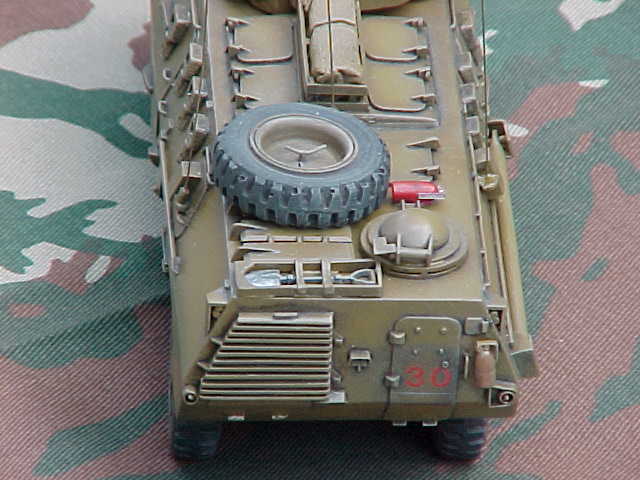
rear engine louvers were made from plastic card and added to the rear of the
hull. The
engine exhaust was made from aluminium plate and attached to the rear of the
vehicle. The
top engine access hatches were made from plastic strip and attached to the
hull with superglue. I
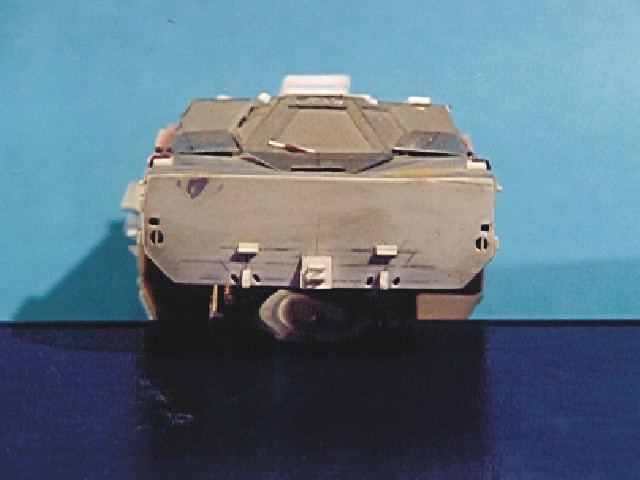
replaced the front glacis plate with plastic card as I needed to attach the
front towing hooks and eyes to the glacis plate, this could then be done with
MEK. The
rear hull anti-aircraft hatch was scratchbuilt from some circles of plastic
card and a piece of clear acrylic rod turned on the lathe to form the dome of
the hatch. The
front drivers window armoured hatches were scratchbuilt from thin aluminium
plate cut to the correct profile and size. This was attached with superglue. The
towbar was scratchbuilt using some aluminium tubing flattened on the both
ends. The stowage housing was superglued to the right rear side of the model
and the towbar inserted. Various
small details were scratchbuilt and attached to the vehicle,
these include: the rear external radio connector box, the two fire
extinguishers, the rear top
bracket for the pioneer tools and shovel and the rear lights and convoy light
housings. The
camouflage net container behind the turret was built using some plastic strip
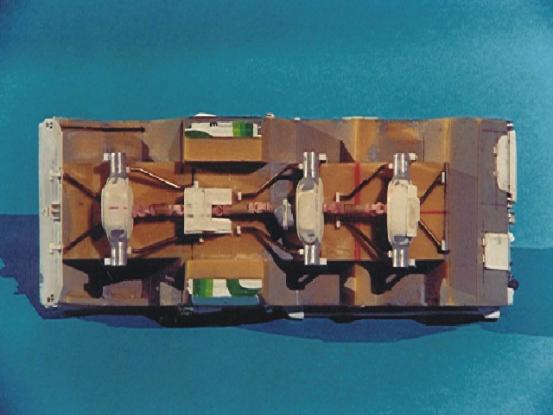
and attached to the hull. Suspension I
spent one Saturday morning crawling under my own vehicle, this had a three
fold objective; to see if my driver had done his first parade inspection and
service, to check my own vehicles suspension for any damage and to gather
first hand information for my modelling project. The
suspension consists of the gearbox and transfer case which supplies the power
to the wheels by means of eight universal joints and drive shafts. Anti-roll
stabilisers are connected to the axials and are bolted to the hull, two for
each axial. These would all have to be scratchbuilt. I made them using brass
rod bent and cut to the correct length. The
gearbox protrudes through the hull approximately inline with the two main
doors, it is protected by an armoured box. The gearbox is attached to the
wheels by a shaft and a series of universal joints. I
scratchbuilt the gearbox and transfer case from plastic card and attached it
to the model with superglue. One universal joint was made from sprue and
dental acrylic castings were made for the other seven. These were attached to
sprue to represent the shafts. Anti-roll stabilisers were made from brass rod
and superglued to the hull. The main axials were made from aluminium tube with brass rod and attached to the hull, the anti-roll stabilisers were attached to the shafts and the hull as mentioned. This completed the suspension details.
The
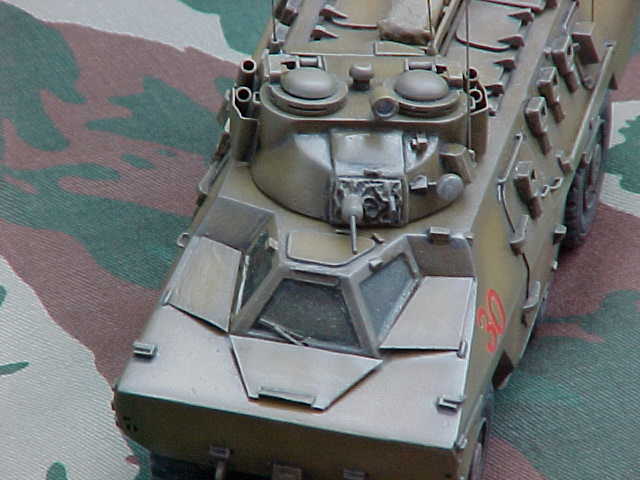
suspension details (Photo: the author) Turret The
Ratel command uses a 12,7mm Browning Machine Gun as its primary weapon and a
7,62mm Browning as its secondary weapon, this configuration makes place inside
the turret for the commander with all his maps and radios and paraphernalia. The
Aerographics turret is correct in shape and outline so I removed all details
and replaced them with my own scratchbuilt details. I
started off with the machine guns, these were made from surgical needles cut
to the correct length and inserted into a piece of plastic sprue sanded to the
correct profile and length. Once
the guns were glues to the turret I sculpted the gun cover with some epoxy
putty and textured the cover by adding creases and a rough texture to the
material. Turret
access hatches were made in the already mentioned way, using clear acrylic rod
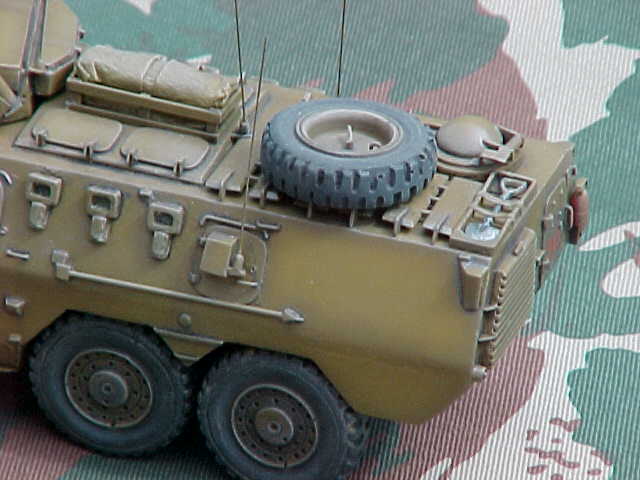
turned on a lathe and detailed with some plastic card. The smoke dischargers were made from aluminium tube cut to the correct length and attached to a plastic strip mounting bracket. I added the protection plates that cover the smoke dischargers by cutting some thin aluminium sheet from a shaving cream tube. These were then bent to the correct profile and attached with superglue.
The
turret details after painting (Photo: the author) The
two turret search lights were made using sprue drilled out to the correct
diameter and attached to mounting brackets. Antenna
were made from steel fishing wire attached to plastic mountings, these were
then superglued to the turret. The commanders rough aiming device was made from thin aluminium sheet cut to the correct size and attached with superglue. The
turret extraction fan was made from sprue and strip and added between the two
turret hatches. Wheels The
Ratel has seven wheels which I needed to scratchbuild. This was the most
difficult part of the model. After a couple of attempts I finally got one
which was acceptable to me from which I could make copies. The
process of making the wheel started with a number of pieces of plastic card
being glued together to form a lamination. This was then cut to a rough cycle.
The piece was then placed on the lathe and turned unto a disk. The rim detail
was then turned. The wheel was cut to the correct shape. I made the tyre part
about 1mm smaller than needed as I was still wanted to add thread to the tyre
part. I then cut a piece of plastic card with a hole and inserted the wheel
into this piece of plastic card., this formed the centre guide for the tyre
thread and divided the wheel into a left and right section.. This piece of
plastic was then glued and trimmed on the lathe to make up for the lost
thread. I then cut small diamond shaped pieces of plastic card and attached
this to the entire tire running surface on both sides to represent the thread.
I then put the wheel into the lathe and sanded al detail to achieve a
even surface. This worked quite well and I was happy with the results. I
then decided to make copy the wheel. I added some black tint to the resin
thinking that this would represent the tyre the best. I did not like the
results as the tyre was too shinny. I then cast he rest of the wheels in the
normal buff colours resin. One
wheel was then placed on the lathe and the rim hollowed out to form the back
of the wheel this would then serve as the spare wheel on top of the hull. I
added the locking device for the spare from plastic and thin copper wire. The
rims were painted in the SADF brown and the tyres in dark grey.
ICV
: Infantry
Combat Vehicle.
HF: High Frequency FSV
: Fire
Support Vehicle.
VHF: Very High Frequency SAI
: South
African Infantry.
EW: Electronic Warfare BN
: Battalion.
RNT:
Regt Northern Transvaal MECH
: Mechanised
RWP : Regt Western Province OPS
: Operation
SSB:
Special Service Battalion
[1]
Römer Heitman, Helmoet : War in
Angola, The Final Phase. [2]
War Machine, Issue 58: Orbis Publication. [3]
Römer Heitman, Helmoet. South
African Arms and Armour. [4]
Military Modelling July 1990 : Argus Specialist Publications. [5]
Steenkamp Willem : South
Africa's Border War 1966 - 1989. [6]
Stiff Peter : Nine Days of War.
[1]
The Author. [2]
Salut Magazine (SANDF): with permission. ©
W.S Marshall, IPMS Pretoria-Centurion, South Africa.
Click the thumbnail to view the
image full size.
Model, Text and Images Copyright © 2000 by William
S. Marshall
|