Home
| What's New |
Features |
Gallery |
Reviews |
Reference |
Forum |
Search
Home
| What's New |
Features |
Gallery |
Reviews |
Reference |
Forum |
Search
|
|
|
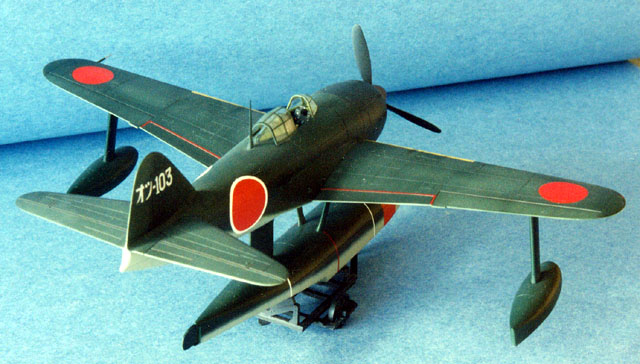
Kawanishi Rex by Rick Marshall
The floatplane fighter was born to fill the gap that the Japanese saw between the time that an invasion commenced and an airfield could be built. The purpose of the floatplane fighter was to provide defense to the invasion force and close air support. In 1940 the Japanese Navy contracted Kawanishi to build a high performance floatplane fighter. This aircraft was known as the 15 Shi Floatplane fighter. Kawanishi built the aircraft as an all-metal midwing aircraft with a single centerline float. The aircraft was to be powered by the Mitsubishi Kasei Radial engine. At one time a counter-rotating propeller was planned to counter act the torque from the engine, this would have made its water manners better and takeoffs much easier, however the counter rotating propellers were dropped.
The Aircraft first few in late 1943 and did not play an important role in the war effort. With a top speed in the order of 280 mph it most likely would not have faired well against Hellcats or Corsairs.
I had no intention of buying this kit. However, my 3-year-old son would not leave the Hobby Shop without the "funny airplane with the upside down skis". Ain't youth grand? So this is his model and he just let me build it. As with other Tamiya kits this one looked good in the box and appeared to have no flaws in any of the parts or sprues. The clear parts are quite clear, distortion free and thin. The decals looked to be on register but appeared thick.
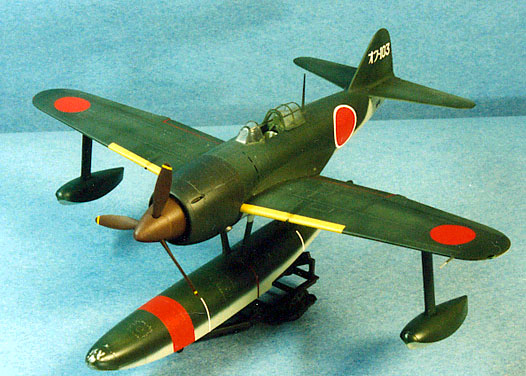
I painted the floats prior to installation on the model. This made painting and weathering the undersides much easier. The kit's decals would not settle in for me at all. Micro Sol had very little effect. I wound up using Solvaset and this did the job. I was not too happy with the decals and would recommend using after market decals. The next time I build a Japanese kit I think I will paint the markings on. For weathering I used a soft lead pencil to highlight the panel lines. Oil washes were used to simulate oil stains and pastels made up the gun and exhaust stains. Paint chips are a mixture of silver pencil crayon and scraping off the top colour to expose the Metalizer.
To further weather the float I used Micromesh polishing cloths to thin the paint on the top and underside of the main float, this very lightly exposed the Metalizer and made the paint look worn though. The effect is subtle and is difficult to pick up from a distance, but the closer you look the more apparent the thinned paint becomes.
This is a nice easy model to build and it was fun to weather. This is the first time I have undercoated a model with silver and chipped the paint. It was also the first time I thinned/sanded the paint to simulate worn paint. Both worked well and were not difficult to do. I would recommend this model to anyone.
Text and Images Copyright © 2000 by Rick
Marshall
|
 The
instructions were easy to follow and well laid out. Everything fit and I
had no problems with the construction. The only flaw that I found was on
the bottom of the left wing where the pitot tube attached. The hole for
the pitot tube extended well into the wing which would have resulted in
some touch up if not installed and filled prior to painting, so I decided
to glue it on early and risk breaking it.
The
instructions were easy to follow and well laid out. Everything fit and I
had no problems with the construction. The only flaw that I found was on
the bottom of the left wing where the pitot tube attached. The hole for
the pitot tube extended well into the wing which would have resulted in
some touch up if not installed and filled prior to painting, so I decided
to glue it on early and risk breaking it.
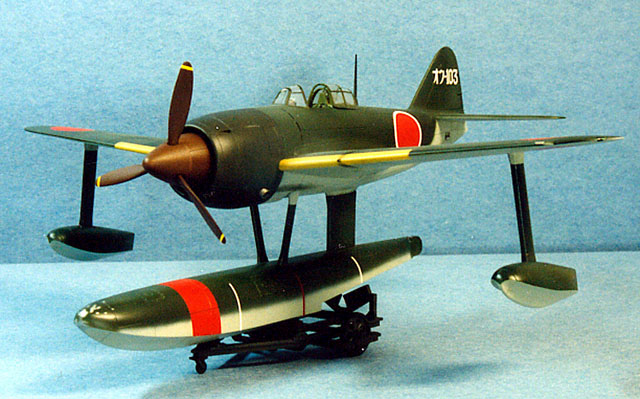
 Construction
was so straightforward that I spent some extra time thinking of ways to
weather the model. From my own time flying floatplanes I know that the
tops and bottoms take a real beating, so I painted the main float with
Metalizer, and then covered it with Tamiya J.N. grey on the bottom and
sides followed by Tamiya Green on the upper surfaces.
Construction
was so straightforward that I spent some extra time thinking of ways to
weather the model. From my own time flying floatplanes I know that the
tops and bottoms take a real beating, so I painted the main float with
Metalizer, and then covered it with Tamiya J.N. grey on the bottom and
sides followed by Tamiya Green on the upper surfaces.