|
P-51
"Roto Finish" Racer
by
Alex Bernardo
|
|
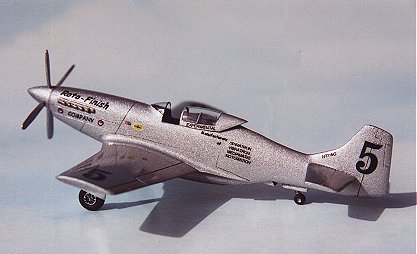
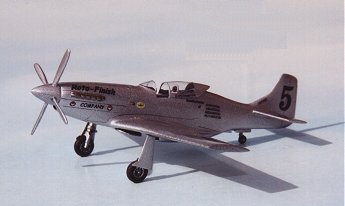
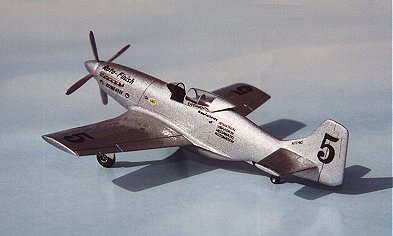
Roto-Finish Racer |
Kit:
Academy 1/144 P-51D Mustang
 I
picked this airplane because it was an "Eye Catcher"! I also
thought that a single color aircraft would make an easy transition into
civil aircraft category. I
picked this airplane because it was an "Eye Catcher"! I also
thought that a single color aircraft would make an easy transition into
civil aircraft category.
Boy, was I wrong! There was nothing easy about this project. |
-
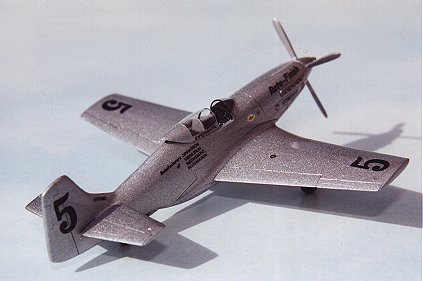 There
was no cockpit to speak of, so off I go to constructing an entire cockpit
made of various sizes of styrene, which included: Main instrument panel,
side control console, various gauge panels on both sides of the cockpit,
Cockpit floor, new seat w/ seat and headrest cushions, and seatbelts, Rear
fuel tank, radio boxes, control stick made out of wire, and main instrument
panel shroud. There
was no cockpit to speak of, so off I go to constructing an entire cockpit
made of various sizes of styrene, which included: Main instrument panel,
side control console, various gauge panels on both sides of the cockpit,
Cockpit floor, new seat w/ seat and headrest cushions, and seatbelts, Rear
fuel tank, radio boxes, control stick made out of wire, and main instrument
panel shroud.
-
External modifications included cutting back
main wing tips and horizontal stabs. Shortened main intake scoop. Lengthened
the trailing edge of the wing root towards the tail of the aircraft. Added
exhaust door panels on the bottom. The spine from the vertical stab and
canopy was raised to accommodate new canopy profile. To achieve the new
spine profile, I glued a narrow section of 1/72 scale drop tank on to the
spine. The seams were filled with super glue and sanded to a smooth finish.
-
Since this is an air racer it should have an
unblemished look. With that in mind, the majority of the recessed panel
lines were filled in w/ small strips of styrene and super glue, and then
sanded down and then polished to a smooth finish. Panel lines around the
engine and wing root were retained to show some definition.
-
Adding a styrene disk on to the base of the hub
lengthened the propeller hub. The propeller blades were repositioned
according to new length of the hub.
-
The existing canopy was modified into the new
low profile racing canopy configuration as a male mold for creating
"Heat-n-Smash" canopies.
-
I printed the markings on to decal paper using
a laser printer at work. Any colors were painted on before coating the
decals w/ liquid decal film.
 I
figured the painting phase was the home stretch. NOT! I applied the silver
paint. Then I put on the initial clear coat. Next, the decals were put on.
Homemade decals with a lot of coverage like these numbers tend to be
thick. With that in mind, several cycles of applying a clear coat and wet
sanding was repeated to create a smooth finish over the decals. What a BIG
PAIN IN THE BUTTOCKS! I
figured the painting phase was the home stretch. NOT! I applied the silver
paint. Then I put on the initial clear coat. Next, the decals were put on.
Homemade decals with a lot of coverage like these numbers tend to be
thick. With that in mind, several cycles of applying a clear coat and wet
sanding was repeated to create a smooth finish over the decals. What a BIG
PAIN IN THE BUTTOCKS!
I followed the directions from the polishing kit to achieve the final
results. It's a good thing this a small model, otherwise it might be
sitting on my workbench at home, instead of here. |
Models, Description and Images Copyright ©
2000 by
Alex Bernardo
Page Created 16 May, 2000
Last Updated 26 July, 2007
Back to HyperScale Main Page
Back to Features Index
|
 Home
| What's New |
Features |
Gallery |
Reviews |
Reference |
Forum |
Search
Home
| What's New |
Features |
Gallery |
Reviews |
Reference |
Forum |
Search