 Home
| What's New |
Features |
Gallery |
Reviews |
Reference |
Forum |
Search
Home
| What's New |
Features |
Gallery |
Reviews |
Reference |
Forum |
Search
|
|
|
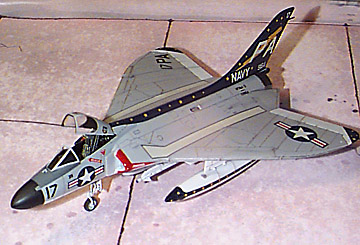
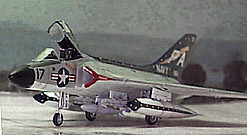
Douglas F4D-1 Skyray by Kyle Williams
Endowed with blistering speed and an incredible rate of climb, the nimble Skyray was the only NAVAL element of NORAD's defence of the continental United States during the late 1950's. Based from Alameda NAS, the VF(AW)-3 squadron stood vigil, and it's colourful aircraft are the primary subject for TAMIYA'S kit. (I'd like to point out here that there is an excellent site that gives a good history on the "FORD" as well as a good number of photographs and walk-arounds specifically for the modeler: http://www.ccdemo.org/AircraftPix/Skyray.html
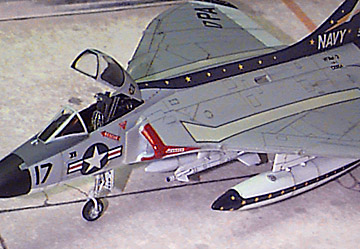
I painted mine with PollyS acrylics and gloss coated it with Future Floor Wax. I ran diluted india ink with a fine brush along the panel lines and weathered the underside slightly with pastels. The decals appear thick on the sheet, but are opaque and snuggle down well with setting solution. The wing tank decals were the most troublesome, and wrinkled around the compound curves. I doused them with setting solution, and once thoroughly dry, took a sharp knife and cut away the raised wrinkles. I touched up those spots with paint mixed to match the decal.
Article, Model and Images Copyright © 1999 by Kyle
Williams
|
 Harvesting
technology from late-war German designs, the Douglas design team headed by Ed
Heinemann began work designing the only delta winged interceptor the US NAVY
would field operationally. By 1951 two prototypes were airborne, the second of
these setting 2 new world absolute speed records in access of 1,200 Km/h.
Harvesting
technology from late-war German designs, the Douglas design team headed by Ed
Heinemann began work designing the only delta winged interceptor the US NAVY
would field operationally. By 1951 two prototypes were airborne, the second of
these setting 2 new world absolute speed records in access of 1,200 Km/h.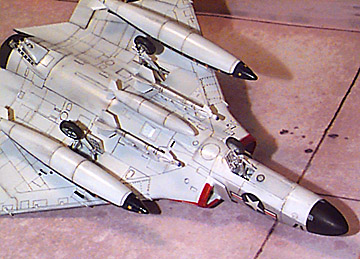 The model is
moulded in Lt. Grey with fine recessed panel lines. The detail is impressive
throughout, and the 2 piece canopy glass not only was crytal-clear, but fit
perfectly as well. The cockpit is well detailed and I only added tape seat belts
and a throttle lever. The 50's era ejection seat is also nicely done. The kit
went together really well with careful attention only needed around the intakes.
One accuracy note: There is a slight bulge under the nose where the nose cone
meets the fuselage. This appears to be incorrect, but in 1/72nd scale, you have
to look for it to notice it.
The model is
moulded in Lt. Grey with fine recessed panel lines. The detail is impressive
throughout, and the 2 piece canopy glass not only was crytal-clear, but fit
perfectly as well. The cockpit is well detailed and I only added tape seat belts
and a throttle lever. The 50's era ejection seat is also nicely done. The kit
went together really well with careful attention only needed around the intakes.
One accuracy note: There is a slight bulge under the nose where the nose cone
meets the fuselage. This appears to be incorrect, but in 1/72nd scale, you have
to look for it to notice it.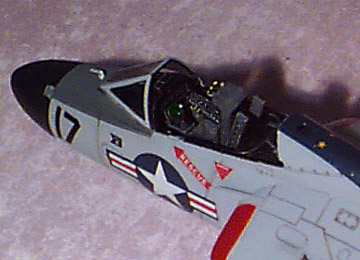
 Overall
this kit is excellent, and can be put together and painted in no-time. It's also
very affordable (I got mine for around $11 in Hobbytown USA in Mobile, Alabama).
I highly recommend it!
Overall
this kit is excellent, and can be put together and painted in no-time. It's also
very affordable (I got mine for around $11 in Hobbytown USA in Mobile, Alabama).
I highly recommend it!