 Home
| What's New |
Features |
Gallery |
Reviews |
Reference |
Forum |
Search
Home
| What's New |
Features |
Gallery |
Reviews |
Reference |
Forum |
Search
|
|
|
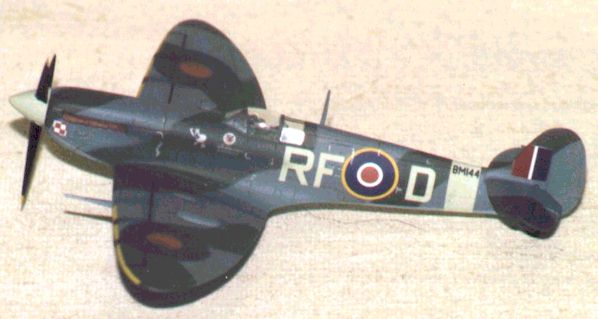
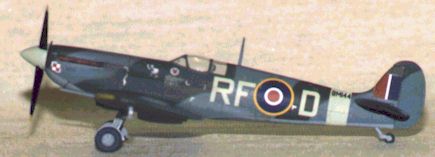
Supermarine Spitfire Vb by Drewe Manton
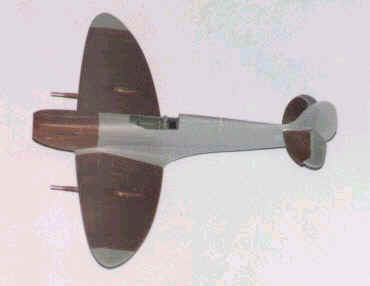
Revell released their new 1/72 scale Spitfire Vb a couple of years ago. Although the quality of the moulding is impressive, the kit has a few outline problems. The first is the lack of the characteristic Spitfire gull-wing effect. It is amazing that the toolmakers managed to miss such an important feature. Other problems are less critical but still annoying. The prop is too small in diameter and the spinner barely resembles any Mk V's. I built this kit straight from the box when released and quite liked it. I confess that I did attempt to incorporate the gull wing by sanding and re-profiling but otherwise it was built it as was.
This is the story of that model.
The major difference between the Spitfire V and IX is the engine so I decided this was the logical place to start.
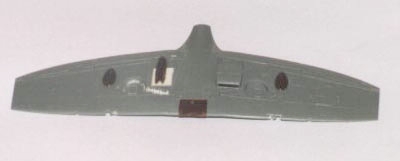
I preferred to work on each half separately rather than after the fuselage was joined. This helped me with alignment. The Mk IX was first cut along the line and very carefully trimmed making sure to keep that kink in the panel line true. This cut was repeated on the Mk V nose and the two offered up. Fit was almost exact. Some light sanding was necessary along the top of the cowl and some filling on the wing fairing but cross sections were almost exact which was a major plus. The nose was secured with liquid poly and reinforced from behind with Zap-A-Gap. When this was done and the two fuselage halves offered together the model already had the unmistakeable air of a Mk V. So far so good! A piece of the Revell lower wing had to be removed and trimmed to fit into the Hasegawa wing recess due to accommodate the small air intake. Again this is merely a careful cutting job. No real problems were encountered and fit was good again with liquid poly and superglue. One advantage of the different colour of the plastic in these two kits is that you can see in the pics exactly what goes where!
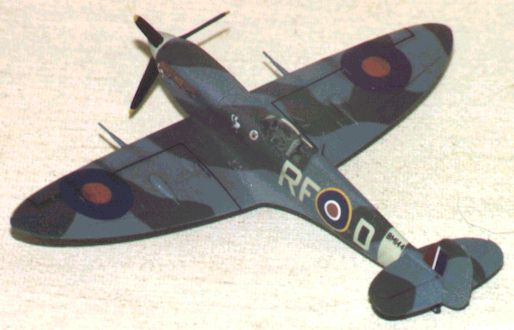
One important detail that must be changed is the oil cooler/radiator layout. The Mk. IX wing has two symmetrical radiators with integrated oil coolers whilst the VB requires one radiator on the starboard side, and a small oil cooler to port. Strictly speaking, the single radiator is slightly different to the one present on the IX. However, I decided to put up with the minor difference in this scale so only the port radiator was removed. The resulting hole was plugged with plastic-card, superglued and sanded smooth. Take particular care with this as it is very near the gull wing and you don't want to ruin that important effect! The plastic card and glue was smoothed out and panel lines were restored using the Revell wing as a template. The Revell oil cooler was then cut out and sanded to fit under the Hasegawa lower wing. Liquid poly was run around the join to secure it. The cannon bulges from the Revell kit for the lower wing were glued in place on the Hasegawa part as indicated by Revell's lower wing. This more or less concludes the major part of the work needed for this model and I could now begin to actually bring the beast together and see how it looks. I decided on a fairly simple interior because my canopy would be closed and little would be on show. My interior is largely from the Hasegawa kit, with the area behind the seat and the control column from the Revell model. The interior was painted Humbrol 78 grey-green with a 120 Israeli green drybrushed and details in black and other colours. The Sutton harness was made from tape. The fuselage halves were joined with plastic weld. The fit of the Revell and Hasegawa parts was as good as the earlier dry fitting suggested. There were one or two miniscule gaps filled with superglue but otherwise a gentle rub down sufficed. My butchered lower wing was glued in place and the upper panels checked for fit. Had I glued the upper and lower wings together prior to assembling it to the fuselage there would have been some problems due to thickness differences between the parts. As it was the problem was anticipated and overcome as follows. Liquid poly was used to tack the upper wing panels to the roots at the fuselage, and then the area at the tip was glued down. This resulted in a great join at the root needing no work at all, secure tips and when viewed from the front a wedge shaped gap at the leading edge (small outboard, bigger inboard). When this was dry I ran superglue into the wedge shaped gap and sanded it smooth - voila! Excellent wing joint! All cannon/gun positions in the leading edge were also filled and smoothed. The cannon were sourced from the Revell kit and the gun positions would later be represented using red decal for doped patches. There is some mismatch between the gun positions on between the Revell upper and Hasegawa lower wings. My solution dealt with this in a fairly good if not perfect manner.
Don’t forget to deal with the aileron line on the Hasegawa parts- they are designed to incorporate both the long span (early style) ailerons and the later Mk VIII short span type. I simply filled in the unwanted part of the hinge line and sanded smooth. The final job was to add the tailplanes. I wanted the Mk. V style tailplanes with the single angle to the mass balance at the tip. The Revell parts fitted the bill, however I wanted to drop the elevators to add a little interest. Having a spare set of tailplanes from the Hasegawa kit meant that I could use the Hasegawa elevators on the Revell tailplanes. I just chopped the unwanted parts away and sanded the elevator/tailplanes to match. The advantage of this method over just cutting an re-positioning the Revell elevators is that you leave a little material on the elevator leading edge to sand smooth- merely using the Revell elevators needs much more care and possibly some plastic card to build up the leading edge before re-gluing. This was quick and simple and yielded the desired result.
The spinner and tail band were sprayed Sky and the tail band masked off prior to application of the camouflage. All my main airframe paints are Xtracolor unless otherwise indicated. Normally I would also spray the yellow wing leading edges and mask these off prior to applying the camouflage but the area is so small that masking can be tricky. I therefore decided in this instance to apply the yellow last as an experiment. More extensive masking was necessary but the result is probably better
Decals were a mixture of Airfix, Aeromaster, Modeldecal and Revell. I decided on the Polish squadron aircraft as featured in the Airfix kit. Super Set and Super Sol was used throughout except on the Modeldecal sky codes. I have always found Modeldecasl settle down perfectly with nothing more than a little pressure from a kitchen towel. This time proved no different. Once the decals had dried I could move on to finishing. Details were added and painted to match the rest of the model. Undercarriage legs and doors are Hasegawa and the wheels are Revell.
The model was given an overall coat of Aeromaster flat acrylic and all exhaust stains and gun marks were airbrushed using heavily thinned Tamiya acrylics. Canopy masking was removed and there she was - my attempt to get an accurate 1/72 scale Spitfire Vb. I do not claim that that this model is totally accurate but I am happy with the outcome. I now have a decent shaped VB with modern levels of engraved detail that can happily sit alongside my Hasegawa VII/VIII/IXs. The required work was not all that difficult - it just needed care. I can recommend this project if you've never tried a conversion and fancy a try
Model, Images and Article Copyright
© 2000 by Drewe
Manton Back to HyperScale Main Page Back to Features Page |
 About
the same time as Revell released the Spitfire Vb, Hasegawa released a new tool
Mk VIII/IX. Hasegawa’s kit is an absolute stunner - every inch a Spitfire and
a lovely kit to build. I was looking at these two kits together one
day comparing shapes. It occurred to me that, as the Mk IX was essentially a
re-engined Mk V, perhaps reversing the process may yield a more accurate
Spitfire V. I compared the two kits directly and was pleasantly surprised
to find that the detail was comparable between the two. They looked extremely
compatible as a cross kit project. The seed was sewn and I had to give it
a go!
About
the same time as Revell released the Spitfire Vb, Hasegawa released a new tool
Mk VIII/IX. Hasegawa’s kit is an absolute stunner - every inch a Spitfire and
a lovely kit to build. I was looking at these two kits together one
day comparing shapes. It occurred to me that, as the Mk IX was essentially a
re-engined Mk V, perhaps reversing the process may yield a more accurate
Spitfire V. I compared the two kits directly and was pleasantly surprised
to find that the detail was comparable between the two. They looked extremely
compatible as a cross kit project. The seed was sewn and I had to give it
a go! 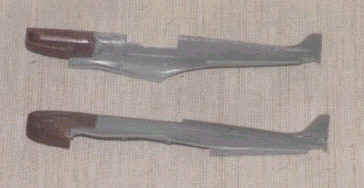 There
is a very obvious panel line on both kits (with a small kink in it) that
represents the rear of the engine bay. The panel line is located almost
identically on both. Simply removing each nose up to this point permits a pretty
good match. Being careful to preserve the required parts (i.e. the Mk IX
fuselage and the Mk V nose), I set about cutting and trimming the two. I
wanted to preserve the entire Mk IX wing fairing so some relatively tricky
cutting was needed here - nothing impossible just needs care and attention.
There
is a very obvious panel line on both kits (with a small kink in it) that
represents the rear of the engine bay. The panel line is located almost
identically on both. Simply removing each nose up to this point permits a pretty
good match. Being careful to preserve the required parts (i.e. the Mk IX
fuselage and the Mk V nose), I set about cutting and trimming the two. I
wanted to preserve the entire Mk IX wing fairing so some relatively tricky
cutting was needed here - nothing impossible just needs care and attention.
 Now it
was time to pick the wingtips. I was building a full span Spit and so had a choice
of tips. In the end I settled on the Hasegawa tips as they are slightly
thicker and would allow a better blending job when dry.
Now it
was time to pick the wingtips. I was building a full span Spit and so had a choice
of tips. In the end I settled on the Hasegawa tips as they are slightly
thicker and would allow a better blending job when dry. 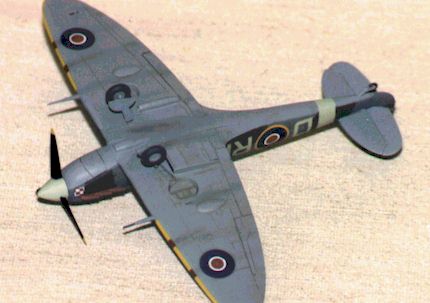
 Camouflage
masking was applied using Blu Tack and paper. This combination resulted in the
usual good looking job. The masking was removed, then masked and sprayed
the wing leading edges. I was pleasantly surprised to discover that Xtracolor
yellow seems far more opaque than Humbrol.
Camouflage
masking was applied using Blu Tack and paper. This combination resulted in the
usual good looking job. The masking was removed, then masked and sprayed
the wing leading edges. I was pleasantly surprised to discover that Xtracolor
yellow seems far more opaque than Humbrol. 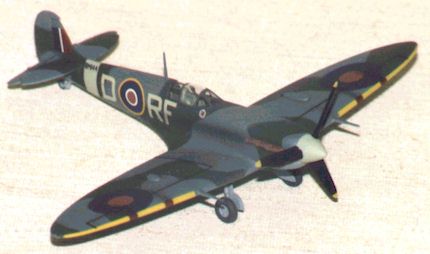 The
Revell prop and spinner are both awful. I reshaped the Revell spinner and added
the Airfix propeller blades. I'm not sure I got the shape of the spinner bang on
but it is certainly a vast improvement on what it looked like originally!
The
Revell prop and spinner are both awful. I reshaped the Revell spinner and added
the Airfix propeller blades. I'm not sure I got the shape of the spinner bang on
but it is certainly a vast improvement on what it looked like originally!