|
Tamiya's
Spitfire Vb |
Spitfire Vb
by
Floyd S. Werner, Jr.
images by Randy Stiefer (indoor)
and Floyd Werner (outdoor)
|
Tamiya's
Spitfire Vb |
B a c k g r o u n d |
Occasionally you find a kit that combines beauty, grace, and exceptional engineering. This
kit is it! If I didn't love the Bf-109 so much the Spitfire would be my next choice for
the sexiest airplane ever flown.
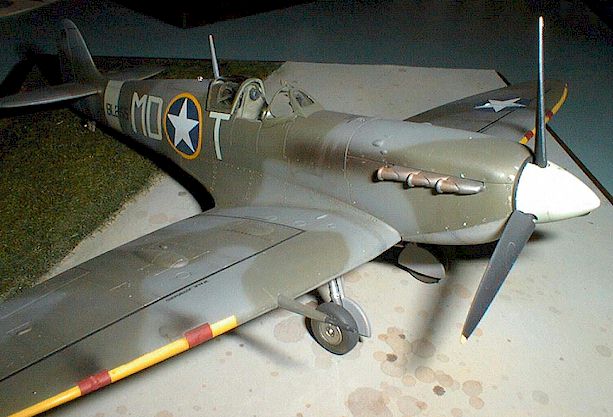
I had always wanted to build the Mk Vb of the Eagle Squadron's Don Gentile. We all have heroes. Erich Hartmann is my all-time ace-of-aces, and Don Gentile is my American hero. A volunteer for the Eagle Squadron before America entered the war, Gentile shot down two Fw-190s over the Dieppe beachhead. This was just the start of his career.
He would fly the Spitfire, the P-47 (decals also available from Aeromaster), and the P-51B in combat. As with all heroes he does have his flaws. On his last mission prior to returning to the states Gentile, unintentionally, flew his aircraft, Shangri-La, into the ground, crashing over the heads of the press he was trying to impress.
Chagrined, he returned to the States and went on War Bond tours in his new P-51D. While conducting test flights on the P-80 he had a flame out on takeoff, crashed and died. This ended the career of a charismatic fighter pilot, but not the end of our story.
When Aeromaster released the markings for Gentile's Spit in 1/48th scale I couldn't wait to build it. I've met Gaston of Aeromaster and mentioned how he should release a booklet of 4th Fighter Group/Eagle Squadron much like the Flying Tigers booklet. I casually mentioned that I would love to build Gentile's Spitfire and P-47. After about six months I ran into Gaston again and mentioned it again. This time he said that I just needed to wait. Good enough for me, at the rate that Aeromaster puts out decals they should be at the hobby shop by the time I drive there. It took a little longer, but was well worth the wait.
C o n s t r u c t i o n |
Not so long ago, if you wanted to build an accurate Spit you have to build the Airfix kit. While not a bad kit it needed a lot of work.
Then Tamiya released their series of Spitfires. I will say that this is the best kit I've ever built. It required just the slightest filler at the trailing edge of the wing to fuselage joint. I mean a little bit.
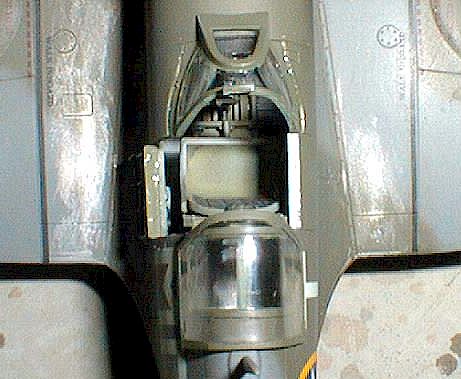 The cockpit is
quite nice and very complete. I was going to use the KMC kit, but decided that I would
build out of the box. The KMC is nicer and includes more detail, as well as a complete
engine assembly I'll save that for my Duane Beeson Spitfire.
The cockpit is
quite nice and very complete. I was going to use the KMC kit, but decided that I would
build out of the box. The KMC is nicer and includes more detail, as well as a complete
engine assembly I'll save that for my Duane Beeson Spitfire.
The entire cockpit fits like a glove and literally holds itself together and square. It was great. Prior to painting I removed the entry door, as I wanted to be able to see inside the aircraft. I painted the interior Humbrol British interior green and weathered it with burnt umber and some pastels. All the detail items were painted black and drybrushed with gray. A drop of Future onto all of the instrument faces brings the interior to life. I then moved on to the fuselage halves.
The fuselage fits so well that if you take your time and line everything up you will need no filler. This is no exaggeration - no filler.
The horizontal stabilizers fit equally well. Don't forget to check your references to see if your aircraft has the vertical fin standoff for the aerial attachment point. Mine didn't and required it to be removed.
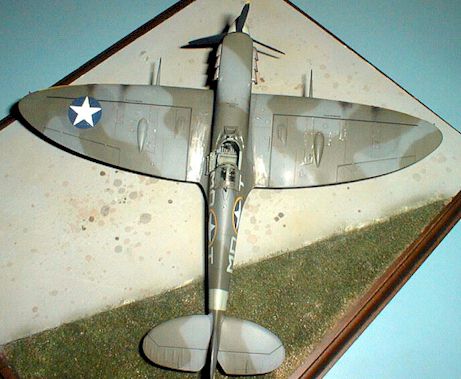
The wings assembled just as well as the fuselage. There are three pieces for the main planes with separate oil coolers. Engineering is so good that when the wings and fuselage are joined that the wing pulls the fuselage to it. But, hey, don't forget to put in the cockpit assembly! It slips right in and glues down well. You may want to wait to glue the aft part of the cockpit assembly to allow the aft window (Perspex as the Brits would say) to fit. I did and was glad I did.
Like I said the fit is great, but the dihedral (angle of the wings) is a little flat. This is easily fixed with masking tape and glue. Just pull one wing at a time and glue it in position, holding it up with the masking tape draped across the fuselage. With the wings attached the beauty of the Spitfire comes into it's own. Frequent strafing of the model bench occurred during construction!
Don't forget to remove the reinforcement ribs from the wings, if necessary.

Of course part of the fun of building is to keeping the motivation to build a certain subject. That is easily accomplished by watching the BBC mini-series "Piece of Cake", MGM's "Battle of Britain", and reading Ted Smith's "Spitfire Diary" book. If watching a Spitfire fly under a bridge isn't enough to keep you going then put the airplane away and build tanks. Oh did I say that? Sorry guys.
P a i n t i n g a n d D e c a l s |
It was time to paint before I knew it. At this time I had put less than 10 hours - phenomenal!
I try something different on every model and this time I decided to try Milton's way of putting a silver undercoat on the model and sand through it. The silver brought out every little flaw, not that there were many. Prior to painting the camouflage colours I pre-shaded the bottom with RLM 66 along all the panel lines. This is really realistic (IMHO) - especially with Polly-S paints.
I painted the sky band and spinner and when dried masked it. Then, using Polly-S British Medium Sea Grey for the belly, paint the inside of the panel and work your way to the outside. Once the panels are all painted then carefully paint over the darker color leaving plenty of the color showing through the camo color. Do this to your liking and it gets better with practice.
Masking the canopies with Bare Metal Foil helps get a real nice edge in prep for paint. Mask off the bottom in preparation for the top colors. The top colors were a pain. I am not a member of the color police, but I know what I like. Right or wrong I don't care. I know what looks good to ME, ME, ME (sorry, only child syndrome coming out). I had used the Polly-S upper colors but didn't like them very much. Too light a gray and too green a green. While this in itself wouldn't be too bad the 3 hours I spent masking the camouflage from the plans made getting that hard edge close to impossible. I bought both the Gunze Sangyo and Humbrol colors for the upper surfaces. After trial and error I finally decided that the Gunze Dark Green (H73) and the Humbrol Gray (Satin 164) were the look I was after.
 I remember losing
in a contest to a beautiful Spitfire with a hard edge, but after seeing the hard edge and
my semi hard free hand edge I must admit I like mine better. My model, my paint scheme. I
think it looks more realistic especially from the early days. I also painted the yellow
recognition bands RLM 04 (Luftwaffe angle). You'll note that the area where the British
roundels and fin flash would be is slightly darker to take into account the repainting of
the American stars and British roundels being overpainted.
I remember losing
in a contest to a beautiful Spitfire with a hard edge, but after seeing the hard edge and
my semi hard free hand edge I must admit I like mine better. My model, my paint scheme. I
think it looks more realistic especially from the early days. I also painted the yellow
recognition bands RLM 04 (Luftwaffe angle). You'll note that the area where the British
roundels and fin flash would be is slightly darker to take into account the repainting of
the American stars and British roundels being overpainted.
A coat or two of Future prepared the model for the Aeromaster decals. The decals went on flawlessly except for the bottom star. The bottom star sits over three huge blisters and did not set down and maintain shape with any setting solution. Finally after four attempts I cut out the forward part of the star and that took care of one bump. Then I cut off one side of the blue and precut it for the other bumps. Once the decal was dry I painted the white and blue touch up. It isn't perfect but it looks good.
One thing here, at first I thought Aeromaster was wrong when they had yellow surround for the fuselage and not the wings. After looking at my references they were correct, the wings did not have a yellow surround. One thing that I do question is the position of the MD O T on the right side. My references show the correct set up would be T O MD. I don't have a picture of Gentile's 336 machine but do show a 335 machine set up this way. Which ever you chose, it appears the RAF couldn't make up its mind when looking at other Spits. Seal the decals with a coat of Future.
F i n i s h i n g T o u c h e s |
Now I highlighted the flight controls with dark gray ink. Then a coat of Polly-S Flat in preparation for weathering. Remember I was going to try something different? Well I forgot to sand off the colors prior to putting on the Future so the sanding took too long and I didn't quite get the look I was after. Live and learn.
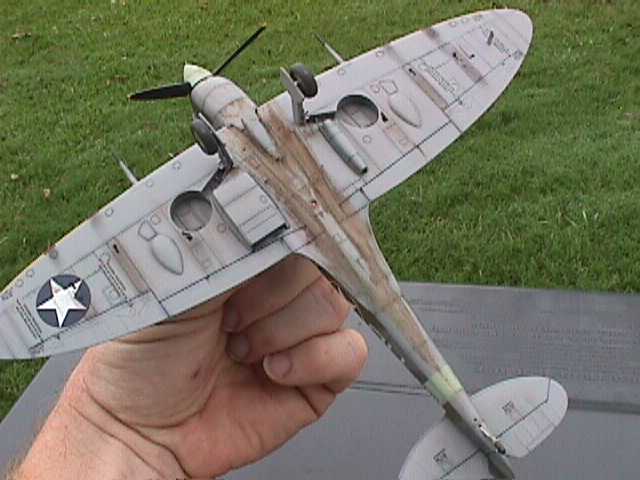
A wash of burnt umber brought out the panel lines. I always like the way it looks. Then came more silver. Gentile's airplane was well worn so I was fairly free with the silver pen and pencil. Beating the leading edge with the pencil and using both for the worn areas on the panels. This looked good but the Spitfire is a very dirty airplane underneath. I took burnt umber, burnt sienna, and black artist oils for the oil streaks. Put a little of the oils at the panel lines and then take a Q-tip and pull them back towards the tail paying attention to the wing shape and taking it back all the way to the tail. I guess the Brits didn't know about gaskets. Pastels were used on the wing panels to bring them alive. The top colors were weathered with pastels and white artist oil. The exhaust stains were a mixture of brown and black. Then a paint brush with spread out bristles was dabbed in airbrush cleaner and stoked on the model to simulate the streaking of the exhausts that are common on Spitfires.
Attach the prop, landing gear, pitot tube and I'm done.
I am very happy with the results and hope that the P-47 comes out as good. I don't know if this is my best model, but it is definitely one of my favorites!
A d d i t i o n a l I m a g e s |
Click on the thumbnails below to view images full-sized.
Click on the "Back" arrow on your browser to return to this page.


Back to HyperScale Main Page
Back to Features Page