Sturmgeschütz III Ausf. FBy Brett Green
Modelling a StuG. IIIF
|
||||||||||||||||||||||||||


Introduction |
Panzergrenadier Division Grossdeutschland (Greater Germany) was the largest Army Panzer armoured unit. It grew out of the prewar Berlin Guard Regiment and its expansion was largely due to the Army's desire to counter the growing strength of Waffen SS armoured divisions. This well illustrated the inter-service rivalry between the increasingly powerful Waffen SS and the traditional Army.
This prestigious Heer (army) unit first saw action as Infantry Regiment Grossdeutschland during the 1940 invasion of France. The Grossdeutschland regiment was transferred to Yugoslavia in 1941 and then participated in Operation Barbarossa in June of the same year. Six months later, elements of Grossdeutschland had reached the suburbs of Moscow.
In June 1943 the regiment became "Panzergrenadier Division Grossdeutschland", just in time for Operation Citadel and the disastrous tank battles around Kursk. By 1945, Grossdeutschland comprised a number of full divisions.
In 1943, Grossdeutschland had one full assault gun battalion. By mid-year, this battalion would have been primarily equipped with StuG III Ausf. F and StuG III Ausf. F/8 and F/48 vehicles. Some newer Ausf. Gs may have started appearing around this time.
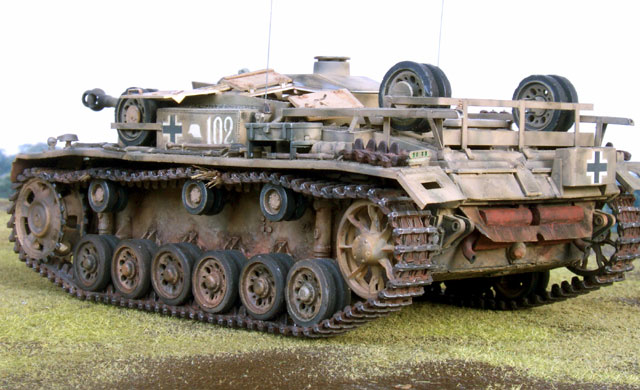
StuGs of Grossdeutschland exhibited many field modifications during this period. Spare road wheels were mounted on the forward superstructure sides, the forward toolbox was usually relocated to the rear drivers side, and concrete fill sometimes supplemented the armour of the forward upper superstructure. Taking advantage of the engine layout, the clear rear deck was often seen stacked with personal stowage and supplies. Many Grossdeutschland StuGs displayed field installed racks running around the back and sides of the rear deck. Additional racks for Jerry cans, spare track links and even more roadwheels were also regularly seen.
These modifications were born of necessity. On the Russian Steppes, supply lines were stretched to the limit, road conditions were primitive (if roads were available at all), and contact with the enemy was an ever present threat. Units and vehicles therefore had to be as self sufficient as possible.
Building a 1/35 Scale StuG. IIIF |
The Sturmgeschütz III has had a great deal of attention from kit manufacturers over the last couple of years. Between Dragon and Tamiya, just about every StuG. III variant has been covered in 1/35 scale. The after market industry has been a little slower jumping on the bandwagon, however, the determined modeller can now buy Jordi Rubio barrels, Model Kasten or Fruilmodellismo tracks, and Eduard photo etched detail sets to ensure that an extra $100 can be spent on these $40 kits!
And now, the ultimate interior detail set is available from Jaguar. This American manufacturer is building a well deserved reputation as a supplier of high quality figures and accessories. I was given the opportunity to fit their interior to Dragon's StuG. III Ausf. F kit as a display model for the 1996 Sydney Toy Fair.
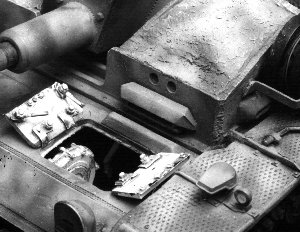
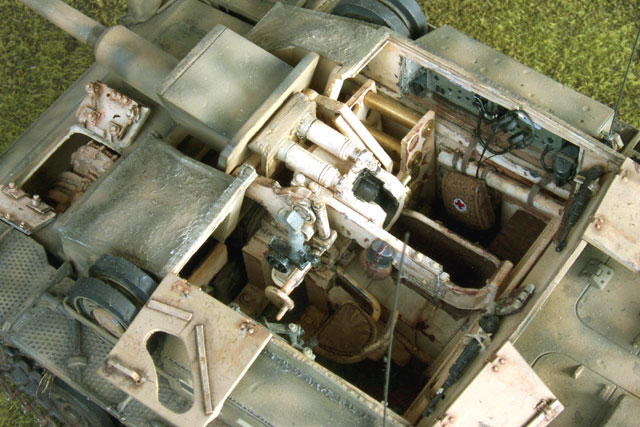
The Jaguar Interior
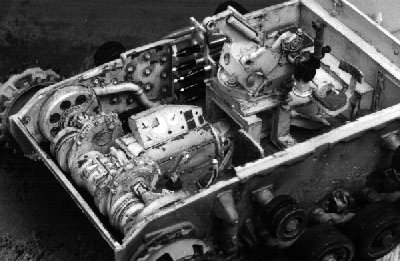 The initial impression after emptying the Jaguar kit contents
onto the workbench is terror. There are over 100 fine resin parts, many on daunting
looking casting blocks. Once the initial shock has worn off, the modeller will appreciate
the cleverness and quality of the design. How do they cast those undercuts?
The initial impression after emptying the Jaguar kit contents
onto the workbench is terror. There are over 100 fine resin parts, many on daunting
looking casting blocks. Once the initial shock has worn off, the modeller will appreciate
the cleverness and quality of the design. How do they cast those undercuts?
The first task is parts identification and cleanup. The skimpy instructions contain a mediocre quality photocopy of the parts and their names. I first laid out all the parts on my workbench, and matched each part to its corresponding photograph. The purpose of this was to firstly ensure that all parts were present; and secondly that I knew what shape all parts were. The second point was particularly important to ensure that I didn't saw off more than just the casting blocks!
Removing the parts from their casting blocks proved to be a much easier task than anticipated. Most parts could be separated by the "score and snap" method - just make sure you don't snap the part. Some parts were moulded onto curved blocks. These were removed by nibbling a small amount at a time with a fine pair of side cutters and cleaning up with the trusty hobby knife. The dreaded saw was only necessary on a couple of occasions. Now I was ready to put the thing together.
This leads me to the only real gripe that I have with this conversion - the instructions. They are plain awful. The reproduction quality is poor, and although a number of views of the assembled conversion are supplied, the modeller will need more detailed references to place the parts accurately. This simply is not good enough when one is spending A$80. Given the lack of guidance in the instructions, I can advise that the project is best tackled in the following stages
- Floor and Walls
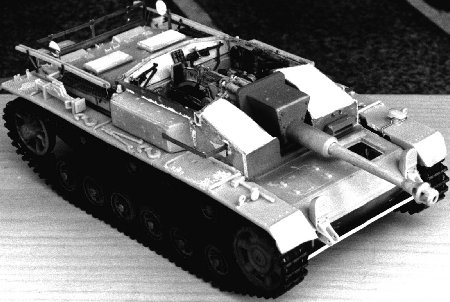
- Upper Hull and Superstructure Modifications
This is the most critical part of the conversion. Remove all structural features from the interior of the Dragon hull. Make sure that all resin wall sections are straight. Do not attempt to thin the main hull floor - the resin block is the appropriate height for the floor.
Before fitting the floor, dry fit (or tack) the front and side wall sections to the Dragon lower hull. Now tack the rear fighting compartment wall in place. Make sure everything is straight. Next, test fit the upper hull and superstructure. The back of the rear fighting compartment wall should rest snugly against the interior of the rear superstructure wall. Minor trimming of the resin walls may be required to achieve this fit. It is essential that all parts are straight and line up correctly.
When you are happy that everything lines up, mark the position of the rear fighting compartment wall on the lower hull walls and floor. Disassemble the tacked-together components and super glue the main fighting compartment floor to the kit hull floor, ensuring that the rear of the floor is lined up with the positioning mark for the rear of the fighting compartment floor you have just drawn. At this stage the remaining wall and floor components may be glued into place.
Congratulations! You now have a base for all that lovely detail.
The Dragon upper hull and superstructure have to be modified to allow the conversion parts to be used. Follow the drawings on the instructions to remove the mounting points for the kit gun on the upper hull. Remember, when cutting kit parts, less is better. It is much safer to cut less than necessary then trim than to realize that you have cut too much off and having to repair.
Jaguar also supply replacement superstructure stowage bins with built-in radios. Mark the interior opening on the outside of the superstructure sides and carefully cut. Be careful when marking and fitting to get the correct bins on the correct sides, and the right way up!
Unlike Dragon's kits of the later variants, the StuG. III F and earlier have the superstructure roof and walls moulded as a single piece. I chose to remove the superstructure roof in order to display the interior detail. This was easily achieved by repeated scoring with a hobby knife. When the roof was removed, I glued lengths of plastic strip near the top of the interior superstructure walls to allow the roof to sit in place without falling into the vehicle!
- Additional Sub-assemblies
The remainder of the conversion should be built as sub assemblies. I chose to first add sidewall supports, ammunition racks and other structural assemblies in the lower hull. I then assembled the forward transmission and brake components. (I am still not sure how the brake assemblies are really supposed to line up with the transmission. My references failed me and the instructions were particularly vague in this area). This completed assembly was fitted to the lower hull and additional parts, including seats, levers and lower gun mount were added. The gun was assembled and put aside. Stowage bins and other superstructure detail was added.
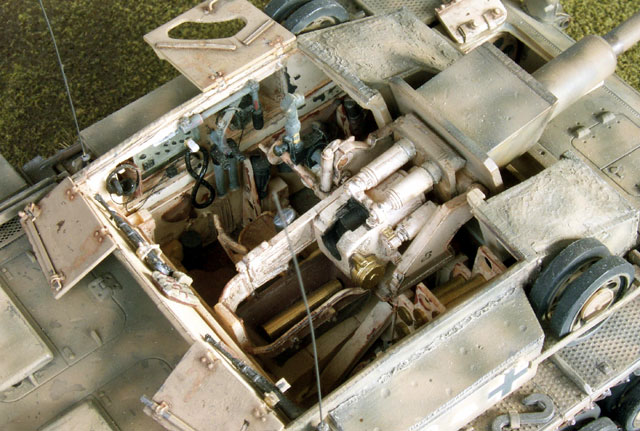
Even after the Jaguar detail had been added, the inner walls of the superstructure and hull looked a little bare. I added various water bottles, mess tins, map cases and machine pistol ammo cases from Dragon accessory kits. References also show a pair of MP 42s prominently mounted on the rear superstructure walls. These, too, were sourced from Dragon, with scratch built brass mounts and lead foil straps.
The kit scissors sight was modified by scratch-building a mount from steel wire and brass tube.
I then turned my attention to the radios. Although cleverly cast, the detail is a bit basic. I added connecting cables from fusewire, Dragon headsets and various wires and knobs.
Finally, I detailed the inner surfaces of the hatches, including the forward port inspection hatch which was modelled open to display at least part of all that lovely transmission detail.
Now that we had finished the interior, I could concentrate on the rest of the Dragon kit.
The Dragon Kit
 I guess anyone interested in German armour already has seen the
Dragon StuG kits. I will therefore not dwell on the detail of step-by-step construction.
See Fred Brunet's review of this kit on Track-Link.
I guess anyone interested in German armour already has seen the
Dragon StuG kits. I will therefore not dwell on the detail of step-by-step construction.
See Fred Brunet's review of this kit on Track-Link.
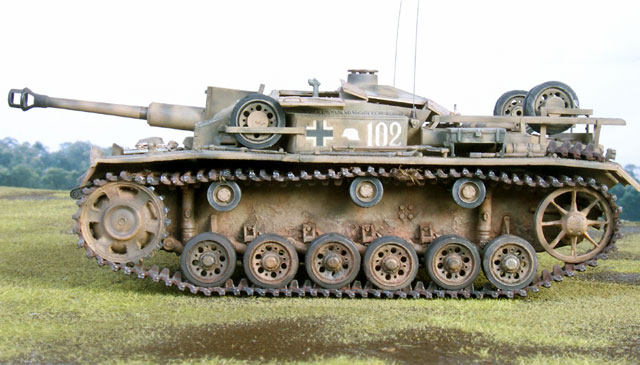
StuG. Fs of the Grossdeutschland StuG Battalion had several unit wide modifications, these are apparent in all photographs taken of them during 1943. These included:
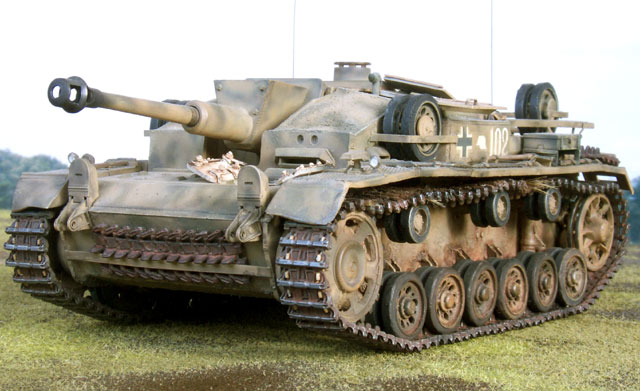
Spare Track Link Rack
This goes across lower front hull, it supports a run of eleven track links and was
scratch-built from a single strip of .010" x .080" plasticard. In retrospect
this was a little flimsy, I would probably go to .020" thickness next time.
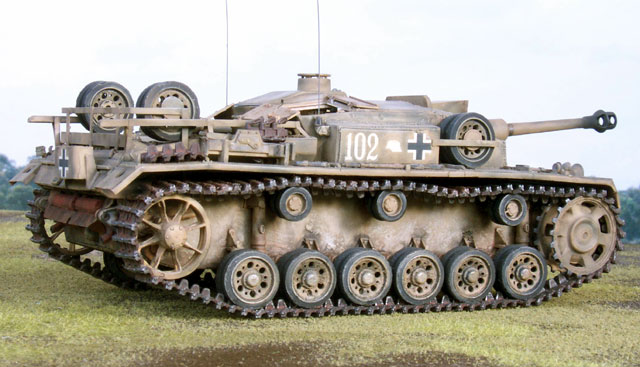
Stowage Rack On Rear Deck
This was scratch-built from lengths of brass strip, the brass wasn't labelled as
conveniently as the packs of Evergreen styrene, but I think it was around .020" x
.080" (maybe .060"), it looked about right at the time and it was lying in my
brass strip tray. I based the rack on a photo in Panzer Colours III on page 35.
This photo shows good detail for the stowage rack and the rear spare wheel mounts on a
vehicle from the same unit as StuG "White 102", my subject vehicle. The three
rear vertical mounts for the rack simply appear to be welded flat to the angled rear of
the upper deck and bent back to the vertical. The side vertical mounts are welded just aft
of the cooling vents. I super-glued all vertical mounts in place before carefully
measuring and bending two identical horizontal brass strips to finish the basic rack. Weld
beads were represented by Squadron White Putty suitably contoured and textured.
Front Spare Roadwheel Racks
The photograph on page 35 of Panzer Colours III, plus another on page 41 of Achtung
Panzer No. 5, provide the reference for the spare roawheel racks on either side of the
forward superstructure. I used the brass strip again, this time slicing an angle at the
front of each rack before bending the racks to shape and supergluing to the
superstructure. The wheels and disks were simply dropped in to the rack and glued into
place. Plastic disks were used for the mounting location points.
Rear Spare Roadwheel Racks
I scribed two 7mm circle (using a brass circle template) on 20 thou scrap styrene to
create the base plates for the rear spare wheel mounts. After the discs were superglued to
the rack and the wheels glued to the round baseplates, I placed fine stainless steel rods
through every second mounting hole (six holes = three rods per wheel - look closely at
construction photos for detail).
Non-Standard Stowage Locations
Stowage was moved according to my reference photographs. The most obvious stowage oddity,
apart from the racks and wheel mounts, was the relocation of the elevated toolbox from the
starboardd front fender to the port side rear fender. Why? Your guess is as good as mine,
but the photos are specific.
 Concrete Fill
Some StuGs used concrete fill in the upper forward superstructure cavity as additional
armour. I used a base of Milliput to represent this prominent feature. I took a ball of
mixed Milliput and pressed it into each cavity, working smaller pieces in place until the
appropriate profile was achieved. When dry, I textured the "concrete" surface
with a thick coat of Squadron putty.
General detailing (which should be applied to any StuG. F model) included weld seams which were added using Squadron White Putty. The same product was used to represent mud on the lower hull and hull bottom. Front mudguards were bent according to the reference photo. A couple of small clumps of railway grass were added to the upper run of the tracks for a bit of extra "Russian Steppes" authenticity.
Painting, Markings and Weathering |
Dark Yellow was introduced as the standard base colour for German vehicles in February, 1943. Olive green and red brown were introduced at the same time to be used as disruptive camouflage. Grossdeutschland vehicles of mid 1943 usually had irregular squiggles and lines of dark green sprayed softly over a coat of faded Dark Yellow.
Photographs of Grossdeutschland StuG.s' colour schemes and variations caught my attention when I was looking for a subject for the Jaguar conversion.
Painting
Tamiya acrylics were sprayed with the Testor A470 (ex Aztec) airbrush to obtain the yellow and green camouflage scheme. I used a mix of Tamiya's Dark Yellow, Desert Yellow and White as the base coat, and mixed this base colour with Tamiya J.A. Green for the disruptive colour.
Markings
Vehicles associated with Grossdeutschland are easily distinguished by its divisional marking - the side view of a German helmet. For the StuG Abt this was in white, while the battery's command vehicles had a black outline around the standard helmet.
In 1943 a typical StuG Battalion consisted of 31 StuG vehicles. There were three Batteries consisting of nine vehicles each. Each Batterie grouped its StuG.s into three Sections of three vehicles each. Additionally each Batterie had one command vehicle for the Batterie commander. Finally the Battalion commander had his own StuG.
Grossdeutschland's StuGs during 1943 were numbered with three digits in white numerals. The first number designated the Batterie -- either "1", "2" or "3". And the last numeral represented the vehicle in that Batterie -- from "1" to "9". So the middle digit would always be "0". Batterie commander's StuG.s would have been "100", "200" and "300" for Batteries "1", "2" and "3". Finally the Battalion commander's vehicle had no numbers just the modified division sign. Shortly after this the StuG. Battalion was upgraded to 45 vehicles and the numbering was changed to the "Company/Platoon/Vehicle" system in use by standard tank battalions.
My vehicle represents the second vehicle of the first Batterie. Decals were obtained from the spares box, the numbers from a Tamiya SU-85, crosses and unit insignia from Dragon. I didn't gloss before decals - my secret formula is a spot of forehead sweat to shine up the surface a little. I have enough forehead to shine a regiment of 1/35 scale vehicles. I then used Gunze flat over the decals only.
Weathering
Weathering was achieved through subtle acrylic washes and drybrushing. Acrylic paint was used for dry brushing - a lightened version of the Dark Yellow - but very sparingly. In this case I drybrushed only the concrete fill and the torchcut slab edges. I tend to highlight by spraying a dark brown-black mix overall, and "fill in" the panels with the overall colour. This creates a very exagerrated weathered appearance which is then progressively blended in with light oversprays of the base colour. I highlight hard edges and corners with a 2B pencil.
The grass clumps were applied after painting. In fact, I painted the all of the suspension and lower hull components before the upper hull was added. Sometimes I do it this way, other times I complete the model (including tracks) then paint. The grass was stuck on with "mud blobs" of Squadron white putty, which were then painted a suitable brown.
Conclusion |
By my standards this was an ambitious project. I would probably not have had the intestinal fortitude to tackle the project had I not been specifically requested to build it for the Toy Fair. However, I was pleasantly surprised at the generally straightforward nature of the resin parts cleanup and assembly.
Apart from anything else, this project gave me a much greater appreciation for the contents of an AFV interior.
I only have a couple of criticisms of the Jaguar conversion. Firstly, those instructions. They really do make the conversion harder than it has to be. A couple of other minor quibbles are the lack of upper superstructure detail, and finally it would have been nice for Jaguar to have supplied a new block mantlet or at least some extra detail for the rear of the kit mantlet.
These small points aside, I can thoroughly recommend this conversion to the moderately experienced armour modeller who wishes to move to the "super-detailing" stage without scratch-building everything themselves.
References |
References are absolutely essential for this project. Fortunately, excellent references for the Stug III are fairly readily available. The best are as follows:
-
Sturmgeschutz and its Variants, By Walter Spielberger. Schiffer Publishing,, 1993.
-
Achtung Panzer 5 - Sturmgeschütz III, Sturmgeschütz IV and sIG 33 Dai Nippon Kaiga, 1995.
-
Both of these books have multiple photographs of vehicle interiors. The "Achtung Panzer" book also has hundreds of very useful detail line drawings. Each book will set you back the price of a good armour kit (A$60-A$70), but will be a faithful source of reference and inspiration forever. Buy 'em if you can afford 'em.
-
Sturmgeschütz III in action, By Bruce Culver and Don Greer. Squadron Signal Publications, 1976.
This book provides limited interior shots of StuG III Gs. -
Panzer Colors III, By Bruce Culver and Bill Murphy. Squadron Signal Publications, 1984. ISBN 0-89747-156-3
This book has sections devoted to Grossdeutschland and Sturmgeschütz units. Grossdeutschland StuG. Ausf. Fs are featured in several of the photographs and in one colour profile. -
Panzer Grenadier Division Grossdeutschland, by Horst Schelbert, edited by Bruce Culver. Squadron Signal Publications, 1987. ISBN 0-89747-061-3
An illustrated chronical of Grossdeutschland is given with maps and text. The several photographs of StuG.s and orders of battle for various time periods were the most useful.
Additional Images |
Click the thumbnails below to view larger images:
|
|
|
|
|

Text and Images Copyright © 1998 by Brett Green
Page Created 26 January, 1998
Page Last Updated
26 July, 2007
Back to HyperScale Main Page
Back to Armour Archive