 Home
| What's New |
Features |
Gallery |
Reviews |
Reference |
Forum |
Search
Home
| What's New |
Features |
Gallery |
Reviews |
Reference |
Forum |
Search
|
|
|
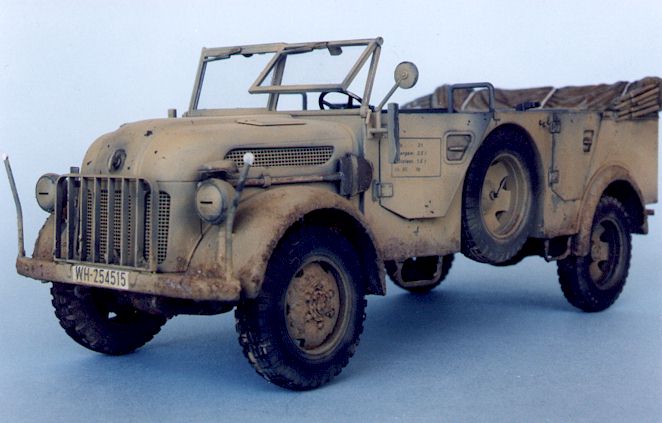
S.gl.Pkw Steyr Typ 1500A/01 by Brett Green
Tamiya's 1/35 scale Steyr kit is moulded in the same tan coloured styrene used for most of their recent German military releases. Nearly 200 plastic parts are attached to 5 separate sprues packed in four clear plastic bags. Tamiya continue their "mini multi-media" trend by including a small sheet of vinyl mesh for engine grilles and vents, plus stamped acetate for the windscreen. Markings for five vehicles are supplied on a small decal sheet. A photo-etched grille set is available separately to substitute for the vinyl mesh. Options are provided to build either the early or late version of this vehicle. These types differed in the mounting location for the spare tyre. Alternate parts are provided for the side body to cater for this variation. The canvas hood is supplied furled, but separate doors may be positioned open or closed. The split windscreen may also be open, closed, raised or lowered according to the modeller's choice. A few sweeps of the hobby knife will separate the halves of the rear cargo doors (which already have detail on the inside face) suggesting more diorama possibilities. Accessories include two figures, a telescope (7 parts), and a telescope case (4 parts). No weapons are supplied. Poly caps secure wheels. This will allow the modeller to remove the wheels for painting.
Moulding is typically Tamiya. The parts are beautifully crisp. Surface texture for the fabric of the seats, the rolled canvas covers and the woodgrain of the stowage boxes and blocks is simply superb. Tamiya's fine detail work has never been too shabby, but this release sets new standards. Witness the thin sidewalls of the jerry can rack, the delicate rifle racks and telescope components. Tamiya also provide detail on the inside of the wheel hubs, very convincing non-slip floor texture and separate seat frames. The lower body and bottom of the engine is well fitted out, but no engine bay detail is included. The only bad news is the very large number of (admittedly shallow) ejector pin marks all over the inside surfaces of the doors, the side of the truck body, and the bottom of the vehicle. Small, raised marks are present on the seat frames, but these should not be visible when the vehicle is assembled. The instrument panel also looks slightly understated when compared to some of Tamiya's recent efforts. The kit markings provide for a wide range of theatres and camouflage schemes. Choices are provided for an overall grey vehicle from "Grossdeutschland" Panzer Division in 1943; two overall yellow vehicles in North Africa and Tunisia; an interim camouflage scheme used in Russia during 1942 of Dark Yellow splotches over Panzer Grey; and a three-colour late-war vehicle in the service of Herman Goring Panzer Division during 1945. Tamiya's painting instructions make no distinction between the European based Dark Yellow and the "Desert Yellow" used in North Africa - they call for XF-60 in all cases. Consult your references carefully.
This is one of the simplest, most trouble-free kits I have ever built. The whole model was assembled in three short sessions. The lower chassis detail (steps 1 to 4 in the kit instructions) was completed in less than one hour; the basic body and seats took about the same time, and the final details were completed in a further couple of hours. This ease of construction does not compromise the level of detail on the completed model. The Steyr 1500A/01 really looks great when finished. The overall fit and alignment of the kit is perfect.
Chassis and Lower Body
The absence of an upper engine would be very obvious through the open grilles at the front and the sides of the upper body. I therefore built a crude engine block from styrene strip and added a piece of tube to the top to represent the air-cooling intake. Although references for this vehicle are quite scarce, a couple of images of the Steyr (including the chassis and engine) may be seen by following this link to a Czech Wehrmacht site. The only other modification to the chassis/lower body was to drill-out the exhaust pipe.
The upper body assembly was equally straightforward. The only slight challenge is the optional etched metal grille set, which I substituted for the kit’s vinyl parts. The front grille side pieces (etched parts 2) are flat, while the space for the grille is curved at the edges. I rolled the edges of these etched parts around a paintbrush handle to achieve the appropriate curve before gluing them in place. Care is also required when fitting the side vent pieces. An unsightly gap will result if these parts are not fitted snugly against the full length of the vent openings. I first "tacked" the vents in place on either side of the etched parts. Super Glue was then sparingly applied to the bottom and top edges of the metal parts, and held in place for a few seconds until the bond was secure. A small quantity of "goo" was applied to the lower part of the body as pre-textured dirt and mud.
References on the Steyr 1500 are pretty scarce. I decided to ignore the decal sheet and build a generic vehicle in southern Italy during 1943. Many vehicles originally delivered into service wearing Dark Grey paint were re-finished in the new standard Dark Yellow from mid-1943. I first pre-shaded the panel lines, nooks and crannies of the vehicle by spraying a coat of flat black. It is important to get into every tiny space with this coat, as it will represent shadows in the hidden parts of the vehicle. An overall coat of Tamiya German Grey followed this. The outer body was then oversprayed with a thin, streaky mix of Tamiya Dark Yellow, Desert Yellow and White. This is my preferred formula for German Dark Yellow. I was careful to leave some patches of Dark Grey showing through. The canvas tilt and seats were sprayed with Tamiya Khaki. Shadows were created with a thin wash of Burnt Umber oil paint. I use a product called "Daler-Rowney Low Odour Thinners for Oil Colour" to thin my oil paints. It is totally odourless, minimising complaints from my wife! At around $11 for 75 ml (2.5 US f. oz.) this product is expensive but, used appropriately, will last for quite a while. Oil wash was also applied to the pre-textured dirt and to the wheels. This created the effect of dried mud and dirt A "wetter" coat of mud was sparingly applied to the lower part of the vehicle courtesy of "Tuft Scenics" Topsoil. Pastel chalk was dusted inside the passenger cabin, and mottled with a damp paintbrush to represent dirty footprints. To reinforce the impression of heavily chipped field-applied paint job, I applied small irregular spots of Panzer Grey to represent damage to the Dark Yellow topcoat. A 2B pencil was run around the edges and tops of doors, the windscreen and some panel lines.
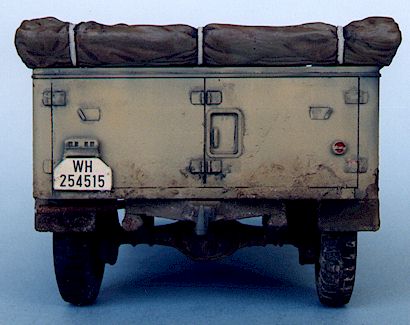
The reflector for the rear vision mirror was punched from the foil of a chip packet! The very shiny silver on the inside of a number of confectionery products is quite convincing as a mirror. I backed the foil with 10 thou plastic stock to add rigidity, and formed the circle using a .160" punch from my Waldron Punch and Die set. Markings were kept to a minimum. Decals for the license plate were sourced from the Tamiya kit but the model does not represent any particular vehicle or unit.
The Steyr’s car-like proportions belie the size of this interesting vehicle. Compare it to a 1/35 scale Kubelwagen - the Steyr 1500A/01 is big! This is a wonderfully detailed kit of an unusual subject that fits together with absolutely no problems. Tamiya's Steyr is a very complete representation straight from the box. Another first class effort by today's leading armour model manufacturer.
Text, Model and Images Copyright © by Brett Green,
August 1998.
|

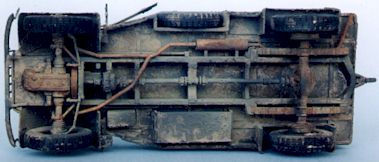 The chassis and lower body detail
is particularly outstanding. I covered
this entire sub-assembly with a thin coat of "goo" (my personal mix of liquid
polystyrene cement, Squadron White Putty, Rustall brand "Dirt" and finely
chopped static grass). This had the dual effects of hiding the ejector pin marks and
adding an authentically grubby texture to the bottom of the vehicle.
The chassis and lower body detail
is particularly outstanding. I covered
this entire sub-assembly with a thin coat of "goo" (my personal mix of liquid
polystyrene cement, Squadron White Putty, Rustall brand "Dirt" and finely
chopped static grass). This had the dual effects of hiding the ejector pin marks and
adding an authentically grubby texture to the bottom of the vehicle.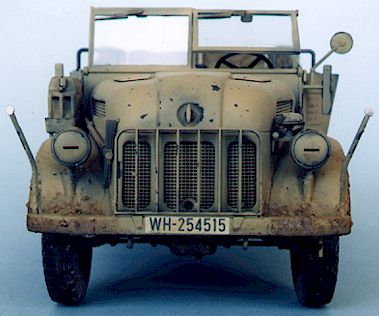 Upper
Body
Upper
Body
