
Part Two of "STURMI!" describes the construction of a Finnish Sturmgesch³tz III Ausf. G using the new 1/35 scale Tamiya kit. For details of the history of the SturmGesch³tz III Ausf. G in Finnish service, and specific modifications, camouflage and markings, see Part One Modifications, Colours and Markings of The Continuation War.
Introduction |
I have learnt my lesson. In future, I will finish my research before I finish the model! After an aborted attempt at building a Sturmi a few years ago, I decided I would build one according to the references I had at the time. I had also recently bought the CMK "Finnish Version" StuG IIIG kit.
Although the CMK kit was based on the Tamiya's now outdated original StuG III Ausf. G kit, I believed that the extras provided in the kit would offer some short-cuts. The CMK kits contains two large, photo-etched brass; a few white metal pieces including a DshK Soviet machine gun, a Saukopf mantlet and a late model gun travel lock; some rather crude injection moulded parts representing concrete armour fill for the forward superstructure plus a very nice set of Propagteam decals covering a couple of German and one Finnish subject. Fortunately I picked this kit up cheaply, as I only used a few of the CMK pieces and one decal option!
I wanted to base the conversion on the new Tamiya StuG III Ausf. G. Most of the important CMK replacement parts (including the new gun shield, the intake screens and the concrete fill) simply did not fit. Further, the white metal parts were either too crude to use, or more easily replaced with parts sourced from the spares box. I also relied on the CMK kit instructions to determine the modifications and markings for this particular vehicle. Following extensive research preparing the accompanying research piece, I discovered that CMK's instructions were largely wrong!
What follows, then, is a detailed construction article outlining how to modify the new Tamiya StuG IIIG without the use of the CMK kit! Due to the inaccuracy of my primary reference (ie, the CMK kit), the model does not represent a particular vehicle, but instead displays typical features seen on Sturmis from July 1944 until the end of the fighting later that year. For accurate details on modifications, camouflage and markings, see Part One of this article.
Much has been much written about the new Tamiya StuG IIIG. Suffice to say that this is by far the best StuG available on the market today. The kit features crisp surface features, close attention to details including very nice tools, individual suspension arms and superbly detailed wheels. Photo-etched grilles for the intakes and the litter guard above the exhaust are available separately. This kit is in a category alongside the best of Tamiya's most recent armour offerings.
The only criticisms of the kit are some difficult to reach ejector pin marks on the
back of the machine gun shield, schurzen of overscale thickness and an simplified jack
block. Two tow cables are provided but, strangely, the guides and clamps for the cables
are not. Not to forget Tamiya's characteristic (and irritating) open sponsons. Basic
construction is very straightforward and requires little comment. The assembly of the gun
mantlet is the only tricky step. I recommend that parts D18 are attached to the mantlet
block (part D32) and allowed to dry thoroughly overnight before attempting to attach part
D19. The completed gun block assembly should in turn be allowed to set for 24 hours before
being trapped between the gun mounting arms.
The Modifications |
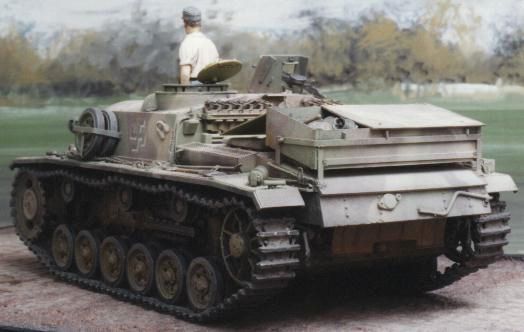
I made a conscious decision not to go overboard with expensive accessories. Instead I relied on scratchbuilding as far as possible to demonstrate that a detailed armour model can be built on a reasonable budget. As discussed in my accompanying reference article, the Finnish army made many unique modifications to the Sturmgesch³tz III. I made the following changes to represent a vehicle shortly after July 1944.
 |
|
|
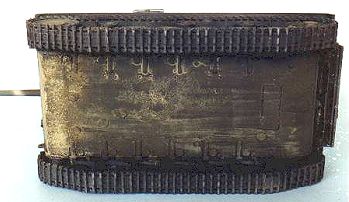
I scratchbuilt lower hull applique armour plates from Plasticard. Resin bolts were sourced from Verlinden. During this initial construction phase, I pre-weathered the lower hull and tracks by adding mud/gunk texture on lower hull, lower front and hull sides from goo mixed with fine dirt and static railway grass.
Spare track rails on the lower hull sides were cut from Plastruct U-beam and detailed from strip brass. The spare track links were from the Tamiya kit. Roadwheels needed sanding along the circumference to eliminate the seam line. However, I left the seam in place for the spare road wheels to represent factory-fresh items.
Torch-cut detail was added to the lower hull overhang with my Dremel motortool. Small details included an Eduard mesh litter guard under the lower hull overhang, I relocated the jack handle onto rear hull per my references for Finnish StuGs of the period. Exhaust pipes were drilled out and chains added to the tow shackle pins on the lower rear hull. I used my "goo" mixture (liquid poly cement and Squadron White Putty) to add surface texture to the exhausts. I also added a reflector to this area using a punched styrene disc.
I sourced the two-groove, 40cm track from the Dragon Jagdpanzer IV L/48 set. These were left over from a previous modelling project, but they are available inexpensively as a separate item from DML. These are excellent tracks and entirely appropriate for this variety of track that did not have a lightening hole in the guide tooth.
 |
|
|
A new Notek light mount was cut from brass shim and bent into shape. Before this was glued in place, I drilled a hole in the hull immediately underneath the mount and fed a short length of fuse wire through representing the power lead. The mount base was glued in place and Model Kasten bolts were added to the front and rear. An Anvil brand Notek light base was glued to the top of the mount.
Kit tools were enhanced with brass wire release handles and other minor details. The kit jack block is simplified and required rebuilding. I first carved off all moulded detail and scored the basic block repeatedly to represent worn woodgrain. I then added new mounting brackets from scrap styrene; brass aircraft seatbelts for straps and buckle; and styrene bases for handles bent from brass wire.
Tow cable brackets were fabricated from lead foil and Anvil brand wingnuts. The rear guides were made from brass strip. These were superglued to the Tamiya trackguards. Tow cable loops were attached to the kit-supplied string with 5-minute epoxy (Araldite). This was smeared over the top to allow later sanding and blending.
 |
|
|
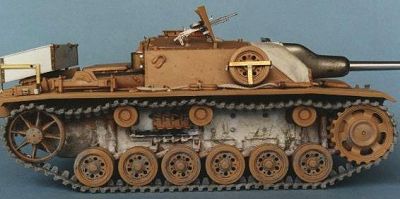
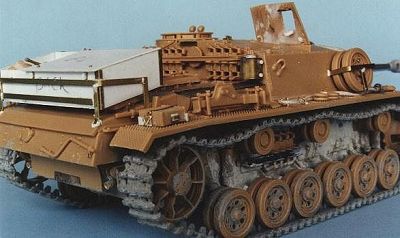
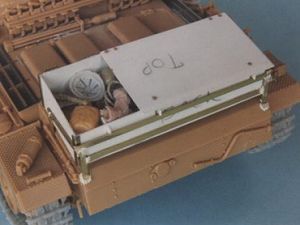
I scratchbuilt the rear stowage box from styrene sheet with the assistance of my new Chopper cutting tool, thanks for the tip Paul. The prominent mounting frame was scratchbuilt from brass strip. Box hinges and corner guard detail was added using brass shim (punched to represent rivets). Bolts and hinges completed this sub-assembly. Some Finnish stowage boxes featured a split lid. I represented cluttered contents using various bits including Dragon accessories; tissue blanket rolls, Hornet German helmets and a boot that I drilled out and split open.
The prominent Finnish style inspection hatch handles were bent from brass wire. Short sleeves were cut from brass tube. These were then slipped over the ends of each handle. A baseplate of scrap styrene was glued to the front and rear of each outside inspection hatch, and superglue was applied to the brass sleeves only. The result is a workable handle (but who cares??)
I enhanced torch-cuts and weld detail with my trusty Dremel Motortool. and/or putty. Finally, I blanked off the dreaded Tamiya open sponsons!
The characteristic driver's splashguard visor was initially scratchbuilt from sheet styrene, but I eventually felt that it was too thick. This was replaced with the CMK brass etched item. However, this item would also be easy to cut from brass shim or thinner sheet styrene. I blanked off behind driver's visor with scrap plastic.
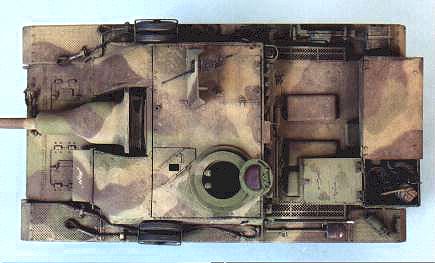
The prominent concrete fill seen on Sturmis after July 1944 was built up on the upper superstructure sides using small balls of Milliput. When smoothed and dry it was textured with a topcoat of Squadron White Putty.
I borrowed the Commander's cupola armour from the Dragon StuG IIIG Late kit. This was suitably textured and weld beads added to the base of the armour. I built a padlock mount for the loaders hatch from brass strip.
 |
|
|
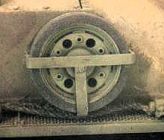
Spare wheel racks for the superstructure sides were scratchbuilt from brass strip. Weld details were added using Squadron White Putty. As discussed previously, the seam lines on the spare wheels were not removed, as new wheels had similar seams.
 |
|
|
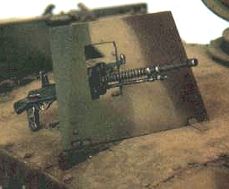
The MG shield was modified to accept the Russian DT5 machine gun. The hole was enlarged; ejector pin marks were filled; a mount was scratchbuilt from scrap plastic and a hook added from brass wire. A handle for the top inside of the shield was fabricated from brass wire. Model Kasten's Soviet DT-5 machine gun was added. This is a really lovely little white-metal item. The optional shoulder rest and circular ammo cartridge are provided as separate items.
I scratchbuilt a mount for the engine retaining hooks from brass shim; and the hooks were bent from very fine electrical wire. This assembly was attached to the centre of the rear of the superstructure roof.
A new mount for FuG. 8 Command Radio with larger isolator was required. I built an armoured "pot" surrounding this new base from brass sheet. Bolts were added using Waldron's punch and die set and a wire lead-in cable was added to the back of the superstructure from fuse wire.
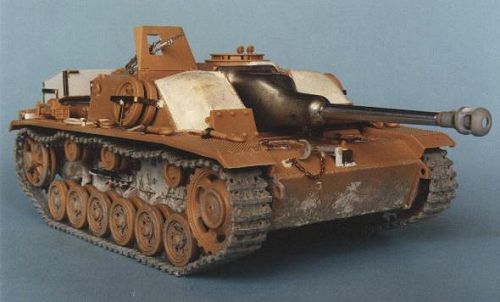
The L/48 75mm gun assembly was based on the Tamiya mount and CMK's white metal Saukopf. This Saukopf required additional detailing on its back face, including bolt mounts and hooks for the weather cover. I filled the coaxial MG hole on the front, and adapted the metal mantlet to Tamiya mount.
 |
|
|
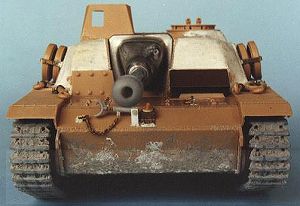
A late pattern gun travel lock was added. This new travel lock was based on the item from the Dragon StuG III Ausf. G (late). I built a new front base plate from brass strip; cut off the cradle and fabricated a threaded neck by wrapping fine copper electrical wire around steel piano wire. I drilled the base tube and collar, locating the neck in between. The hull mount for the retaining chain was built from strip styrene, and drilled out. A spring was made from fine wire and glued to the chain, which was in turn glued to the mount. A base for the spring was bent from brass strip and superglued to the upper front hull. Putty weld beads were added to the completed assembly, and a prominent Verlinden hex bolt was added to the front of the mount.
The rubberised-fabric weather cover between the rear of the mantlet and the front of the roof was formed by carefully manipulating lead foil. I used the Italeri item (which is about 1/3 too short) to form the bellows shape. I modelled the fabric torn to see some of the bolt detail behind mantlet.
I used the CMK, turned metal barrel. The muzzle brake was rebuilt. The base for this
new item was the Dragon L/48 muzzle brake. I added the circular washer between the baffles
(from styrene tube). I glued the assembly together and reformed the shape of the baffles
and front by using a motor tool as a makeshift lathe and carefully carving the spinning
assembly with the back of a hobby knife. I also engraved a ring at the rear of the
assembly using this method. After significant filling, slots were cut in front of the rear
ring and I glued a small rectangle of styrene in front of the top slot. A Verlinden bolt
was added to complete the muzzle brake.
Painting and Decals |
I find that painting a convincing hard-edged camouflage scheme is a real challenge. Give me a mottled finish any time! Contemporary photos suggest that Finnish StuGs had a very high quality, hard-edged finish suggesting that the vehicles may have been spray painted with the assistance of masks. For more details about Finnish colours and camouflage schemes, see the accompanying research article.
 |
|
|
I first sprayed a base coat of black. This reverse shading leaves convincing shadows in all those crevices and dark places. The next step was to spray a coat of Moss Green overall. I used a mix of Gunze's new acrylic German Dark Green lightened with Dark Yellow. I then hand-painted a thin outline of the brown disruptive colour (using Gunze 406 Schokoladenbraun) and carefully filled in this outline using my Testors airbrush. The final colour is a light grey. I used a mix of Tamiya XF55 Deck Tan (40%), XF19 Sky Grey (40%) and 20% Flat White to achieve this colour. I repeated the previous step of brush painting the camouflage outline and filling it in with the airbrush. The pre-textured mud was now sprayed a flat light brown. I mixed a thin oil wash, which was applied to panel lines. A thin brown wash was used to highlight the mud and dirt.
Decals were from the CMK kit, but Finnish decals may be sourced from a company called
"Wiking" (I have a couple of sets and they are very nice); and Stencilit also
provide brass stencils for the relevant Hakaristi. Finally, a dull coat was applied and a
coat of light pastel chalk dusted over the top. This dusty coat was weathered by painting
random spots of water over the chalk.
Conclusion |
This was an enjoyable and challenging project. Once again I have attempted new construction and painting techniques; and I have certainly never undertaken quite as much research for a single subject!
 |
|
|
In summary, the CMK kit is a bit sad by today's standards. Tamiya's old StuG III (upon which the CMK kit is based) looks embarrassingly bad when viewed beside the new offering. And although the brass accessories are very nice, almost nothing fits the new Tamiya Sturmgesch³tz III Ausf. G. Certainly none of CMK's original (and very crude) plastic parts fit the later kit.
The cast mantlet is quite nice, but a new Saukopf can more easily be sourced from a Dragon kit. In fact, if you purchase a Dragon "StuG IV Early", you will get two spare Saukopfs, a spare late StuG III/IV roof (which is almost a drop fit for the Tamiya kit), and a spare late StuG III drive sprocket with the hubcap removed and bolts exposed; as well as various other bits and pieces. Now that is good value for the canny StuG builder! Thank you Dragon. I cannot really recommend the CMK kit at all. An interesting idea with a fundamental flaw (i.e. rotten base kit). Nice decals though.
By contrast, I can recommend the Tamiya Sturmgeschutz IIIG kit to everybody - novice
and expert. Tamiya's new StuG looks great and almost falls together. With the number of
StuG references available, there are many interesting variations yet to be built. Go build
one of them using this kit!
References |
|
|
Back to HyperScale Main Page
Back to Armour Archive