 Home
| What's New |
Features |
Gallery |
Reviews |
Reference |
Forum |
Search
Home
| What's New |
Features |
Gallery |
Reviews |
Reference |
Forum |
Search
|
|
|
Sturmjõger
Part 1 by Mike Millette
I don't know exactly why, but the Sturmjõger Fw 190s seem to have some of
the neatest paint schemes. At some point I had decided that I would have to build one or two of
these aircraft, but was a bit put off by the price of a Trimaster Rammjõger
kit.
The other option, converting the wing to the 30mm outboard cannon
configuration, seemed a daunting challenge until I discovered the Cutting Edge
conversion set, CEC 48078, for TamiyaÆs Fw 190F-8. Actually this conversion set allows you to modify either the
Tamiya kit or any of the Trimaster family (Trimaster, DML, Dragon, Hasegawa,
Revell/ Monogram) of 1/48 Fw 190s into almost any version from A-5 to A-8.
For the Sturmjõger s, this includes a resin replacement piece for each of
the outer wing 30 mm gun bulges and shell ejector port.
It was just what I needed.
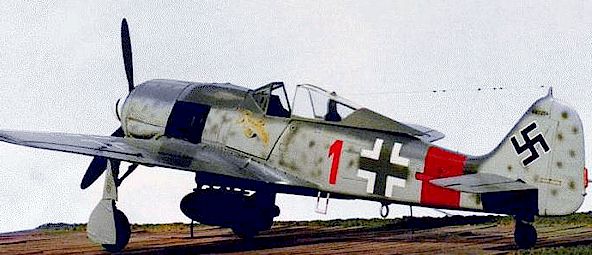
Due to some very obvious confusion about Red 19s paint scheme (see Part
II), I started on Red 1 first. Red
1 was the aircraft of Staffel Kapitan Klaus Bretschnider.
Bretschnider was by all accounts a fearless and aggressive fighter pilot
with 31 victories, 19 of which were bombers.
The inscription on his aircraft "Rauhbautz VII" (Tough Guy VII)
pretty much says it all. This
aircraft carried the MG 151/20, 20mm cannons inboard and Mk 108, 30mm
ōpneumatic hammersö outboard. In
an effort to offset the weight of the armor and restore some of the aircraftÆs
performance, the upper deck MG131, 13mm machine guns were removed.
I started with TamiyaÆs excellent Fw 190F-8 kit built, for the most part, straight out of the box. The only area where any significant modifications were made was in the bottoms of the wings using the Cutting Edge conversion set.
The Cutting Edge set supplies several different outer wing panels as
well as a revised cowling gun cover allowing you to build a variety of late A
models from the A-5 to the A-8, including the Sturmjõger version.
The replacement parts for the Sturmjõger conversion bear a striking
resemblance to the wing inserts used in the Trimaster family of 190Æs but in
any case they are very well cast with crisp details and no air bubbles or
warpage. In order to locate the
replacement panels properly, I took them and taped them to the bottom of the
wings so that all of the panel lines matched up.
I then used a pencil to draw the outline of the replacement pieces and
removed the taped components. The
instructions recommend that, initially, you cut out a smaller section of wing
than needed to install the replacement panel.
This is so that if you make a mistake, you err on the safe side.
Good advice. A pin vise was used to drill numerous holes around the inside of the
area to be cut out. The holes were
then connected using an Xacto knife and a ragged chunk of wing removed.
The ragged edges were cleaned up and the tedious task of trim, test fit,
trim, test fit, trim, test fit... began. This
was kind of a pain and I actually had better luck doing this on the DML kit I
used to build Red 19.
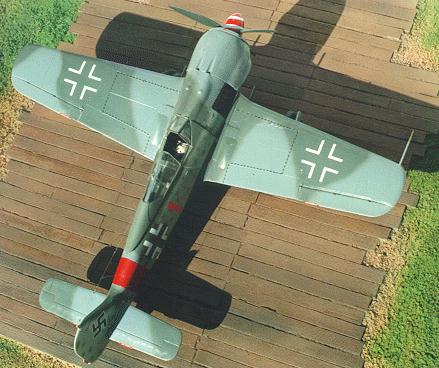
One of the unique features of many of the Sturmjõger s is the appliquķ
armor. Aeromaster has 3 sheets of
decals featuring these aircraft (48-231, 232 & 233) and they all include
patterns for the left and right side appliquķ armor. The original armor was 5mm thick that works out to approx. 5
thou in 1/48 scale. I made mine out
of 10 thou plastic sheet that, obviously is thicker than scale, but for some
reason looks closer to what you see in photographs.
In addition, looking at photos of aircraft carrying this armor, it seems
pretty clear that the edges were beveled, perhaps in an effort to improve
airflow a bit. This can be replicated by running the edges of the plastic armor
across a sheet of 400 grit sandpaper at a 45
angle.
One or two swipes should do it. Eduard
also makes photoetched metal armor for Sturmjõger s (48-244) but I have not tried
these. As part of the conversion work all of the kit guns were removed, the
upper deck guns permanently, as Red 1 didnÆt carry cowl mounted machine guns.
The wing guns were replaced with left over gun barrels from Pro
ModelerÆs Me 410. This may sound odd if you arenÆt familiar with this kit,
but what made them appealing is that the come pre-drilled, straight out of the
kit. Just cut to length and glue
on. The outboard 30mm guns are
installed low in the wing so they protrude out the bottom of the wing slightly
with an attendant ōbumpö or ōfairingö.
This fairing was replicated using a small blob of Squadron Putty that was
then drilled out and sanded to shape before the guns were installed.
I should probably have a section in this write-up entitled
ōResearchö since an awful lot of time on these projects was dedicated to
that, but, as much of it was done during the painting stage, I will include it
here. The black & white profile
and photos in Bernd Barbas' "Planes of the Luftwaffe Fighter Aces, Vol.
2" were compared to the black & white photo and color profile in Sundin
& Bergstrom's "Luftwaffe Fighter Aircraft in Profile" and with the
Aeromaster decal instructions (sheet 48-231).
Inconsistencies in all three sources became apparent immediately.
Claes Sundin's color profile seemed to be the closest color
interpretation of the available photos so that was used for the most part, the
notable exceptions being the II Gruppe bar and the spinner. It appears from Claes Sundin's color
profile that the tactical number "1", the II Gruppe bar and the RVD
band are all painted in the rust red color that JG300 used for its early RVD
bands. The Aeromaster sheet and
Bernd Barbas' book suggest that the number, bar, RVD band and under cowling are
all painted using RLM 23 Red (this was the color used by JG1for their RVD
bands). Looking at the photographs,
the II Gruppe bar is definitely a lighter shade than the RVD band that surrounds
it. It also appears that the
tactical number is painted the same color as the II Gruppe bar.
From this I concluded that the number "1" and the II Gruppe bar
are RLM 23 and the RVD band is painted using the rust red primer color.
The patches on the bolts holding the armored ring on to the engine
cowling also look to be rust red as well and this makes sense, as this was
primer paint for the most part. In
most of the paintings or profiles that I have seen of this aircraft, the under
cowl is also painted red. In the
photo in Sundin & Bergstrom's book, the under cowling panel is definitely a
lighter shade than either RLM 23 or the rust red primer.
Yellow seems a reasonable interpretation, although I suppose at some
point it could also have been painted red.
I painted this area yellow on my kit.
The paint scheme is the standard combination of mid war grays, RLM 74
Gray Green, 75 Gray Violet and 76 White Blue.
I really like Aeromaster's enamels so they were used for all three of
these projects. They are already
pre thinned for airbrushing, but were thinned additionally to a 60/40 mix with
Odorless Thinner and shot through a Badger 150 with the air pressure set at
about 20psi. While this requires
that more layers be applied to get the right color density, but it gives a nice
soft edge to the mottling without a lot of overspray.
The Fug 16 antenna was made from invisible thread with blobs of wood
glue to represent the resistors. The
FuG25 antenna was made of a short section of stretched sprue painted with Model
Master Tire Black. The gun camera
port was drilled out and replaced with a dot of superglue. IÆm not thrilled with the way it turned out and will
probably use Crystal Clear in the future. I
also drilled out TamiyaÆs main gear retraction flags. They are robust but not exactly to scale.
I replaced them with stretched sprue painted red.
See Part 3
Model, Images and Article Copyright
® 1999 by Mike Millette Back to HyperScale Main Page Back to Features Page |
 The
next big decision was which aircraft to model.
The
next big decision was which aircraft to model.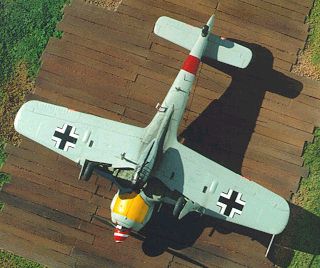 No
matter what I did I could not get the replacement panels to line up flush to the
bottom of the wing all the way around.
No
matter what I did I could not get the replacement panels to line up flush to the
bottom of the wing all the way around.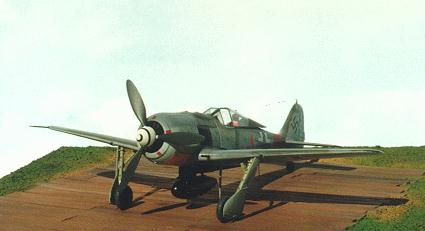 Rather
oddly, the spinner also turned out to be a bone of contention.
Rather
oddly, the spinner also turned out to be a bone of contention.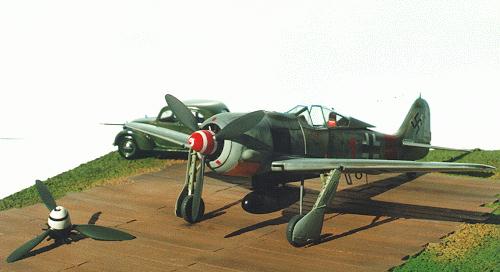 One
detail that I missed in the course of all this research is that the Aeromaster
decals for the II Gruppe bars go all the way from the aft end of the RVD band
forward so that they protrude ahead of the band just a bit.
One
detail that I missed in the course of all this research is that the Aeromaster
decals for the II Gruppe bars go all the way from the aft end of the RVD band
forward so that they protrude ahead of the band just a bit.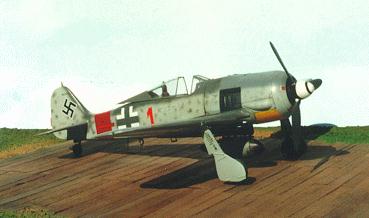 This
model and Red 19 marked the first time I tried the "Future" floor wax
as a clear coat I didn't have quite the problem with it on this model as with
Red 19 but still.... it was not a stellar success.
This
model and Red 19 marked the first time I tried the "Future" floor wax
as a clear coat I didn't have quite the problem with it on this model as with
Red 19 but still.... it was not a stellar success.