 Home
| What's New |
Features |
Gallery |
Reviews |
Reference |
Forum |
Search
Home
| What's New |
Features |
Gallery |
Reviews |
Reference |
Forum |
Search
|
|
|
Sukhoi
Su-22 Fitter by Lukasz Kedzierski
8 PLSz (Attack Aviation Regiment) was formed in September 1944 in Volchansk near Khrakov, USSR. After completion of training the unit was a part of the 2nd Brandenburska Dywizja Lotnictwa Mysliwsko-Szturmowego and commenced active duties on 25 April 1945. By the end of the war the regiment has flown 129 missions including 92 combat sorties mainly in support of the 1 Armia Wojska Polskiego (1st Polish Army). In 1946 the unit was disbanded and one of its squadrons was assigned to 6 PLSz. In 1952 this squadron became 53 PLSz formed at Bednary. In 1960 it was renamed a Fighter-Attack Regiment and in 1967 the name Brandenburski was given to the unit. The current name 8 PLMB (Fighter-Bomber Aviation Regiment) was assigned in 1982 and the unit was re-equipped with Su-22M-4 soon afterwards.
In 1984 the Polish AF bought 90 Su-22M-4s and 20 Su-22UM-3Ks as a replacement for Lim-6, Lim-6bis and Su-20 which were used by fighter-bomber units. Aircraft of the 23, 24, 27, 28, 29, 30, 37 and 38 series were delivered to Poland and equipped three regiments: 6 PLMB in Pila, 8 PLMB in Miroslawiec, 40 PLMB in Swidwin as well as 7 PLMBR (fighter-bomber and reconnaissance unit). Currently approximately 80 Fitter Ks form an essential part of PAF strike force.
The Sukhoi Su-17/20/22 family was a development of the fixed wing Su-7. This highly manoeuvrable and fast aircraft proved to be a bit of a disappointment due to its inadequate weapon carrying capacity and limited range caused by high fuel consumption by AL-7F engine. These limitations can be summarised by a statement of one of the Indian AF pilots : "it is an impressive aircraft, which can carry quite a lot of bombs and can fly to remote targets, it’s a pity that we can’t do both things at once". A requirement for an improved aircraft was issued by Soviet AF High Command and as a response Sukhoi OKB offered modified Su-7 aircraft known as Su-7IG or S-22I. The Sukhoi OKB team decided that the variable sweep wings would improve aircraft’s performance. However, a full sweep wings could not be used without radical modifications to the fuselage. Therefore, the wing sweep point was moved to nearly half span position and fixed part of a wing was equipped with large aerodynamic fences. Flaps were fitted to both fixed and variable parts of the wing, while leading edge slats only to variable sections. These changes increased the weight of the aircraft by 400 kg, however, the first test flight proved that the modified aircraft has much better performance than its predecessor. Take off and landing improved considerably as did range, weapon load and manoeuvrability. The next improved prototype S-32, which included some technological changes and improved internal installations was introduced into production as Su-17. External changes included a dorsal spine fairing, clamshell canopy which replaced Su7’s sliding canopy, and slightly bigger fuselage diameter. This version was produced between 1970-72 and then replaced by Su-17M (Fitter C) featuring a new generation engine AL-21F3. The weapon load was increased from 3000 kg to 4000 kg (two additional hardpoinst were mounted under the fuselage) and range increased by 60 to 80%. The export variant with downgraded electronics was designated Su-20, which was supplied to Poland and Egypt. In 1975 a new version was built - Su-17M2 (Fitter D) and was in production until 1979. The aircraft had completely new electronics including laser rangefinder and DISS Doppler radar, which were housed in a longer nose. The Su-17M2D (Fitter F) was essentially identical to Su-17M2, but equipped with R-29BS-300 engine with larger diameter resulting in "fatter" fuselage, and was mainly offered for export as Su-22 with downgraded electronics (delivered to Peru and Libya). In 1976 Sukhoi OKB designed two-seater version of Fitter known as Su-17UM (Fitter E). The redesigned and lowered nose (3o declination) of the aircraft as well as a double cockpit gave the aircraft its characteristic "hunchback" appearance.
The changes to the fuselage were also incorporated into single seater version Su-17M3 (Fitter H). The export variant with R-29BS-300 engine was designated Su-22M and its two seater equivalent Su-22UM. Fitter H featured improved electronics and new weapon systems, larger cockpit, new ejection seat K-36DM, strengthened landing gear and increased fuel load. New electronics and additional fuel tank were accommodated into a large spine. The fin and rudder were made taller and a ventral fin under the rear fuselage section was added to improve stability. Two small pylons for R-60 air-to-air missiles were added under the fixed parts of wings. Self defence capability was also increased by the addition of two ASO dispensers on both sides of the fuselage. All the changes were incorporated into Su-17UM, which was re-designated Su-17UM3 (Fitter G) and produced since 1978. The export variant with R-29BS-300 engine known as Su-22UM3 (Fitter J) was delivered to Angola, Libya, Peru, South and North Yemen, and Hungary. Since 1983 an export variant is built with AL-21F-3 engine (Su-22UM3K). The last version in the Fitter family is Fitter K (Su-17M4, Su-22M4), which was produced since 1980 until 1990. New avionics, comprehensive navigational system and on-board computer allowed for better target acquisition and greater attack accuracy. A new heat exchanger was installed in front of the fin because of the new electronic equipment and two additional ASO dispensers were mounted on the fuselage. Fitter K was optimised for low level, high speed attacks and was converted to a tactical strike aircraft. Its fighter capabilities were no longer needed and as a consequence the aircraft has a fixed nose cone in the air intake, which limits the maximum speed to M = 1.75. Its two seater version is capable of reaching M = 2.1. Su-22M4 are used by air forces of Poland, Slovakia, Czech Republic, Bulgaria and Afghanistan. Fitter K is removed from inventories of Russian AF and Luftwaffe (former East Germany aircraft).
The Fitter family was neglected by model manufacturers for a long time. In 1:72 scale there has been no decent Su-22 model kit for a long time. There is a good model of Su-7 made by KP, but Su-22 was only made by Hobbycraft and from what I read it is a hybrid of Su-20 and Su-22. But a few years ago Pantera released a series of Fitters. There was long before Bilek/Italeri came up with their excellent Fitter K and Fitter G kits. Pantera models are simple, but fairly accurate with engraved panel lines and nice set of decals printed by Techmod. The range includes Su-17M3, Su-22M3, Su-17M4, Su-22M4 and Su-22UM3K. There is also Su-20 and Su-20R and a separate nose section suggest that Su-17M2 might also be released. I have a few of this kits in my collection (still "under construction" at various stages of completion), but I got Italeri’s reboxing of Bilek kit as soon as it was in the shop.
Wings are nicely done, but aerodynamic fences on the fixed sections are too thick too. There is a full set of underwing pylons and underfuselage hardpoints. The underwing stores are limited to fuel tanks, two R-60 missiles (they look overscaled) and two B-8 rocket pods. The canopy comes in two parts and the sprue also contains landing lights and HUD. When compared with plans the kit seems to be almost perfect. I did not measure it exactly but it looked good to me. So there we go - very good starting material to make an excellent replica. I have quite a lot of photos of Su-22 from various airshows in Poland and two excellent reference books: PKL no. 1 "Su-22M4" and 4+ "Su-22M4 and UM3K", so I decided to get some additional sets for this kit. There is plenty to choose from, but I decided to use photo-etched sets made by PART. There are three comprehensive sets covering exterior and interior details plus a set with a crew access ladder. The K-36 ejection seat came from True Detail range and Dragon’s Modern Soviet Aircraft Weapons - air to surface missiles set provided me with all underwing stores I needed. PART’s sets are really excellent. Very nicely done and thin, can be easily cleaned with a file or sanding paper. As I said there are three of them:
The last set is 72-031 with a complete crew access ladder and two wheel chocks. These sets provide enough parts to detail Su-22 completely, but I did not like the idea of detailing the kit’s ejection seat with photo-etched parts and bought a resin replacement. However, I did detail a seat for Pantera kit and I have to say that the seat belt arrangement is a mystery to me. I used reference photos, but it seems like the harnesses are overscaled!!! There is no way that all of them can be fixed onto one seat. Nevertheless, I think that these sets provide more details than Eduard’s sets.
Fuselage
Firstly, airbrakes openings were cut out and edges shaved with a scalpel blade to enhance fit of photo-etched inserts. I cut rectangular holes to accommodate a whole airbrake, but these are actually partially covered at the front end and have a U-shaped insert at the rear end. After detailing with a fuse wire, the additional parts were fashioned from a styrene sheet. The next step was to open auxiliary air intakes on the nose, upper and lower nose
avionics compartments, on-board computer bay, engine access panel and heat exchanger inlet
and outlets. All these required quite a lot of drilling and cutting, because the plastic
was about 2 mm thick!! With all the holes in the fuselage opened, I moved to the nose air
intake cone. The ribs in KLEN-54 target designator were added from photo-etched fret and
the cone was modified to accommodate avionics bays and stuffed with lead, whereas the
transparent cover for KLEN-54 was cut from an acetate sheet and glued to the photo-etched
frame. In the meantime covers to the auxiliary air intakes were made from a plastic sheet
and glued in the open position, followed by the This was followed by the engine, which was made from a plastic pen cut to give an approximately 4 cm long pipe. External detail was fashioned from masking tape, fuse wire and bits and pieces of plastic to make it look busy. The whole thing was painted steel and drybrushed with silver and black, while "plumbing" was picked up with black and different shades of grey. Do not forget that the access panel is about 4 x 11 mm, so not much can be seen anyway. The other end of the fuselage was blanked with kit’s engine exhaust enhanced with photo-etched convergent nozzle and afterburner ring. External detailing involved addition of KSU dispensers and fuel cups on the dorsal
spine, photo-etched attachment points for the access ladder, landing light frames on both
sides of the nose wheel well, addition of various antennas (Italeri’s kit
Cockpit Right from the beginning I decided to use True Details K-36 resin ejection seat instead of the kit’s seat. The seat was painted black and dry brushed with light grey, seat cushion was painted olive green and harness light grey. I only added firing handles supplied in PART’s set. The cockpit was supposed to be detailed with photo-etched parts, which included instrument panel, side consoles and seat rail as well as some minor details. However, these did not fit into the cockpit!! The instrument panel was too big, side consoles too small and the seat rail did not go well with the resin seat. I reviewed my options and was left with only one - to buy NeOmega resin set for Su-22. The only problem was that I can not get NeOmega products in Australia!! However, during my daily (Internet) visits to NKR Models I discovered that they just got resin sets made by Pavla Models and there was one for Su-22 for only 12 AUD! Two days later it was sitting on my desk. The set consists of the nose cone, cockpit tube, instrument panel with coaming, nose wheel well and K-36 seat. The nose cone and seat went to Pantera model, but the rest of parts was utilised in Italeri’s kit. The instrument panel was sanded down and replaced with photo-etched part (cut into three pieces and trimmed), the whole assembly was put together and superglued into the fuselage, which required a bit of surgery to accommodate a new cockpit. The end effect was very good. Then, the HUD was cut from an acetate transparency and fixed in place. The kit’s windshield did not fit over the new resin coaming, but when compared with scale plans it turned out to be too small anyway. It was replaced with transparencies from Pantera kit, which fitted perfectly. The canopy was enhanced with an internal support framework for the instrument flying hood. This was scratchbuilt from copper wire and plastic card and the hood itself was made in folded position from a wine bottle foil. All the hinges for the canopy came from the PART’s set.
Wings As you can see, from the beginning I was really determined to remove as much plastic from this kit as possible.
Flaps, slats and ailerons were cut from the wings, appropriately modified and fixed in extended position. The trailing edges were thinned down, position lights added as well as SIREN system antennas on the leading edge. The aerodynamic fences were installed in place after the whole wing was fixed to the fuselage. What seemed to be a straightforward operation turned into a major surgery involving a lot of sawing, dryfitting and cursing. The small fences fitted rather nicely into specially rescribed lines. The only problem
was that they were both the same length, whereas the plans show that one of them is longer
than the other. The big fences were a problem. The inner one was not that bad, but the
outer one was a real pain. It goes over the trailing edge and joins the outer weapon pylon
and it
Undercarriage As mentioned before the nose wheel well was replaced with Pavla Models resin well. The resin part is full of raised detail, which needed some drybrushing and a bit of "wiring". The front wheel and a yoke are moulded as one part, and were separated. All the wheels were made weighted and enhanced with photo-etched parts (brake disks, etc.). The landing gear legs were also improved with photo-etched parts provided in abundance by PART. The main wheel wells were detailed with some fuse wire and corrected at the fuselage-wing joint. It all looked perfect until the final after painting assembly. When I installed the undercarriage the whole model had a tail sitting appearance. It is supposed to have slightly tail sitting look, but the ventral fin under the rear fuselage was almost touching the ground, and there was no way that I can fit missiles on the underwing pylons!! After checking references and studying scale plans the main undercarriage legs were extended by 4 mm. This cured the problem and allowed for weapon installation as well as it did not affect the overall appearance. It seems to me that Bilek/Italeri did not do a good job in here. All the kit’s undercarriage covers were replaced with photo-etched parts.
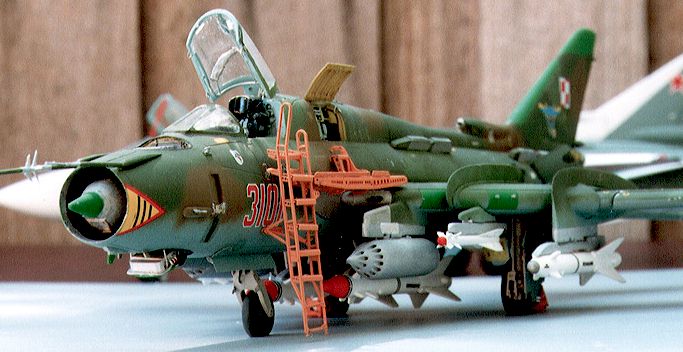
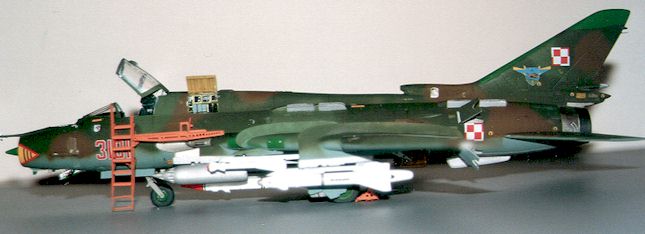
There was only one marking scheme for me - Polish Air Force Su-22. This actually gives a variety of colour options and some interesting unit markings. Italeri supplies decals for three aircrafts - two Russian and one Polish, but it is a "plain" scheme without any unit markings. Pantera, on the other hand, supplies beautiful decals printed by Techmod with markings for 5 aircrafts: two Polish (8 PLMB and 7 PLMB), Iraqi, Afghan and East German. I decided to paint my model in markings of the 1st squadron of 8 PLMB (Fighter Bomber Regiment). The red 3101 wears three colour camouflage (there is also a four colour camouflage, which seems to be more widely used) of brown and two shades of green with light blue undersides. I also got a colour photo of this aircraft from Polish Aviation Site. The photo was taken by Cezary Przeorski, who is a member of a ground crew in 8 PLMB.
This is an excellent model of a very interesting aircraft. The basic Bilek/Italeri kit is enough to make a good replica of Fitter, but needs some re-working of the undercarriage. And with the variety of colour options available there is a need for at least 3 of them. I am going to build three Pantera kits (East German Su-22M-4, Hungarian Su-22M3 and Slovak Su-22UM-3K) plus one more Italeri kit in markings of the 20th Fighter Bomber Regiment. This model won a third place in small/modified category during Model Expo 99 competition held in Melbourne.
Article, Images and Model Copyright © 1998 by Lukasz Kedzierski
|
 The kit comes in a
large box containing three large sprues with approximately 80 parts plus a small sprue
with transparent parts. There is also a small decal sheet with markings for three aircraft
-two Russian and one Polish. Only national insignia and tactical numbers are included. All
parts are moulded in dark grey plastic with a slightly matt finish and engraved panel
lines. The cockpit detail is rather basic and the same goes for the nose wheel well. The
main landing gear consists of several parts and the wheel wells have a nice internal
structure moulded in, but the covers are too thick.
The kit comes in a
large box containing three large sprues with approximately 80 parts plus a small sprue
with transparent parts. There is also a small decal sheet with markings for three aircraft
-two Russian and one Polish. Only national insignia and tactical numbers are included. All
parts are moulded in dark grey plastic with a slightly matt finish and engraved panel
lines. The cockpit detail is rather basic and the same goes for the nose wheel well. The
main landing gear consists of several parts and the wheel wells have a nice internal
structure moulded in, but the covers are too thick. 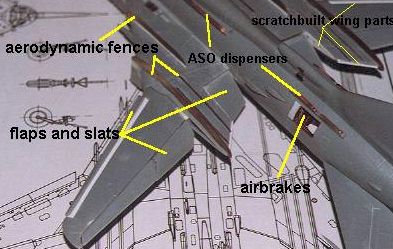 Construction
started with fuselage modifications.
Construction
started with fuselage modifications. 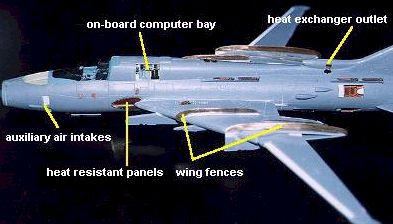 nose cone installation (this was secured with a superglue). All
the avionics bays and computer bay were then made from a styrene sheet and detail
scratchbuilt.
nose cone installation (this was secured with a superglue). All
the avionics bays and computer bay were then made from a styrene sheet and detail
scratchbuilt. 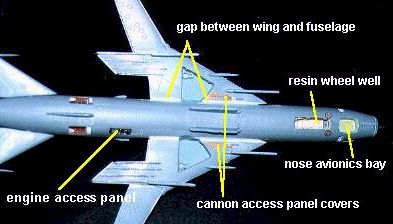 depicts an early production
Su-22, whereas the Fitter I made is a late production example with slightly different
antennas) and addition of protective heat resistant panels near cannon barrels (this was
done after wings installation). Also ASO dispensers’ photo-etched faces were added to
existing model parts. The fit of both fuselage halves was excellent and I did not use any
putty. The engine access panel and computer bay covers were made from .010" plastic
card and internal surfaces of covers were detailed with thin stripes cut from a wine
bottle foil, while the overpressure valves on the engine access panel cover were cut from
a stretched sprue.
depicts an early production
Su-22, whereas the Fitter I made is a late production example with slightly different
antennas) and addition of protective heat resistant panels near cannon barrels (this was
done after wings installation). Also ASO dispensers’ photo-etched faces were added to
existing model parts. The fit of both fuselage halves was excellent and I did not use any
putty. The engine access panel and computer bay covers were made from .010" plastic
card and internal surfaces of covers were detailed with thin stripes cut from a wine
bottle foil, while the overpressure valves on the engine access panel cover were cut from
a stretched sprue.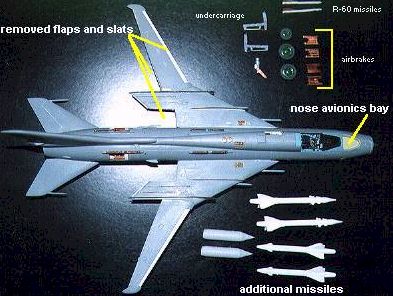 The wing
construction started with removing all aerodynamic fences from the upper and lower surface
of the fixed part of the wing. These are supplied by PART as photo-etched and they are
more to scale. Also cannon barrels were removed from the wings and replaced with barrels
made from syringe needles and the covers of cannon bay access panels were replaced by
photo-etched parts.
The wing
construction started with removing all aerodynamic fences from the upper and lower surface
of the fixed part of the wing. These are supplied by PART as photo-etched and they are
more to scale. Also cannon barrels were removed from the wings and replaced with barrels
made from syringe needles and the covers of cannon bay access panels were replaced by
photo-etched parts.  also wraps around the
leading edge and forms an integral part of the pylon. The problem was that the underside
part was too long, but it was simply cut. However, no matter what I did it didn’t
want to stick to the wing surface, but the brute force and superglue finally won the
battle. The upper part for a change seemed to be "slightly" different that the
wing profile and a bit too short, so there was no way that it was going to join the weapon
pylon leaving approximately 3 mm gap. This was filled with a plastic insert, covered with
a gap-filling superglue and sanded smooth. All the gaps between the fences and wing
surface were filled-in with a superglue and the inner fence was strengthened with thin
strips of plastic card at the base (this is also seen on real Su-22s). The fit of wings to
the fuselage is not very good either. When the upper surface was properly positioned,
there was about 1 mm gap between the fuselage and the lower surface of the wing. This was
filled with bits of plastic card and filler.
also wraps around the
leading edge and forms an integral part of the pylon. The problem was that the underside
part was too long, but it was simply cut. However, no matter what I did it didn’t
want to stick to the wing surface, but the brute force and superglue finally won the
battle. The upper part for a change seemed to be "slightly" different that the
wing profile and a bit too short, so there was no way that it was going to join the weapon
pylon leaving approximately 3 mm gap. This was filled with a plastic insert, covered with
a gap-filling superglue and sanded smooth. All the gaps between the fences and wing
surface were filled-in with a superglue and the inner fence was strengthened with thin
strips of plastic card at the base (this is also seen on real Su-22s). The fit of wings to
the fuselage is not very good either. When the upper surface was properly positioned,
there was about 1 mm gap between the fuselage and the lower surface of the wing. This was
filled with bits of plastic card and filler.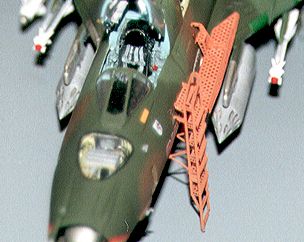 These included the
addition of a crew access ladder, which is a little model by itself, wheel chocks and
static discharge devices at the ends of wings, horizontal stabilisers and the tail. All
underwing stores were taken from Dragon Modern Soviet Aircraft Weapons - air to surface
missile set. The AS-10 Karen (Ch-25ML) and AS-12 Kegler (Ch-25MP) were taken
out-of-box, whereas B-8M1 rocket pods were enhanced with photo-etched backplates. Two
air-to-air AA-8 Aphid (R-60) missiles had all their fins replaced with photo-etched fins,
which have an amazing tendency to disappear on my desk. Four APU-68 and two APU-60 pylons
were used as well. Also both kit’s nose probes were replaced with stretched sprue and
had all their fins replaced with photo-etched parts.
These included the
addition of a crew access ladder, which is a little model by itself, wheel chocks and
static discharge devices at the ends of wings, horizontal stabilisers and the tail. All
underwing stores were taken from Dragon Modern Soviet Aircraft Weapons - air to surface
missile set. The AS-10 Karen (Ch-25ML) and AS-12 Kegler (Ch-25MP) were taken
out-of-box, whereas B-8M1 rocket pods were enhanced with photo-etched backplates. Two
air-to-air AA-8 Aphid (R-60) missiles had all their fins replaced with photo-etched fins,
which have an amazing tendency to disappear on my desk. Four APU-68 and two APU-60 pylons
were used as well. Also both kit’s nose probes were replaced with stretched sprue and
had all their fins replaced with photo-etched parts.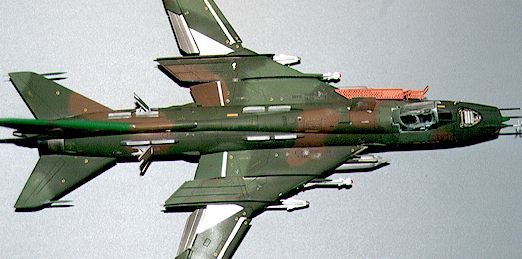 Firstly, Humbrol
polished steel was sprayed on an engine exhaust, followed by Testors steel for engine
exhaust, parts of wings and steel plates on the fuselage. Then Humbrol polished aluminium
was used on a part of the fuselage and all the pylons as well as rocked pods and ASO
dispensers. Undersides were painted with Humbrol 115 Russian blue and main camouflage
colours with Testors 1702 field drab, Humbrol 120 light green and Humbrol 117 US light
green, which were found to be the closest FS matches. Humbrol 3 emerald was used for all
the dielectric surfaces and wheel hubs and Humbrol 64 was used for the undercarriage
painting. All panel lines were given a wash of raw umber and a bit of "dirt" was
drybrushed on wings and fuselage. Analysis of photographic references suggests that Polish
aircrafts are kept in clean conditions, therefore, I limited my weathering to minimum. All
the photos also show that Su-22 is covered in stencilling. This unfortunately was not
supplied on Pantera’s decal sheet, but I got HDL sets 72-033 and 72-031. The first
one offers markings for four machines: Ukrainian, Polish (6 PLMB), East German (very
colourful option for the last flight of Su-22 in LSK/NVA service) and German (Luftwaffe).
The second has markings for six Russian aircrafts of 20th Guards Fighter Bomber Regiment
based in Germany, all of which have unusually colourful unit markings. This set also has a
full set of stencilling for one aircraft, which is complemented by warning triangles from
the first set (these are also supplied in Pantera decals). Both HDL and Techmod decals
from Pantera kit are excellent and reacted very well to Aero Set and Sol solutions.
Firstly, Humbrol
polished steel was sprayed on an engine exhaust, followed by Testors steel for engine
exhaust, parts of wings and steel plates on the fuselage. Then Humbrol polished aluminium
was used on a part of the fuselage and all the pylons as well as rocked pods and ASO
dispensers. Undersides were painted with Humbrol 115 Russian blue and main camouflage
colours with Testors 1702 field drab, Humbrol 120 light green and Humbrol 117 US light
green, which were found to be the closest FS matches. Humbrol 3 emerald was used for all
the dielectric surfaces and wheel hubs and Humbrol 64 was used for the undercarriage
painting. All panel lines were given a wash of raw umber and a bit of "dirt" was
drybrushed on wings and fuselage. Analysis of photographic references suggests that Polish
aircrafts are kept in clean conditions, therefore, I limited my weathering to minimum. All
the photos also show that Su-22 is covered in stencilling. This unfortunately was not
supplied on Pantera’s decal sheet, but I got HDL sets 72-033 and 72-031. The first
one offers markings for four machines: Ukrainian, Polish (6 PLMB), East German (very
colourful option for the last flight of Su-22 in LSK/NVA service) and German (Luftwaffe).
The second has markings for six Russian aircrafts of 20th Guards Fighter Bomber Regiment
based in Germany, all of which have unusually colourful unit markings. This set also has a
full set of stencilling for one aircraft, which is complemented by warning triangles from
the first set (these are also supplied in Pantera decals). Both HDL and Techmod decals
from Pantera kit are excellent and reacted very well to Aero Set and Sol solutions.