 Home
| What's New |
Features |
Gallery |
Reviews |
Reference |
Forum |
Search
Home
| What's New |
Features |
Gallery |
Reviews |
Reference |
Forum |
Search
|
|
|
Sukhoi Su-22 Fitter by Lukasz Kedzierski
When I bought Pantera's 1/72 scale Sukhoi Su-22 Fitter I was really impressed. The 1/72 scale Bilek/Italeri Su-22 kit was not even on the market and this Fitter looked good in the box. The box contained two sprues of parts moulded in a light grey plastic with engraved panel lines (a bit shallow, but nevertheless engraved) plus a clear one piece canopy. There was a layer of greasy release agent covering parts so the kit needed a wash with mild detergent before proceeding with any further work.
I started building this kit along with Italeri's Fitter and the initial modifications were pretty much the same. First of all the auxiliary air intakes were cut and doors were glued in the open position. Air brakes were rescribed on the rear part of the fuselage (these are not included at all). Apart from that, I did not make any other major changes and decided to use all leftovers from various sets used for Italeri's Su-22. A resin air intake cone (Pavla Models) replaced the kit's part, which is a small cone moulded integrally with the ring at the front section of the fuselage. I separated both and used the ring at the front section, then the kit's exhaust tube was glued on the other side of the fuselage.
The fuselage halves were glued together without problems, but be aware that this is a limited run injection kit and there are no locating pins. The Pantera kit is available in a few different versions, therefore the dorsal spine comes as a separate part as well as a heat exchanger, which is characteristic for M-4 version and needs to be glued to the front section of the fin on top of the dorsal spine. Here I encountered a few problems. The fit of these parts is really bad, especially the heat exchanger. Large amounts of putty and gap filling superglue were necessary. I took a few sessions of filling and sanding to get a smooth surface and rescribing of panel lines was necessary afterwards. There was no problem with canopy or horizontal stabilisers fit. I omitted ASO dispensers (which are supplied, but need some re-shaping) and removed all the antennae from the fuselage. This kit was supplied as a late production model and I needed to change it to the early series. Antennae were replaced with photo-etched parts as well as parts cut from a styrene sheet.
After completion of the fuselage I turned my attention to the wings. Here there is one major problem - the thickness of plastic. When cutting out openings for the air intakes I noticed that the plastic is about 3 mm thick. As you can guess the trailing edges are enormously thick. These were sanded down on the fixed parts of wings, whereas the movable parts were acceptable and needed just a bit of attention. Each wing consists of three parts: upper and lower part of the fixed wing and one-piece movable part. Some surgery was needed here. Firstly, a part of the movable wing extending to the fuselage had to be cut off where it joins the mechanism; allowing it to be repositioned on the finished model. If this surgery was not performed, it would be visible in the wheel well. Secondly, bits of a cut sprue had to be inserted between top and bottom part of the fixed wing to prevent it from collapsing and keep it in shape. The wheel wells were then boxed-in (there is no detail within the wells) and the completed wing was glued to the fuselage. This operation requires careful alignment of both wings (use scale plans here) since the attachment points on the fuselage will leave one wing moved forward in relation to the other. A lot of putty was needed here to fill in all the gaps (mainly the ventral joint). The gun barrels in the wing roots were removed and replaced with steel tubing cut to size. All the pylons under the wing and fuselage were added next. The fit here was not great, but a small amount of putty fixed the problem. The landing gear legs were attached next. These are rather basic and very fragile. I am afraid that I will have to replace them one day, because they are not going to support the weight of the model for a long time and will eventually collapse. All undercarriage covers were taken from Italeri kit (I suspect that those supplied in Pantera kit can be used as armour plates on tanks when scaled up to the real size!)
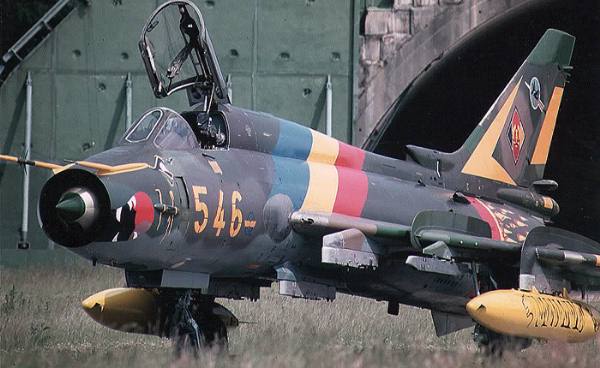
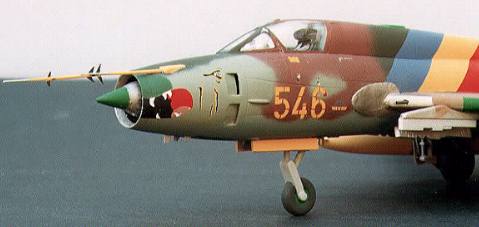
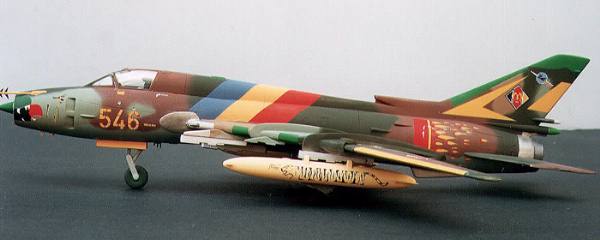
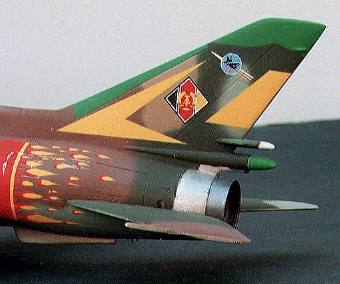
Nose probes were replaced with stretched sprue and their fins were cut from metal foil (from wine bottle). The same foil was used to make heat resistant panels at wing roots, which are not depicted at all. The Pantera Fitter comes with a variety of underwing stores, which include two fuel tanks, two R-60 air-to-air missiles, two S-24 air-to-ground unguided missiles and four OFAB-100 bombs. I only used fuel tanks from Italeri kit, which were enhanced with photo-etched fins and fuel caps. The reason for omitting the underwing weapons as well as ASO dispensers was the colour scheme. This kit comes with a very nice little decal sheet printed by Techmod. There are national insignia and markings for 5 individual aircraft but no stenciling. Subjects covered are two Polish machines (my Italeri kit is done in markings of 8 PLMB, which come from this kit), Iraqi, Afghan and East German. However, I had HDL decal set 72-033, which offers markings for 4 aircraft: Polish (6 PLMB, Pila 1994), Ukrainian Su-17M-4R (827th Independent Recce Aviation Regiment, Limanskoye 1995), Luftwaffe Su-22M-4 of Military Trials Unit WTD 61 (Manching 1994) and the most colourful option - Fitter of 77 JGB in a scheme applied for the last flight in LSK/NVA service, Laage AB, 27th September 1990. The latter was my choice as this colour scheme is one of the best I have seen applied to Fitters.
The decals were fantastic - colour density, perfect register, minimal carrier film. I used Aeromaster Set and Sol solutions, which worked very well and decals settled nicely over the surface details (I had some minor problems with the "flames" on the rear fuselage, but a few applications of Sol solution solved the problem).
This Fitter won the third place in senior, small open category during Wings 99 competition held in Melbourne in October 1999.
Article, Images and Model Copyright © 1998 by Lukasz Kedzierski
|
 Next, I
moved my attention to cockpit, which is represented as a tube with side
consoles, a control stick, very basic K-36 ejection seat and an instrument panel
with instrument faces supplied as decals. I used the supplied decals for
instrument panel (it looks quite convincing) plus enhanced the panel with TV
guidance system display taken from PART photo-etched set. I decided to depict my
model with canopy in the closed position, therefore, there was no point in
stuffing the cockpit with various bits an pieces. All side consoles form PART
set were used and the kit's ejection seat was replaced with one coming from
Italeri kit enhanced with seat harness and other photo-etched elements. Guide
rails for the seat were also used and there was no more room for anything else
apart from HUD cut out from acetate sheet.
Next, I
moved my attention to cockpit, which is represented as a tube with side
consoles, a control stick, very basic K-36 ejection seat and an instrument panel
with instrument faces supplied as decals. I used the supplied decals for
instrument panel (it looks quite convincing) plus enhanced the panel with TV
guidance system display taken from PART photo-etched set. I decided to depict my
model with canopy in the closed position, therefore, there was no point in
stuffing the cockpit with various bits an pieces. All side consoles form PART
set were used and the kit's ejection seat was replaced with one coming from
Italeri kit enhanced with seat harness and other photo-etched elements. Guide
rails for the seat were also used and there was no more room for anything else
apart from HUD cut out from acetate sheet.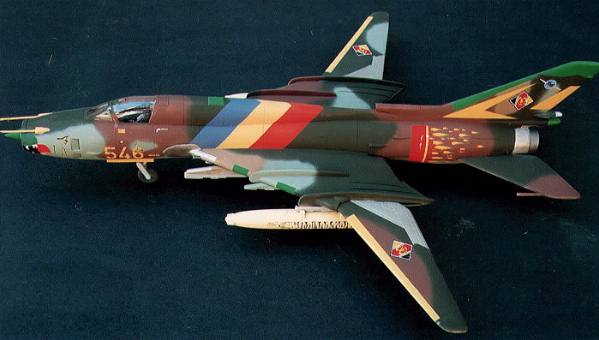
 Instructions
recommend the following Humbrols for the main camouflage scheme: FS 34079 Dark
Green (116), FS 30108 Dark Brown (160), FS 34226 Mid Green (78), FS 30219 Tan
(118) and FS 34277 Light Blue Grey (115). The other colours were Radome Green,
Chrome Yellow, Lemon Yellow, Red and Dark Blue. I did not have any photos of
this particular aircraft at the time of painting and decided to use the colours
recommended by HDL. The only exception was yellow - I used Insignia Yellow for
the fuselage band and mixed my Lemon Yellow for fuel tanks. After finishing the
paint job I was not really convinced as to the shade of Mid Green (Humbrol 78),
but I left it without repainting. Thanks to Rob de Bie from the Netherlands, who
sent me a photo of the real thing so I was able to compare it with my model.
Turned out that I was right as to that green colour, because it does not seem to
be there (have a look at the photo). Nevertheless, I am happy with the final
result and it looks very colourful amongst my other models.
Instructions
recommend the following Humbrols for the main camouflage scheme: FS 34079 Dark
Green (116), FS 30108 Dark Brown (160), FS 34226 Mid Green (78), FS 30219 Tan
(118) and FS 34277 Light Blue Grey (115). The other colours were Radome Green,
Chrome Yellow, Lemon Yellow, Red and Dark Blue. I did not have any photos of
this particular aircraft at the time of painting and decided to use the colours
recommended by HDL. The only exception was yellow - I used Insignia Yellow for
the fuselage band and mixed my Lemon Yellow for fuel tanks. After finishing the
paint job I was not really convinced as to the shade of Mid Green (Humbrol 78),
but I left it without repainting. Thanks to Rob de Bie from the Netherlands, who
sent me a photo of the real thing so I was able to compare it with my model.
Turned out that I was right as to that green colour, because it does not seem to
be there (have a look at the photo). Nevertheless, I am happy with the final
result and it looks very colourful amongst my other models.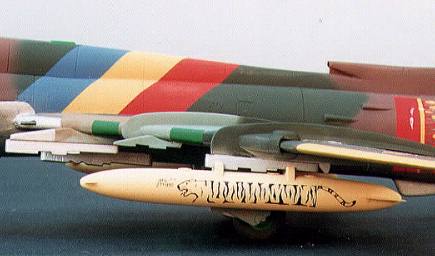 Overall
this is a very good model which is cheaper than Italeri/Bilek, but lacks the
quality of the latter. However, some minor additions and improvements can turn
it into a very nice replica of Fitter. The landing gear legs need to be
replaced, because every time I move the model it swings from side to side!!!
Other versions are also available (M-4R, M-3 and UM-3K) as well as it was
re-boxed by SMER (with markings for 77 JGB machine).
Overall
this is a very good model which is cheaper than Italeri/Bilek, but lacks the
quality of the latter. However, some minor additions and improvements can turn
it into a very nice replica of Fitter. The landing gear legs need to be
replaced, because every time I move the model it swings from side to side!!!
Other versions are also available (M-4R, M-3 and UM-3K) as well as it was
re-boxed by SMER (with markings for 77 JGB machine).