 Home
| What's New |
Features |
Gallery |
Reviews |
Reference |
Forum |
Search
Home
| What's New |
Features |
Gallery |
Reviews |
Reference |
Forum |
Search
|
|
|
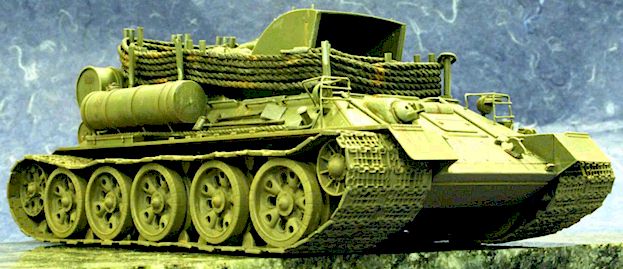
T-34T
Recovery Vehicle by Valentin E. Bueno
I like Armored Recovery Vehicles. The giant winches, tons of cables, loads of tools and spares everywhere are lots of fun to build. This particular vehicle is featured in Walter Spielberger's new book about vehicles of the East German Army. A photo shows a vehicle with the same equipment as shown on the model, and the next page over has a line drawing of a proposed double wide tracked vehicle. I combined the two images to create the vehicle shown above.
The conversion is an easy one in terms of cutting plastic - no cutting is required. The cargo bed is added to the engine deck, the cable is wound round and round the hull, and running gear has parts added to it. The biggest challenge was the gluing the track links side-by-side and link-to-link. The extra links came from a second copy of the kit, the extra set of wheels from a Maquette wheel set, and the rest was sheet plastic, nylon string, and junk from the spare parts box.
First on my "to-do" list was to work out how far apart to mount the wheels. I needed a guide to measure the spacing of the wheels, so I glued two track links side by side. Two assembled wheel pairs were set on this link and a piece of Evergreen plastic tubing was threaded through the centers. The distance was marked on the tube. A cutting jig was made from sheet plastic using the marked tube as a guide. 10 axle extensions were then cut and 10 sets of dual wheel pairs made from the original Dragon kit wheels and the Maquette wheels. These were added to the lower hull after normal assembly of the springs and swing arms. Assembling the tracks was the most tedious part of this conversion. I spent a week gluing links side-by-side using a marble/plastic jig. I glued alternating flat toothed links sided-by-side. This made it easier to connect them when gluing link-to-link. I also added a sliver of plastic strip to the top of the join to make it stronger.
When I had enough for both sides, I started gluing link-to-link. I have a long piece of marble tile for this job. The links slide around on the surface easily, especially after the glue has set. The tile is also perfectly flat. This allows me to see if all my roadwheels are on the ground. With 20 sets of roadwheel pairs, this is important. I use liquid cement for my tracks. I therefore had to get the track runs onto the vehicle when the tracks set set for about an hour. At this point, the tracks have dried enough that they won't come apart easily, and yet can still be bent and rolled over the sprockets and roadwheels. I almost gave up on this project at this point. I painted the lower hull and running gear a dark earth color before I went screaming off into the night. I left it alone for about a week and worked on airplanes to ease my feeble mind.
The upper hull was next on my list of adventures. There aren’t many changes made to this part. I filled the turret opening with sheet plastic and sanded it level. I added a weld bead around the edge to make it look like it was converted from a regular tank, which it probably was. Since I was going to add the cargo bed above the engine deck, I didn't go overboard detailing this area. I just assembled it according to the instructions.
The winch was made next. I don't remember what the diameter of the cable drum was. The housing has a scale 4' diameter. A 4'x3' base and the two sides were cut from 30 thou sheet plastic and assembled. After this had dried, the curved top was made from 10 thou plastic sheet. I glued an oversize pieced to the base. When this had dried, I applied glue to the sides and rolled it over. After trimming it to size, I added the rivets along the top. A length of nylon string was wound around the cable drum, painted and inserted into the housing. This assembly was then glued to the top of the hull. Some leftover resin tanks from The Tank Workshop's Heavy flatcar kit replaced the side fuel tanks (if you have a copy of Tamiya Model Magazine No. 74, my diorama of said flatcar, a DML Panzer III and U.S. assault team is in there). The rear tanks came from Tamiya's German fuel drum set and the smaller oil tanks are from Maquette's T-34 detail set. Four retaining straps were added the side tank in locations that would correspond to the regular tank's attachment points.
The retainers for the mass of cables were built next. This unit consists of a base plate (made from a strip of plastic) and three vertical prongs (made from plastic rod). A total of nine units are needed. Seven are attached to the cargo bed with two more in front of the winch. The cable ends were scratch-built from plastic tubing, thick solder wire and attached to the ends of five lengths of nylon strings. Each was about 7" (about 177mm) long. These were then dunked into a bottle of Testors Burnt Iron Metalizer paint. This gave it a nice dark, rusty color. The cable ends were looped over one of the prongs and glued to each retainer with a little sag in between. I alternated the cables between inner and outer prongs.
The vehicle was brush painted with Russian Green. Next was a wash of dark umber oil paint on the running gear, and black oil paint on the upper hull and superstructure, then drybrush with white oil paint. Pastels were added to the running gear and lower hull for dust effects. I added a bit of rust here and there and made chipped paint with silver Prismacolor pencil.
This model took about six months to complete. I was working on the VT-34 Czech Recovery vehicle at the same time, which delayed me a bit. A search for the nylon string of suitable diameter slowed me down big time. After searching high and low for three months, a department store next to my office ended up having the very sizes I needed. How's that for hiding in plain site! Building this was fun even if a little tedious due to the track work!
Model, Images and Article Copyright
© 2000 by Valentin E. Bueno Back to HyperScale Main Page Back to Features Page |
 When
the new Dragon kit of the T-34 with starfish wheels appeared on the market, I
was elated. Finally, a new mold T-34! It is up to Dragon's usual standards of
excellence in regards to fit and fidelity of detail. I especially liked the
link-to-link tracks. I didn't have to buy another set of Modelkasten tracks at
the same cost of the kit itself.
When
the new Dragon kit of the T-34 with starfish wheels appeared on the market, I
was elated. Finally, a new mold T-34! It is up to Dragon's usual standards of
excellence in regards to fit and fidelity of detail. I especially liked the
link-to-link tracks. I didn't have to buy another set of Modelkasten tracks at
the same cost of the kit itself.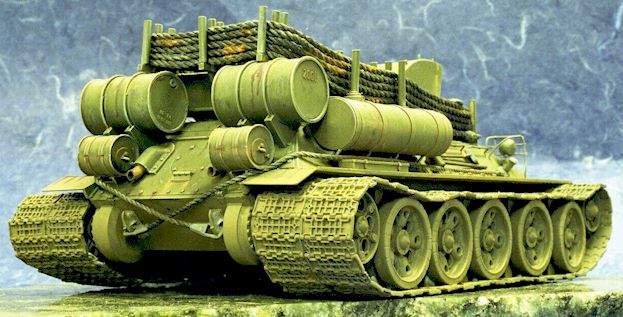
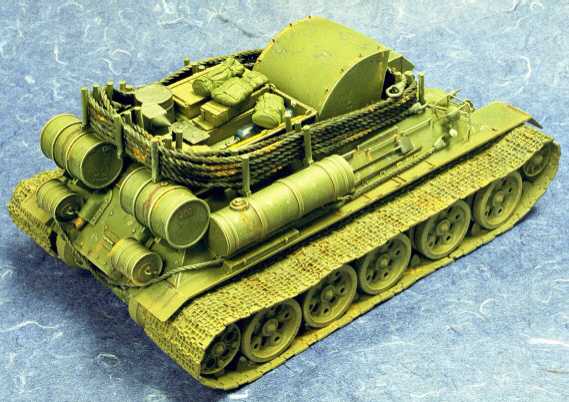 The
cargo bed is made from 10 thou sheet plastic. I think I made it a scale 4' x 5'.
The bed walls were made 1' high. The photos show a tubular framing on the
outside of the bed. This was made from Evergreen tubing. Feet for the bed were
made from square plastic stock and added to the bed. The entire hull was brush
painted Russian Green before proceeding. I don't care what others do, I paint my
models as I go along. With all the stuff being added to the hull, this is a
must.
The
cargo bed is made from 10 thou sheet plastic. I think I made it a scale 4' x 5'.
The bed walls were made 1' high. The photos show a tubular framing on the
outside of the bed. This was made from Evergreen tubing. Feet for the bed were
made from square plastic stock and added to the bed. The entire hull was brush
painted Russian Green before proceeding. I don't care what others do, I paint my
models as I go along. With all the stuff being added to the hull, this is a
must.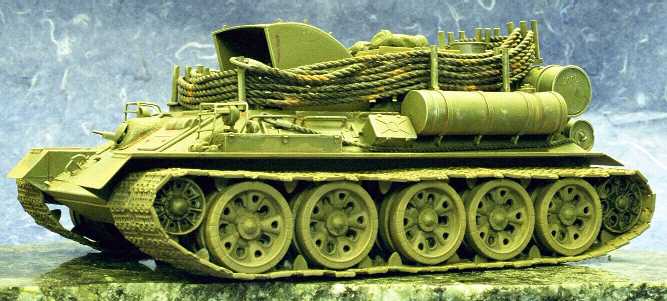
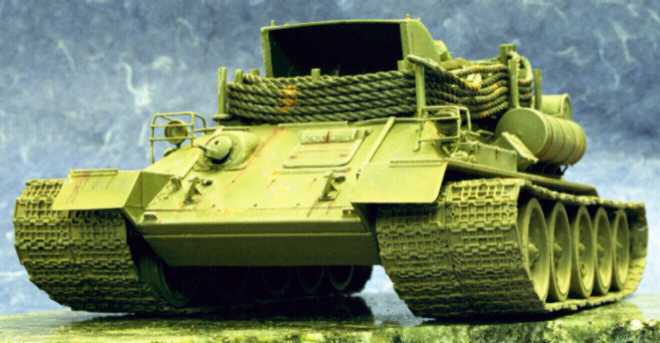
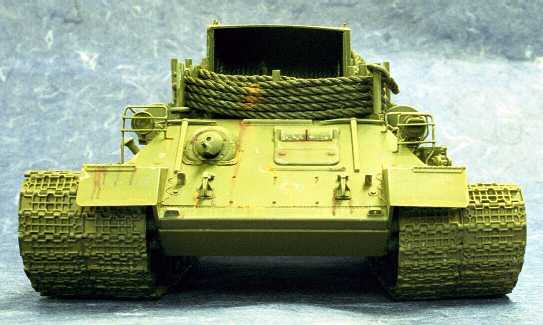 Now
it is time to add all the details. The headlights were hollowed out and MV
Lenses were added. Brush guards around the headlights were scratchbuilt from
wire solder. Tools were then added all over the hull. The two pickaxes on the
front hull came from Tamiya's British Soldiers walking set. Acetylene torch
bottles, toolboxes, anvils, and other miscellaneous tools came from Italeri's
Field Workshop and loaded into the cargo bed.
Now
it is time to add all the details. The headlights were hollowed out and MV
Lenses were added. Brush guards around the headlights were scratchbuilt from
wire solder. Tools were then added all over the hull. The two pickaxes on the
front hull came from Tamiya's British Soldiers walking set. Acetylene torch
bottles, toolboxes, anvils, and other miscellaneous tools came from Italeri's
Field Workshop and loaded into the cargo bed.