|
Focke-Wulf
Ta 152C-0
by Brett T. Green
 |
Focke-Wulf
Ta 152C-0
Speculative Scheme, Stab /JG 301, 1945 |
Beauty and The
Beast
The Ta 152C was the ultimate expression of Dr Kurt Tank's successful
Focke-Wulf Fw 190 series of fighter aircraft.
Designed as a low-altitude day fighter, it was big, sleek and more powerful
than its predecessors. It was nearly 7' longer than the BMW powered Wurger;
generating 2,100 horsepower compared to the 1,600 hp of the early "A"
series. This resulted in an impressive top speed of 454 mph. The Ta 152C would
have undoubtedly proved a handful for contemporary Mustangs and Spitfires had it
reached full production status.
| Trimaster's
1/48 Focke-Wulf Ta 152C-0 |
Trimaster changed the landscape of aircraft scale modelling when they burst
briefly onto the scene in the late 1980s. They offered a level of detail,
finesse and accuracy previously unheard of in plastic models. Trimaster supplied
multi-media parts in their kits - white metal, etched metal and acetate. Their
high price tag also started a trend!
The 1/48 scale Focke-Wulf Ta 152C-0 kit was Trimaster's final product. It
featured more significant multi-media content than any of their earlier kits.
This model incorporates elements of both Beauty and The Beast in the one box!
Beauty
The kit was based on Trimaster's earlier Ta 152H release. The entire contents
of the high-altitude fighter are in the box, including the long-span wings. This
was a gorgeous kit with features including:
- fine engraved detail
- a plastic, metal and etched Jumo 213E-1 motor,
- the option to display the powerplant separately (on a supplied stand) or
behind hinged cowl panels
- a stack of metal and etched detail parts.
The quality of the plastic has to be seen to be appreciated. It is shiny yet
not brittle, responding well to sprue-cutters, hobby knife and sandpaper. Really
luxurious to work with.
... and The
Beast
The Ta 152C was a very different Beast from the delicate-looking H variant.
It featured a chunky new nose housing the DB 603LA engine and a newly designed
wing.
Trimaster supply a replacement nose and wings in resin. These parts are fair
in outline but poor in almost every other respect.
The surface of the resin has an orange-peel effect, and is pitted with a
number of pinholes and imperfections. Surface detail is crude compared to the
plastic parts. All of these main parts - even the thick nose-halves - are
warped.
Some other details are also supplied in resin including the cowl ring,
spinner front, propeller blades and supercharger intake. Casting quality of the
smaller parts is much better. The prop blades are accurately thin but almost
inevitably warped.

A fret of etched detail and white metal exhaust stacks complete all the parts
required to convert the model to the "C" variant.
It may be unfair to judge Trimaster's ten-year-old resin parts by today's
standards, but even for their time they were pretty ugly. The vivid contrast
between the main resin parts and the elegant plastic, etch and metal makes them
seem even worse!
Nevertheless, it remains the only game in town for quarter-scale modellers.
This is the second Trimaster Ta 152C that I have built. The first one was an
unpleasant construction job, with poor fit and needing plenty of filler. I was
hoping that time had made the experience seem worse than it really had been.
This one was just as painful.
Wrestling With
Resin
I decided to prepare the resin parts first.
I filled a few pinholes then sanded all the main resin surfaces. This
improved the look of the parts considerably. The trailing surfaces of the wings
were a bit thick so I sanded them down to a sharp edge.
I then cut the plastic nose off the kit fuselage along the line indicated by
the instructions down to the curved wing-root panel line. Do not cut off this
thin crescent. I scored along the curved line then finished the job with a sharp
knife.
After taping together the nose halves and the fuselage halves, it became
clear there were going to be serious alignment problems. I decided it would be
easier to attach each nose half to each fuselage half, and then deal with the
alignment at the top and bottom of the nose.
I laid out the rear fuselage and nose on top of a 1/48 scale plan. The nose
was turned up and slightly too long so I trimmed the nose halves to match the
plan. Super Glue was used to fix the resin nose halves to the fuselage.
 The
wings were quite badly warped. The full-span lower wing bent upward, and the top
wing halves bent downward. I applied hot water to the parts without much success
so I resorted to simple brute force. Using two-part epoxy glue for maximum
strength I glued each wing half, starting from the outside working in, clamping
as I went. The
wings were quite badly warped. The full-span lower wing bent upward, and the top
wing halves bent downward. I applied hot water to the parts without much success
so I resorted to simple brute force. Using two-part epoxy glue for maximum
strength I glued each wing half, starting from the outside working in, clamping
as I went.
Cockpit
 These
assemblies were set aside while I started work on the cockpit. These
assemblies were set aside while I started work on the cockpit.
I decided not to use the kit cockpit, instead electing to use the simple but
effective Aires Focke-Wulf Fw 190D-9 front office. This is a resin, brass and
acetate set that is designed for the Tamiya kit but was almost a drop fit for
the Trimaster Ta 152C.
Aires provide a full cockpit tub, nice brass and acetate instrument panel,
resin seat, separate brass harness and some small details. Instructions are
adequate. Construction was very 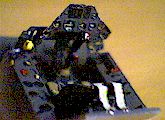 straightforward
and enjoyable. I painted the instrument panel, cockpit tub and seat as completed
sub-assemblies. straightforward
and enjoyable. I painted the instrument panel, cockpit tub and seat as completed
sub-assemblies.
The only modification required to improve the fit of the cockpit was to snip
off the vertical section of the forward locating positions for the kit cockpit.
It is not necessary to remove the casting plug on the bottom of the Aires
cockpit tub.
Main Assembly
It was time to face the bad news.
 The
fuselage halves were joined. The plastic rear sections mated perfectly but the
alignment of the nose halves was pathetic. I glued the fuselage halves to the
best of my ability using two-part epoxy cement but I did not apply glue to the
lower cowl join. The
fuselage halves were joined. The plastic rear sections mated perfectly but the
alignment of the nose halves was pathetic. I glued the fuselage halves to the
best of my ability using two-part epoxy cement but I did not apply glue to the
lower cowl join.
When the fuselage was dry I test-fitted the wings to the wing root. As I had
feared, there was a very big gap at the wing root plus a "bonus" gap
and step at the front wing-to-fuselage join. The uncovered wheel bays of this
aircraft would also expose any filled gap from underneath, so I had to lose the
gap at the wingroots and move them elsewhere.
 The
answer was to wedge open the rear of the lower cowl until the fuselage met the
wingroot. I used a wedge of plastic scrap, then superglued it at the required
width. The top of the wedge was sliced off when the glue had dried. The
resulting 2.5mm gap was liberally filled with White Milliput. The
answer was to wedge open the rear of the lower cowl until the fuselage met the
wingroot. I used a wedge of plastic scrap, then superglued it at the required
width. The top of the wedge was sliced off when the glue had dried. The
resulting 2.5mm gap was liberally filled with White Milliput.
This useful epoxy putty was also used to fill large gaps and steps at various
positions on the nose to fuselage join, the wing tips and the wing leading edges
- all of which suffered poor fit. I painted an overlapping coat of Gunze Mr
Surfacer 500 on top of the Milliput. I find this technique helps feather tiny
steps between the putty and the kit parts during sanding.
When thoroughly dry, the putty was sanded and polished. The process was
repeated to address some holes and gaps that remained.
The fuselage and wings were almost ready for assembly.
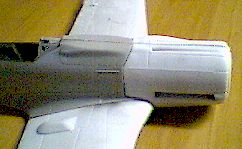
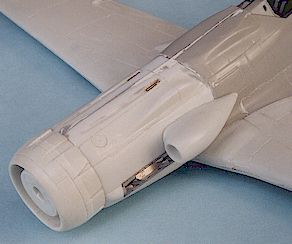
Interior Details
The wheel well of the Ta 152 is open to the fuselage and engine bay. The
absence of an engine and armament would be very noticeable!
Although the kit engine depicts a Jumo 213 E-1 (not the correct DB 603 LA) I
decided to use the supplied parts to fill the gap. There are two main problems:
- Different engine design and the supercharger intake is on the wrong side.
Solution? Ignore!
- The whole engine won't fit between the thick resin sidewalls of the
replacement nose. Solution? Leave various bits off!
I assembled the engine and MK108 30mm coaxial cannon according to the
instructions, but left off the crankcase, manifolds and sump. The engine is
really a gem with plenty of brass and etched detail. It is a shame so little of
it is visible through the open gear bay.
The Pay-Off
 Careful
preparation pays off. With the hard work now complete, it was time to see how
the whole thing fitted together. I glued the cockpit tub in place with super
glue. Careful
preparation pays off. With the hard work now complete, it was time to see how
the whole thing fitted together. I glued the cockpit tub in place with super
glue.
The frame supporting the engine mounts was trimmed to fit inside the
fuselage. This frame also acts as an additional spreader for the wing root. The
engine and gun slipped easily into the nose cavity. The mounting frame mated
perfectly with the raised locating positions on the inner fuselage sidewalls.
The wings were offered to the fuselage and secured with two-part epoxy
cement. The fit at the wing root was almost free of gaps, but there was still a
slight step at the trailing edge and a hole at the leading edge of the starboard
wing. There also remained the big gap at the bottom wing-to-fuselage join. All
of these flaws were addressed with copious quantities of Milliput.
Panel lines were rescribed after a final sanding and polish. At last the
model looked like a Ta 152C!
The canopy was given a bath in Johnson's "Super Shine" (called
Future in other parts of the world) before being masked and sprayed. A small
rectangle of clear acetate was used as the reflector for the gunsight.
I was dreading the undercarriage after some bad experiences with a few Dragon
Fw 190 kits. It turns out my fears were misplaced. Trimaster's white metal
undercarriage legs were almost a snap-fit. The angle of the legs looked good
with no adjustment.
The propeller blades were quite badly warped. I found that they returned to
their original banana-like profile even after soaking in warm water. I finally
assembled the spinner, backplate and prop blades then applied heat using a
hairdryer. That fixed the problem!
IFF aerial, DF loop and Morane mast are all supplied in etched steel. These
were secured with super glue.
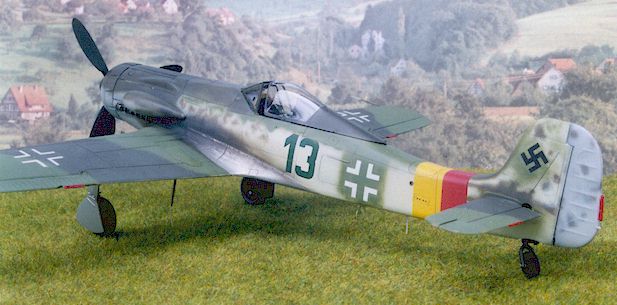
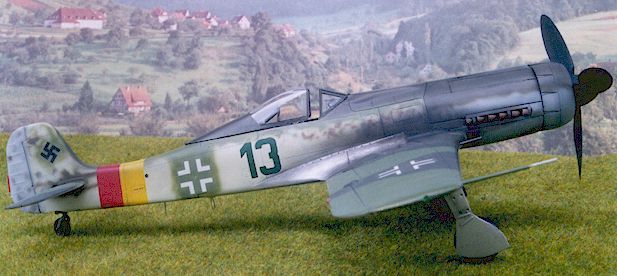
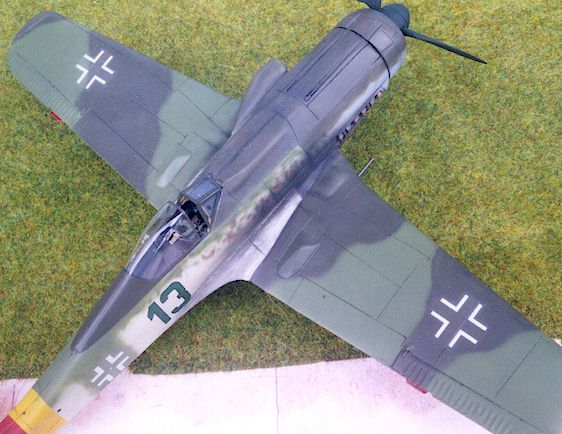
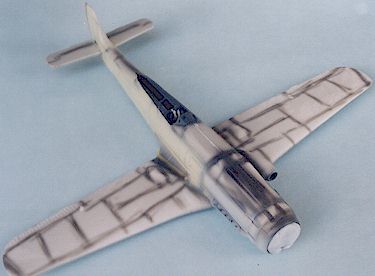 I was
building this model as a commission. My client had very specific instructions
about the markings for this model. He wanted the aircraft to wear the colours of
JG 301 with the number "Green 13". He also wanted the model to have a
camouflage scheme of Dark Green 83 and Bright Green 82. This scheme was inspired
by the Claes Sundin's colour profile in "Luftwaffe Fighter Aircraft In
Profile". I was
building this model as a commission. My client had very specific instructions
about the markings for this model. He wanted the aircraft to wear the colours of
JG 301 with the number "Green 13". He also wanted the model to have a
camouflage scheme of Dark Green 83 and Bright Green 82. This scheme was inspired
by the Claes Sundin's colour profile in "Luftwaffe Fighter Aircraft In
Profile".
I decided to improvise a little by adding some camouflage features noted on
many late-war German fighters.
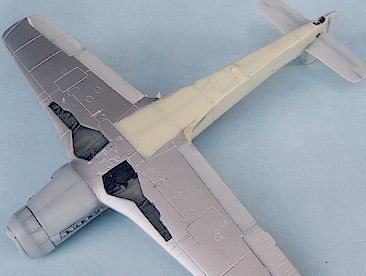
As with all of my paint jobs, I started by "pre-shading" panel
lines in black.
I then masked and sprayed the wing root panel and lower wing silver.
Ailerons, rudder and the lower nose were painted Gunze H417 RLM 76 Light Blue.
The lower rear and side of the fuselage received a coat of Gunze H74 Sky
representing the Green-Blue colour often seen on late-war Doras.
 The
silver wing roots were carefully masked and the upper surface camouflage
commenced with Gunze H422 RLM 82 Bright Green. The disruptive RLM 83 Dark Green
(Gunze H423) followed. I sprayed a sporadic mottle of RLM 81 and RLM 82 on the
forward fuselage and tail to add a little extra interest. All upper surface
colours were painted freehand using my Aztek airbrush. The
silver wing roots were carefully masked and the upper surface camouflage
commenced with Gunze H422 RLM 82 Bright Green. The disruptive RLM 83 Dark Green
(Gunze H423) followed. I sprayed a sporadic mottle of RLM 81 and RLM 82 on the
forward fuselage and tail to add a little extra interest. All upper surface
colours were painted freehand using my Aztek airbrush.
Although the Ta 152H decals supplied in the kit include the Red/Yellow JG 301
RVD band, I decided to mask and spray instead. Gunze H413 (RLM 04 Yellow) and
H414 (RLM 23 Red) were used.
Decals were kept to a minimum. "Green 13" was sourced from the Ta
152H sheet. National markings came from the Ta 152C sheet.
With the decals in place I applied a thin wash of black oil paint to the
entire model. The wash was left in place for a minute or so then wiped off,
leaving panel lines subtly highlighted. A few minutes were spent touching up the
lines with a fine brush.
 Disaster
struck at this point. The forward upper fuselage, heavily stressed by the spacer
bar, split. This left a fine gap from the instrument coaming to the front of the
gun cover. My choices were to fill, sand and repaint (very undesirable), or to
be more creative. I chose the latter. Disaster
struck at this point. The forward upper fuselage, heavily stressed by the spacer
bar, split. This left a fine gap from the instrument coaming to the front of the
gun cover. My choices were to fill, sand and repaint (very undesirable), or to
be more creative. I chose the latter.
I sparingly superglued the split and scribed a new (admittedly bogus) panel
line along the centre split to disguise the fault. I sprayed Dark Green over the
top and applied a wash of thinned oil paint to the panel line.
Gunze Flat Clear sealed the paint job and flattened down the decals.
Exhaust stain was sprayed using a murky brown-black mix and a blob of Tamiya
Flat Base. Tamiya Flat Base adds an appropriately chalky finish to the dirty
stain. The lower fuselage received the same treatment.
The last tasks were to add the clear navigation lights and the aerial wire. I
used very fine stretched sprue for the aerial, as it will reproduce the required
"droop" and can be curled for the slack lead-in.
Trimaster's 1/48 scale Ta 152C-0 is let down only by its poor resin parts.
There can be no doubt about the high quality of the plastic, etched and white
metal components.
The Ta 152C-0 is so rare that a recommendation is almost redundant. It
remains the only Ta 152C in town, so if you stumble upon one at a reasonable
price buy it!
With forethought and patience, this kit will produce a detailed and accurate
model of Kurt Tank's ultimate low-level day fighter.
"Luftwaffe Fighter Aircraft in Profile" by Claes
Sundin and Christer Bergstrom, ISBN 0-7643-0291-4, Schiffer Publishing Limited,
1997
Model Art Special No.336 "Focke-Wulf Fw 190D & Ta 152",
Reprinted in June 1997, ISBN/ISSN not quoted.
Model, Images and Article
Copyright © 1999 by Brett Green
Page Created 19 October 1999
Last updated 26 May 2007
Back to HyperScale Main Page
Back to Features Page
|
 Home
| What's New |
Features |
Gallery |
Reviews |
Reference |
Forum |
Search
Home
| What's New |
Features |
Gallery |
Reviews |
Reference |
Forum |
Search