 Home
| What's New |
Features |
Gallery |
Reviews |
Reference |
Forum |
Search
Home
| What's New |
Features |
Gallery |
Reviews |
Reference |
Forum |
Search
|
|
|
Eastern
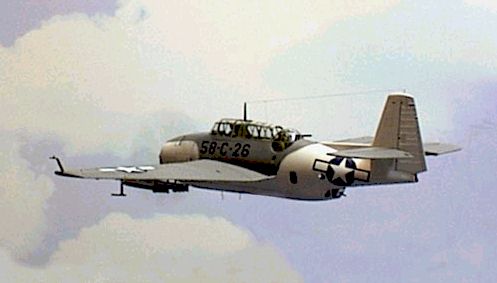
Aircraft TBM-1 by Caz Dalton
This model represents one of two Eastern Aircraft TBM-1C "Avenger" aircraft that executed the first American rocket attack of World War II on January 11, 1944.
Both aircraft operated from the escort carrier USS GUADALCANAL with Composite Squadron VC-58 doing hunter-killer ASW (anti-submarine warfare) operations in the middle Atlantic. The rocket attack was against the German submarine U-758 and although not sunk, the submarine had to return to port with heavy damage and was scrapped. The flight crew for 58-C-26 on that day was LT JG L. L. Mc Ford, pilot; ARMS3/c Charles Gertsch, bombardier/radio operator; and AMM2/c W.H. Ryder, rear turret gunner.
Interior: Sidewalls added using styrene strip. Accessory boxes, throttle, and such done with styrene sheet. Kit's cockpit floor was cut away on the starboard side for access of bombardier to rear compartment. Seat belts for unused bombardier's seat were from True Details. Gunsight reflector glass cut from clear sheet styrene.
The basic interior color was Polly Scale Interior Green with the instrument panel, several boxes, and some turret highlights painted flat black.
I didn't like the representations of the kit's turret and ventral gun barrels (the turret barrel looked like a 30 caliber and the ventral barrel looked like a .50 caliber). I used hypo tubing of an appropriate size to represent the turret gun as a .50 caliber and the ventral gun as a .30 caliber. I added handles to the ventral gun using styrene tubing. The cartridge ejection bag on the turret gun was done with styrene sheet coated with epoxy to round it out.
Exterior: The kit's Yagi radar pieces were carefully drilled to except .010 stainless steel wire to more properly represent these units.
Although not seen, I had to do quite a bit of cutting, thinning, and model engineering to properly represent the landing gear in the retracted position. I also sanded the bulge at the rear of the fuselage that represented the tailhook and scratch-built a more believable unit from styrene rod. No modifications were done to the engine other than adopting it and the propeller to except two sizes of brass tubing so that the prop would spin with the slightest breeze. Kids of all ages are invited to blow it; JUST DON'T SPIT!
Clear areas were masked with Bare-metal foil and given a coat of interior green before priming the entire model with Krylon Flat White primer shot through the airbrush. Once dried and sanded the lower surfaces were giver two coats of Polly Scale White.
All National Insignia, in addition to the lettering and numbering were take from Superscale decal sheets. Once dried and cleaned, all recessed controls and accesses were given dark gray and black ink washes. All was sealed in an additonal gloss coat followed by two coats of Polly scale Clear Flat. Exhausts stains were lastly applied using dark gray and black powdered pastels. Wing lights were painted clear red and clear green as required.
Model, Images and Article Copyright
© 1996-2000 by Caz Dalton Back to HyperScale Main Page Back to Features Page |


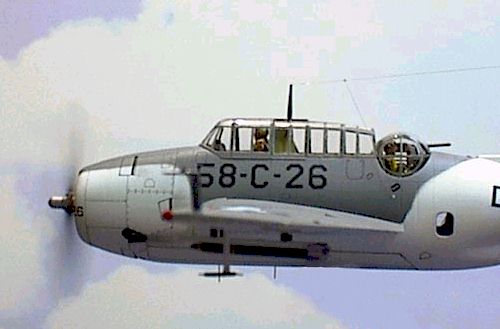 The
rear turret was spruced up with armor plating from styrene sheet and
armored glass from .30 clear styrene sheet. Gun control box and handle
were done with styrene sheet and copper wire. Copper wire also used for
turret electric wiring. The gun opening cover was cut from styrene strip.
The area in front of the seat had to be cut out to make room for my
gunner.
The
rear turret was spruced up with armor plating from styrene sheet and
armored glass from .30 clear styrene sheet. Gun control box and handle
were done with styrene sheet and copper wire. Copper wire also used for
turret electric wiring. The gun opening cover was cut from styrene strip.
The area in front of the seat had to be cut out to make room for my
gunner.
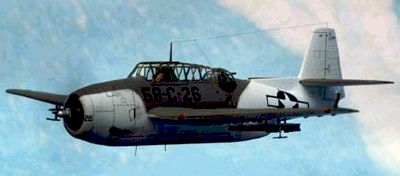 The Mk-4
rocket rails were scratch-built using Plastistrut u-shaped strip and styrene
rod. These were attached to drilled out flash holes for the Mk-5 rocket
launchers supplied with the kit. The rockets came from a HASEGAWA P-38 kit. They
were drilled out at the rear and a piece of 34-gauge aluminum thread was
inserted into the opening and the rear of the rail to represent the electric
ignition wires for the rockets. Smoke-colored invisible thread was used for the
aerial wiring.
The Mk-4
rocket rails were scratch-built using Plastistrut u-shaped strip and styrene
rod. These were attached to drilled out flash holes for the Mk-5 rocket
launchers supplied with the kit. The rockets came from a HASEGAWA P-38 kit. They
were drilled out at the rear and a piece of 34-gauge aluminum thread was
inserted into the opening and the rear of the rail to represent the electric
ignition wires for the rockets. Smoke-colored invisible thread was used for the
aerial wiring.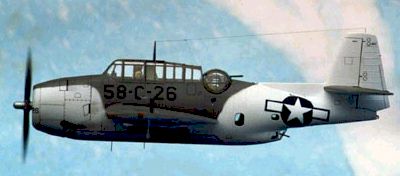 Masks
were cut for the lower surfaces and the upper surfaces were sprayed Polly Scale
Dark Gull Gray. The model was next given two coats of Polly Scale Clear Gloss
for decal prep. Only the vertical tail IDs were taken from the kit's decal
sheet.
Masks
were cut for the lower surfaces and the upper surfaces were sprayed Polly Scale
Dark Gull Gray. The model was next given two coats of Polly Scale Clear Gloss
for decal prep. Only the vertical tail IDs were taken from the kit's decal
sheet.