Home
| What's New |
Features |
Gallery |
Reviews |
Reference |
Forum |
Search
Home
| What's New |
Features |
Gallery |
Reviews |
Reference |
Forum |
Search
|
|
|
Hawker Tempest by Lee Rouse
Late in the afternoon of 3 May 1945, Flight Lieutenant Pierre Clostermann led 24 aircraft of No. 122 Tempest Wing in an attack on Grossenbrode naval air base in northern Germany. The Tempest pilots were met by more than 100 enemy fighters over the target, while on the beach and at anchor, approximately 100 flying boats and transport aircraft were being used to evacuate the base. After positioning 20 of his force to face the enemy fighters, Clostermann led the remaining aircraft down to attack the airfield. He made three high-speed strafing passes in his "Le Grande Charles" and destroyed four aircraft on the ground and in the water, and shot down a transport and two armed flying boats in the air.
After completing his attack on the air base, Clostermann engaged the enemy fighters and shared in destroying two of them. Following the battle, only 13 of the original 24 Tempest aircraft returned home. Four days later, on 7 May 1945, Germany surrendered. By the end of WWII, Clostermann had flown 420 combat sorties during World War II and achieved 32 confirmed aerial victories, most of them in engagements with fighters (from Air University Bios page, http://www.au.af.mil/au/goe/pages/bios/83bios/closte83.htm )
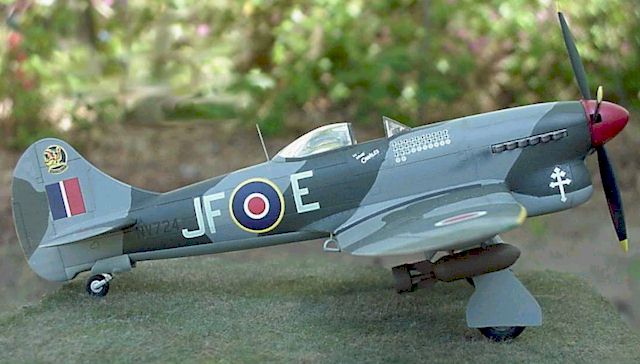
This 1/72 scale offering from Academy was released in 1999. The box art depicts Clostermann's Mk V Series 2 Tempest. It is molded in light gray plastic which is easy to sand and scribe. Panel lines are crisp, petite, and on the whole, accurate. Clear parts are very clear and include canopy, windscreen and gunsight. According to 1/72 line drawings in Aircraft Archive Fighters of WWII, Vol. 2, the kit dimensions scale out on the money.
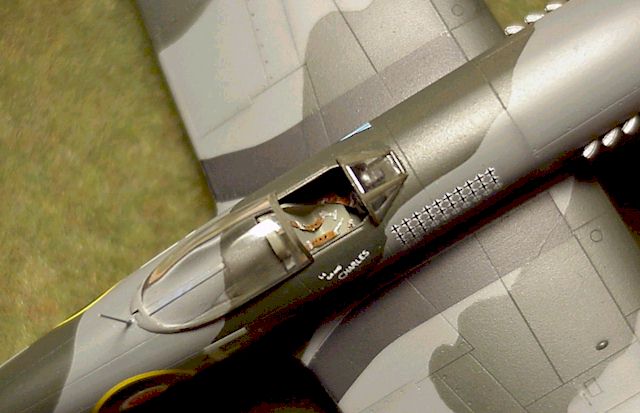
Cockpit Construction began with the cockpit which consists of 7 parts: seat, seat mounting frame, rudder pedals, control stick, floor, rear bulkhead, and instrument panel. Fuselage sidewalls have molded in stringers, throttle quadrant and a few boxes. The stringer detail is a little overstated, so I elected not to highlight this detail and did not use any washes in the cockpit. The level of cockpit detail is perfectly adequate for 1/72 scale, especially after the fuselage is closed up.
After painting cockpit parts British interior gray green (per kit instructions), I came across the Hawker Tempest page (http://user.tninet.se/~ytm843e/tempest.htm), which is an excellent source of information about the Tempest. I found there that most Tempests had black interiors and black or dull metal seats, not the gray-green I had already committed to. Oh well. Cockpit parts fit together quite well. The only thing I added were shoulder and lap belts which I fabricated out of masking tape and painted a leather color.
Fuselage and Wings The interior radiator parts and the cockpit assembly are trapped between the fuselage halves. Locator pins ensure that parts are correctly located. Once this is done the fuselage halves fit together well. Only a small amount of filler (putty and superglue) was needed along the seams. Next the top wing halves were joined to the one-piece bottom wing. I was impressed with how well the panel lines which wrapped around the leading edges matched. The same can be said for the pane lines of each fuselage half. The only real fit problem in the entire assembly sequence becomes apparent when the completed wing assembly is insert into the bottom of the fuselage. With the wing pushed forward to ensure a good fit at the front, there is a gap of about 1/16 " where the rear central portion of the wing should meet the bottom of the fuselage. I filled this with a piece of plastic card and the filled the remaining seam with superglue. Once this cured I was able to sand it out until there was no hint of a seam. Referring to the Tempest line drawings in Aircraft Archive Fighters of WWII, Vol. 2, I noticed that there were several panel lines missing on the model which should run along the fuselage. These lines were properly scribed using a scribing tool with narrow strips of labeling tape as a guide.
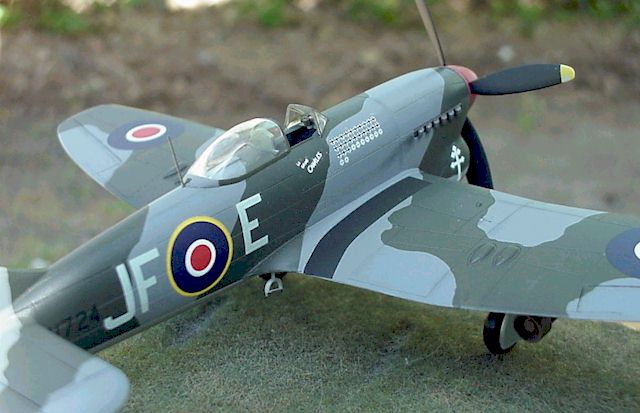
The wheel wells and gear doors were airbrushed silver. Wheel wells were then masked off with drafting tape. The cockpit opening was also masked off with tape. Medium Sea Gray (Testors FS36240) was then airbrushed over the bottom of the aircraft, and along upper seam lines to highlight any areas still requiring filling. Once dry the bottom was masked off with Parafilm and the dividing line (which just happens to coincide with a panel line) was cut through lightly with a new No. 11 scalpel blade. I rarely get any bleed through with Parafilm, but just to make sure I brush-applied Future Acrylic Floor wax along the border where the upper and lower colors would meet. Next Tamiya Ocean Gray was airbrushed over the top of the fuselage. After this I used Parafilm to cover the upper fuselage and wings. An indelible black felt pen was then used to draw the outline for the upper camouflage demarcations on the Parafilm. Again using a sharp No.11 blade I cut lightly through the Parafilm along these demarcation lines and removed the Parafilm where the next color (Tamiya Dark Green) would be applied. I have found that even if the plastic is cut into, this is not noticeable after painting since it matches exactly with the paint demarcation lines. The Dark Green was applied and once dry the remaining Parafilm (which was covering the Ocean Gray) was removed. There was no overspray, with the results yielding a very nice hard edge camouflage pattern.
I should mention here that I elected not to attach the horizontal stabilizers until after the fuselage had been fully painted. The stabs were painted separately and then attached to the fuselage using a small amount of superglue gel after all painting was completed. This allowed for easier masking and painting. Only a small amount of filler in the form of white glue was needed.
Options for two aircraft are included. I chose to model the aircraft of Pierre Clostermann, the leading Free French ace of WWII. The decals were in perfect register, with the colors appearing accurate. After airbrushing a coat of Future over the entire fuselage, decals were applied. Unlike the decals in the Academy Fieseler Storch kit I built several months ago, the Tempest decals gave me no problem whatsoever. Once in place, they snuggled down nicely, especially after a coat of decal solvent was applied. After decals were dry, the aircraft was wiped down with a clean paper towel moistened with water to remove any decal adhesive residue. Finally a mix of approximately 80% PollyScale Flat, and 20% Future was airbrushed to produce a satin finish.
Various odds and ends were then painted, including wheels, landing gear, propeller, spinner, pitot tube and bombs. The windscreen and canopy were masked off with, you guessed it, Parafilm, and airbrushed British gray-green followed by the appropriate camouflage color.
Small parts were attached. The landing gear fit snuggly into their locator holes. A small (no.79 bit) hole was drilled into the top of the fuselage immediately behind the canopy rail. I used a piece of stretch sprue to replicate the antenna. The kit was finished in about 3 weeks of "an hour here, an hour there". I was very pleased with the final product. The Tempest is a sexy aircraft. Although a direct descendent of the Typhoon, it has a graceful appearance about it that the Typhoon just can't capture. I would highly recommend this kit to anyone wanting to add a Tempest in 1/72 scale to their collection.
Models, Description and Images Copyright ©
2000 by
Lee Rouse
|