|
Hawker Tempest V
Model
by Chris Wauchop
|
Hawker
Tempest V
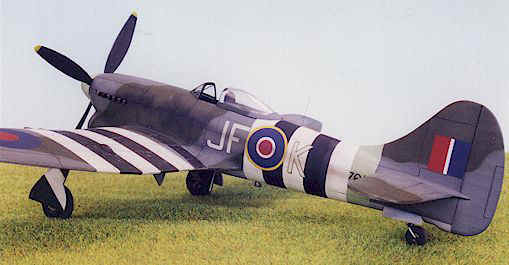
Flying Officer G.E. Kosh, 3 Squadron RAF, June 1944, England
|
Review and Descriptions
by Brett Green
The Hawker Tempest was a development of the Typhoon using a new thinner, shorter wing but
retaining the Typhoon's big twenty four-cylinder Sabre powerplant.
The Tempest V was the first type to enter production. This aircraft retained a strong
family resemblance to the Typhoon. However with the new wing, large fin fillet and
fuselage extension it was significantly different to its predecessor. The Tempest V was
powered by a Sabre II engine. Performance was impressive. Top speed was 466mph compared to
413mph for the Typhoon Ib.
 Production commenced in mid 1943, with the
first Tempest Vs entering service with 486 Squadron RAF in January 1944. Unlike the
Typhoon, the Tempest rarely carried underwing stores for its operations except for the
purpose-designed 45-gallon "teardrop" drop tanks. Instead it relied on its four
Mk. V Hispano 20mm cannon. Production commenced in mid 1943, with the
first Tempest Vs entering service with 486 Squadron RAF in January 1944. Unlike the
Typhoon, the Tempest rarely carried underwing stores for its operations except for the
purpose-designed 45-gallon "teardrop" drop tanks. Instead it relied on its four
Mk. V Hispano 20mm cannon.
Tempests were used extensively against V-1 rockets from June 1944, and over Europe in
ground attack and flak suppression missions from late August. They were very successful in
both these roles and also scored many air victories. These achievements included a number
of Me 262 jet fighters.
The Tempest continued into postwar service with both the RAF and a number of foreign
air forces. The other major developments of the type were the Tempest VI, which was
similar to the Mk. V but equipped with the Sabre V engine; and the Tempest II which
featured a close cowled Centaurus CE4S radial engine.
Further development and testing of the Tempest eventually led to what many would argue
was the ultimate piston-engined fighter aircraft - the Hawker Fury and Sea Fury.
Eduard released this long-awaited kit in 1/48 scale during 1997. Previous offerings have
been available in this scale (including AMT/ERTL), but needed a lot of work to bring them
up to an acceptable standard.
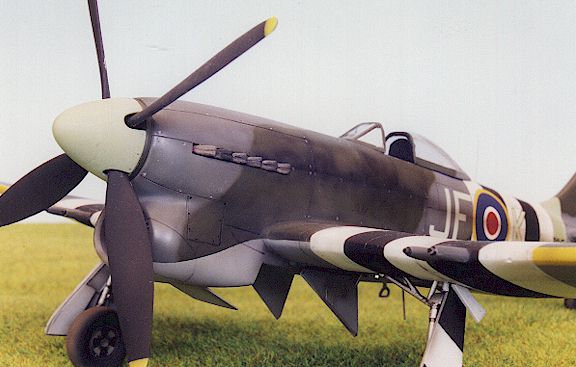
Eduard's kit represents a late version Tempest V. The main distinguishing feature
between this version and the early Tempest is the absence of protruding barrels for the
four Hispano cannon.
"Profipack" indicates that this kit has the optional multi-media parts.
Eduard has also released an all-plastic version of the same kit, and has more recently
produced a "Profipack" version of the early Tempest.
The kit comprises 66 light grey injection moulded parts on four sprues, one clear
styrene part, 8 resin parts and a photo-etched steel fret. The resin covers the cockpit
tub, seat (with nicely detailed quilted backrest cushion) and flattened main wheels. Photo
etched harnesses, instrument panel and minor cockpit details complete this comprehensive
multi-media package. The resin and photo-etch are both flawless in design, detail and
execution. Options are provided to add slipper tanks or to build the aircraft as a Target
Tug.
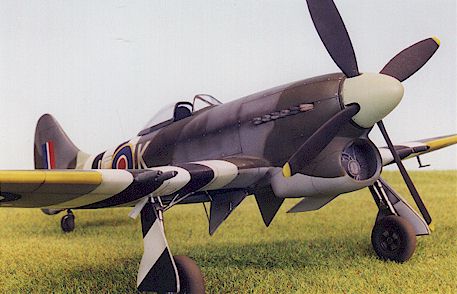
As one might expect of Eduard, the cockpit detail in particular takes full advantage of
the resin and etched metal to deliver a very busy and convincing replica.
Styrene parts are better than most previous short-run injection offerings, but don't
expect Tamiya quality. Sprue attachment points are larger than average, but manageable
with nippers and a sharp hobby knife. The plastic itself combines the qualities of being
slightly brittle, very shiny and yet with a very fine, rough texture on the larger
surfaces. This may have something to do with the short-run injection process. A brief
rubdown with 1000-2000 grit glasspaper followed by a quick polish will fix this minor
problem. Small raised semi-circular ejector pin marks mar the inside surface many parts.
Although most will be invisible when the model is assembled, some will interfere with fit.
It won't take much effort to remove these protrusions.
It is important to note that no locating pins are provided for the plastic parts
- so take care with alignment during construction.
A further limitation of the short-run production process is the thick trailing edges of
wings and tailplanes.
Surface detail is quite good, featuring finely recessed panel lines. However, Eduard's
Tempest lacks the finesse of detail in its smaller styrene parts compared to
mass-production kits. Fortunately brass or resin items are supplied to replace most of
these small plastic parts. You are still stuck with a pretty ordinary looking tailwheel
though. And you will probably want to replace the solid grey plastic gunsight!
Another minor quibble is the one-piece canopy. A razor saw will be required if you want
to display all that lovely cockpit detail.
The decal sheet is colourful, and my example was in perfect register. In addition to
markings for four aircraft, full stencil data is also provided.
Instructions consist of exploded-view diagrams in seven steps. They are a little
ambiguous in some key areas (see construction notes below).
As mentioned above, although panel line detail is up to world’s-best standard, the
trailing edges of surfaces are not. The tail is particularly thick. This, together with
the wing trailing surfaces, will need lots of patient sanding to achieve an accurate scale
effect.
 Fit of some of the major parts is less than perfect.
This problem is made worse by vague instructions in a number of areas. Some of the problem
areas included the undercarriage and the exact location of the cockpit tub. The tub must
be fitted in to the completed fuselage halves. Some jiggling and trimming will be
necessary to get a perfect fit. Dry fit frequently! Fit of some of the major parts is less than perfect.
This problem is made worse by vague instructions in a number of areas. Some of the problem
areas included the undercarriage and the exact location of the cockpit tub. The tub must
be fitted in to the completed fuselage halves. Some jiggling and trimming will be
necessary to get a perfect fit. Dry fit frequently!
The clear part for the cockpit canopy is very clear and free of distortion, but early
deliveries did not supply a separate windscreen and sliding section. Chris separated these
parts to display the cockpit detail. The latest version of the early Tempest corrects this
shortcoming - check before you buy.
The photo-etched stirrup (footstep) is too short and quite flimsy, so Chris modified
the plastic part to suit.
Chris backdated the aircraft by adding the spare long cannon barrels from the Airfix
Spitfire 22/24 kits. However, the newly released "early version" of the Tempest
also includes this cannon option.
Decals are sourced from Aeromaster "Storms in the Sky VI", with four
interesting colour schemes for Tempest Vs.
It is probably unfair to judge Eduard's Tempest V solely on the quality of its styrene
parts. The kit is ambitious and good value with its genuine multi-media presentation. With
a little extra care during preparation and basic construction, the average modeller can
build a well-detailed replica of this big, beautiful attack/fighter aircraft
out-of-the-box.
The Hawker Tempest Page has photos,
drawings and even sound-clips of the Tempest. Worth a look
also the ubiqiuitous and inexpensive Squadron/Signal series…
"Typhoon/Tempest in Action" by Jerry Scutts, Squadron/Signal
Publications, Carrollton Texas, 1990
ISBN 0-89747-232-2
.
Model by Chris Wauchop
Article Text and Photographs Copyright 1998 by Brett
Green
Page Created 30 April, 1998
Last Updated 26 May, 2007
Back to HyperScale Main Page
Back to Features Page
|
 Home
| What's New |
Features |
Gallery |
Reviews |
Reference |
Forum |
Search
Home
| What's New |
Features |
Gallery |
Reviews |
Reference |
Forum |
Search