|
UH-1N of the USAF |
UH-1N "Twin Huey"
by Brett Green
|
UH-1N of the USAF |
| B a c k g r o u n d |
Nearly 30,000 Bell UH-1 Iroquois have been produced since 1959, in a variety of roles
ranging from Gunship to Rescue Ship. As its designation implies, it has indeed proved
itself to be a Utility Helicopter.
The UH-1N was the result of Bell's desire to produce a more reliable machine with two engines. The "Twin Huey" entered service with the US Air Force in 1970. A total of 294 UH-1Ns were produced for the US Armed Forces, not including foreign license-built versions. Many UH-1Ns and their equivalents remain in service today.
| I n t h e B o x |
UH-1N "Twin Huey" Helicopter
Italeri Kit Number 847
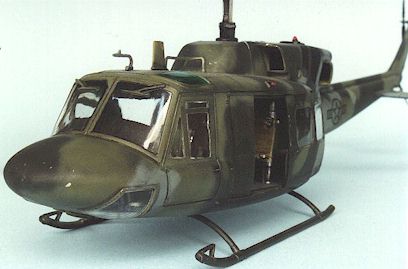
Italeri’s kit comprises 123 light grey parts on two sprues, and thirteen parts on one clear sprue. All sprues are packed in one plastic bag. Surface detail is a combination of raised bolts, handles and fairings, plus engraved panel lines. The effect is quite good although some of the engraved detail is a little soft.
Optional parts and markings are provided for a US Air Force Gunship, or one of two Rescue choppers
Moulding quality is first rate. There are no sink marks and most ejector pin marks have been planned so that they appear only on the unseen back surfaces of some smaller parts. However, some holes will require filler on the M.21 Minigun and the skid assembly.
The clear parts, while commendably thin, distort light a little.
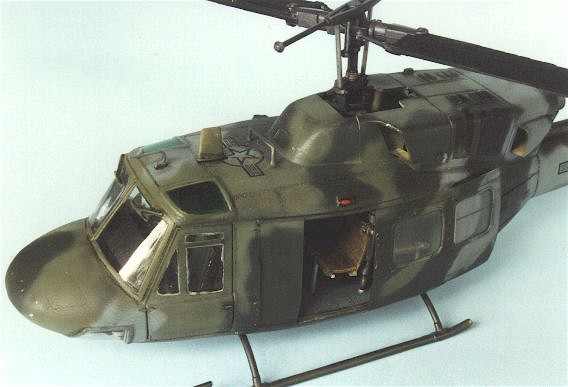
Interior detail is very well done. The quilted back wall and ceiling, the cloth seat texture and detailed instrument panel add to a busy and convincing cabin. The determined scratchbuilder may wish to add detail to the somewhat oversimplified pilot’s and co-pilot’s seats. Some detail will be desirable on the inside of the sliding cargo doors if they are to be displayed closed.
| C o n s t r u c t i o n |
The level of detail provided in this kit is very good. I built the model straight out of the box with no modifications or additions. Construction is generally straightforward and fit is fine. The modeller will have to decide which option is preferred quite early in the construction process - don’t forget to open the appropriate flashed-over holes!
The following areas will need special attention:
Cabin
The instructions are a little vague regarding the placement of the instrument panel and coaming. I found that if I cut the lower centre tab off the instrument panel, it would fit roughly in the position as indicated by the instructions.
Glazing
 The
extensive windows are a very obvious feature on the Huey. Glue must be applied to the
edges of the clear parts, and these edges are visible when the kit is assembled. You can
see in the photographs that I used conventional polystyrene cement on the windows for the
pilot and co-pilot's doors. The glue is obvious from most angles. Very unattractive! To
avoid these visible glue marks, use Krystal Kleer or white glue to fix all windows in
place. I added the rest of the glazing using Krystal Kleer after the model was
built and painted.
The
extensive windows are a very obvious feature on the Huey. Glue must be applied to the
edges of the clear parts, and these edges are visible when the kit is assembled. You can
see in the photographs that I used conventional polystyrene cement on the windows for the
pilot and co-pilot's doors. The glue is obvious from most angles. Very unattractive! To
avoid these visible glue marks, use Krystal Kleer or white glue to fix all windows in
place. I added the rest of the glazing using Krystal Kleer after the model was
built and painted.
The windscreen was a tight fit. I recommend applying glue to the top and sides only, then locating the windscreen under the top lip of the cockpit roof and push the bottom of the windscreen forward until a good fit is achieved. Try this without glue first! You will probably need to tape this assembly while it dries.
Engine Cowling Assembly
The intakes, engine cowling and exhaust assembly is quite complex. It is made up of 11 pieces. There is a lot of potential to get the alignment wrong, so take particular care.
Tail Boom
The separate panel on the starboard side of the tail boom (part 56B or 57A) will tend to "sink" to a position behind the surface of the boom. You may wish to build up behind this part with thin plasticard.
Also, don’t spend too long looking for part 96A (for the tip of the tail) - the correct part number is 96B on Sprue B.
| P a i n t i n g a n d D e c a l s |
I built my UH-1N as a standard machine in European I markings seen at RAF Bentwaters during September, 1981. European I is a three colour scheme in Dark Green, Medium Green and Medium Grey.
I used a combination of Gunze and Tamiya paints to complete this scheme. The very dark green is Gunze RLM 70 Black Green, the medium green is Gunze 320 JASDF Dark Green and the blue-grey colour is Tamiya XF-19 Sky Grey. I first sprayed an overall coat of the dark green and used this as counter shading for the lighter colours. All colours were sprayed freehand using a Testors (Aztec) airbrush.
Additional weathering was provided by a thin, black oil wash flowed into panel lines. Tiny, hand-painted spots of Tamiya Chrome Silver were added to the nose of the chopper and the leading edge of the rotor blades. These spots represent minor chipping.
Markings were adapted from the kit decals, although I could not find an appropriate serial number. A coat of Gunze Flat Clear was applied to the painted model.
Finally, formation lights were first painted with Tamiya Gloss White acrylic, followed by Tamiya Clear Red and Clear Blue, as applicable.
| C o n c l u s i o n |
This is the first helicopter I have built since returning to modelling ten years ago. I found Italeri’s Twin Huey to be an interesting subject of good quality. The level of detail is really very good straight from the box. However, the modeller should have some previous experience due to the complexity of the engine cowling assembly and the extent of glazing. Recommended to all rotor-heads!
Back to HyperScale Main Page
Back to Features Page