![]()
Wright
Flyer
Building Hasegawa's 1/16
Scale Museum Model Series Kit
by Kenneth H. Goldman
|
Wright
Flyer I |
| B a c k g r o u n d |
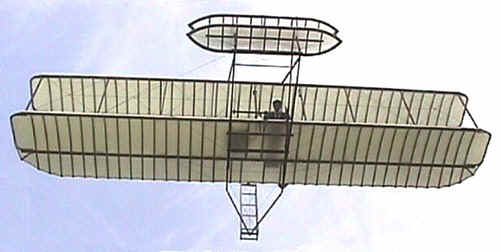
On December 17, 1903, on the bleak expanse of Kill Devil Hill, North Carolina, Orville Wright stretched out across the wing at the crude controls of Flyer I. The box kite-like contraption was powered by a 12-horsepower, four-cylinder water-cooled engine. Orville nodded to his brother Wilbur, and moments later flew into aviation history with the world's first sustained flight of a machine powered, heavier-than-air craft. That first flight lasted twelve seconds and covered thirty-six meters. They made two other flights that day, extending the range to 260 meters and the duration to 59 seconds. Today, one cannot know the word "airplane" without having at least a passing knowledge of what the Wright brothers accomplished that day.
Fireworks and a jet flyby marked the rededication of the Wright Brothers Memorial this past May 2nd. The monument, hewn from North Carolina granite, was originally dedicated on 19 November 1932 at a cost of $285,000. Seven thousand spectators listened to dignitaries including George Bush and "Buzz" Aldrin, in one of a series of events that will culminate in 2003, the 100th anniversary of the first machine-powered flight.
| The Model |
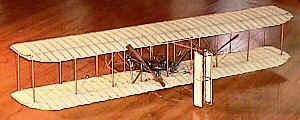
 In keeping with the
festivities, it is fitting to build the impressive Hasegawa rendering of Wright Flyer I.
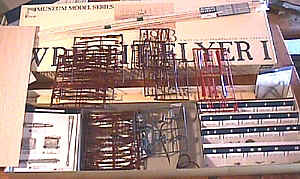
Despite being faced with a daunting number of parts arrayed like a museum display in the
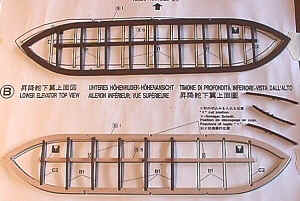
box, the kit turns out to be a relatively straightforward project, building directly on
the full-size plans. Enough wood is provided to allow for a few mistakes and there is more
than ample rigging line for those of you who feel safer cutting thread longer than
specified, "just in case..." Actually, the suggested lengths are right on the
money with enough slop to easily pull everything tight. The necessary 0.6mm drill is
provided, as is plenty of white glue -- even if it is the consistency of toothpaste in two
tubes and has to be thinned. About all you need to add is a #11 X-Acto knife, tweezers,
sandpaper, paint, and both thin and mid-cure CA glue. Also, I found it easier to use a
razor saw than the X-Acto knife to cut the copper tubing into 70, 3mm lengths for the
rigging.
In keeping with the
festivities, it is fitting to build the impressive Hasegawa rendering of Wright Flyer I.
Despite being faced with a daunting number of parts arrayed like a museum display in the
box, the kit turns out to be a relatively straightforward project, building directly on
the full-size plans. Enough wood is provided to allow for a few mistakes and there is more
than ample rigging line for those of you who feel safer cutting thread longer than
specified, "just in case..." Actually, the suggested lengths are right on the
money with enough slop to easily pull everything tight. The necessary 0.6mm drill is
provided, as is plenty of white glue -- even if it is the consistency of toothpaste in two
tubes and has to be thinned. About all you need to add is a #11 X-Acto knife, tweezers,
sandpaper, paint, and both thin and mid-cure CA glue. Also, I found it easier to use a
razor saw than the X-Acto knife to cut the copper tubing into 70, 3mm lengths for the
rigging.
 I was
disappointed, however, to find that Hasegawa decided to injection mold all the ribs and
the propellers in polystyrene. I assume this was done to keep the price down since the
ribs are eventually covered with rice paper anyway, but it tarnished the kit's allure.
Also, all of the plywood parts were coated with paraffin on one side. The instructions
tell you to scrape off the wax, which probably is related to their die cutting process,
but this makes staining impossible and complicates painting the parts. I used Behr Plus-10
Russet opaque pigment acrylic house stain (more like paint). It was the right color and I
had plenty of it after staining a deck and back staircase.
I was
disappointed, however, to find that Hasegawa decided to injection mold all the ribs and
the propellers in polystyrene. I assume this was done to keep the price down since the
ribs are eventually covered with rice paper anyway, but it tarnished the kit's allure.
Also, all of the plywood parts were coated with paraffin on one side. The instructions
tell you to scrape off the wax, which probably is related to their die cutting process,
but this makes staining impossible and complicates painting the parts. I used Behr Plus-10
Russet opaque pigment acrylic house stain (more like paint). It was the right color and I
had plenty of it after staining a deck and back staircase.
It's difficult to go wrong if you thoroughly familiarize yourself with the instruction book and full-size plans before commencing and then follow the instructions step-by-step. A bit of tape to hold the wing assembly jig (parts B-4) in place makes things a little easier. Applying the rice paper is pretty straightforward. The results look good but are extremely fragile. You may want to use some of the excess paper to experiment making repairs.
| C o n s t r u c t i o n |
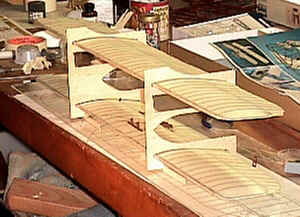 Cutting off the top of
the strut assembly jig facilitates that process. It was here that I ran into my first
problem and had to shorten the rear struts. Since the correct measurements are given in
the instructions, I highly recommend checking the parts before you try to assemble them
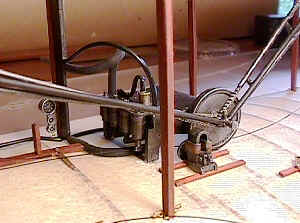
and find they don't fit. The propeller mounts are also fitted at this time. They were
poorly cast and both propeller shafts were broken off. I had to putty the metal castings
and fit new shafts. Aside from a little flash cleanup, the other metal castings were
reasonably good. The instructions call for painting most of the cast metal parts black,
but I found Tamiya gunmetal gave me a better effect -- especially with a little judicious
buffing and then some black and brass where appropriate. The supplied rubber hoses for
fuel and radiator lines look good, but I had to insert a bit a copper wire in order to
tame them into proper position.
Cutting off the top of
the strut assembly jig facilitates that process. It was here that I ran into my first
problem and had to shorten the rear struts. Since the correct measurements are given in
the instructions, I highly recommend checking the parts before you try to assemble them
and find they don't fit. The propeller mounts are also fitted at this time. They were
poorly cast and both propeller shafts were broken off. I had to putty the metal castings
and fit new shafts. Aside from a little flash cleanup, the other metal castings were
reasonably good. The instructions call for painting most of the cast metal parts black,
but I found Tamiya gunmetal gave me a better effect -- especially with a little judicious
buffing and then some black and brass where appropriate. The supplied rubber hoses for
fuel and radiator lines look good, but I had to insert a bit a copper wire in order to
tame them into proper position.
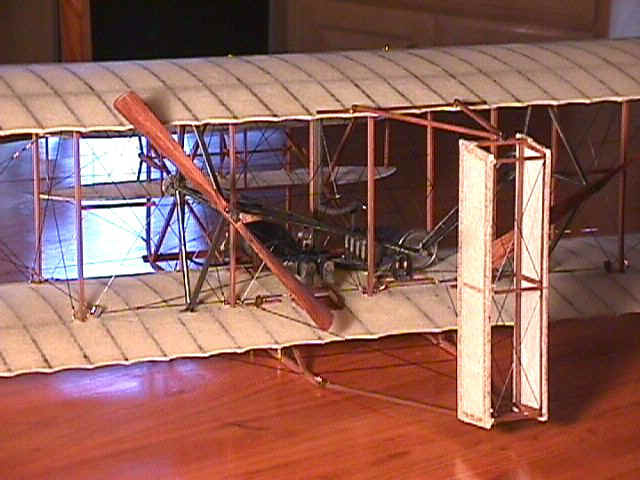
 Stringing the wing
bracing wires is tricky and can lead to premature baldness from the accompanying hair
pulling as the thread keeps slipping off the brass wire hooks. This difficulty can be
pretty much eliminated by bending the hooks down into more of a "c" shape that
will actually hook the thread as you pass it around the struts. Note that not all of the
struts hold the horizontal rigging, and only drill those that do so even though all of the
struts are dimpled for drilling. The 3mm lengths of copper tubing work like bolo tie
slides and make it easy to snug up the rigging.
Stringing the wing
bracing wires is tricky and can lead to premature baldness from the accompanying hair
pulling as the thread keeps slipping off the brass wire hooks. This difficulty can be
pretty much eliminated by bending the hooks down into more of a "c" shape that
will actually hook the thread as you pass it around the struts. Note that not all of the
struts hold the horizontal rigging, and only drill those that do so even though all of the
struts are dimpled for drilling. The 3mm lengths of copper tubing work like bolo tie
slides and make it easy to snug up the rigging.
Be careful not to forget plywood part B-2 that braces the fuselage to the leading
edge of the lower wing. It's easy to overlook its location in 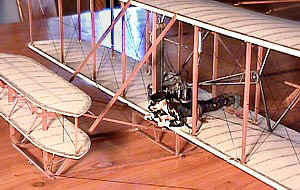 the drawings. This needs to be cut to size and
carefully fitted. Before attaching the elevator control shaft in step 10, it's a good idea
to jump ahead and assemble the figure of Orville Wright. That way you can make any needed
adjustments to his arms and hands and locate the shaft so his hands properly grasp both
shaft and control lever. In an amusing note, when I applied a wash to bring out the detail
on the figure's face, he turned out to have decidedly Asian features, and I had to widen
his eyes with paint.
the drawings. This needs to be cut to size and
carefully fitted. Before attaching the elevator control shaft in step 10, it's a good idea
to jump ahead and assemble the figure of Orville Wright. That way you can make any needed
adjustments to his arms and hands and locate the shaft so his hands properly grasp both
shaft and control lever. In an amusing note, when I applied a wash to bring out the detail
on the figure's face, he turned out to have decidedly Asian features, and I had to widen
his eyes with paint.
Fitting the rudder struts to the rudder connectors is a bit tricky and requires you to use the full-size drawings to get the angles right, and you'll have to cut a rabet on the struts to fit them to the connectors. Also, the brass rudder hooks have too much curl to them and need to be straightened to conform to the drawing in the instruction booklet.
| C o n c l u s i o n |
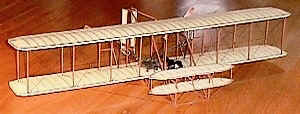 About 60 to 80 hours
after tearing off the shrink-wrap, you're done. Back when I was a kid, assembling model
kits right out of the box without putty and usually without paint, I proudly displayed my
Monogram Wright Flyer. As much as I enjoyed that model, it really didn't convey the sheer
guts it took to risk life and limb on that flimsy contraption. Hasegawa, with their 1:16
Museum Model Series Wright Flyer I, makes it obvious just how fragile that airplane was
and is an impressive addition to any collection.
About 60 to 80 hours
after tearing off the shrink-wrap, you're done. Back when I was a kid, assembling model
kits right out of the box without putty and usually without paint, I proudly displayed my
Monogram Wright Flyer. As much as I enjoyed that model, it really didn't convey the sheer
guts it took to risk life and limb on that flimsy contraption. Hasegawa, with their 1:16
Museum Model Series Wright Flyer I, makes it obvious just how fragile that airplane was
and is an impressive addition to any collection.
 To see more of Ken's beautiful work visit his website, THE
WALRUS AND THE CARPENTER, at http://www.wman.com/~khgold/
To see more of Ken's beautiful work visit his website, THE
WALRUS AND THE CARPENTER, at http://www.wman.com/~khgold/
Back to HyperScale Main Page
Back to Feature Articles Index