Home
| What's New |
Features |
Gallery |
Reviews |
Reference |
Forum |
Search
Home
| What's New |
Features |
Gallery |
Reviews |
Reference |
Forum |
Search
|
|
Republic
XP-72 Superbolt by Mike Millette
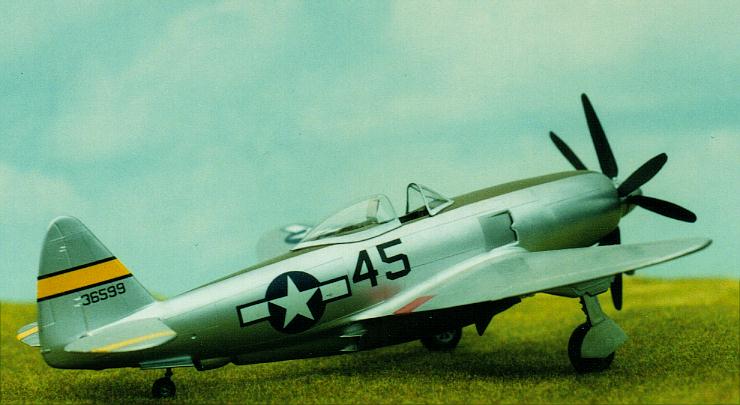
In an effort to increase the speed of it's P-47 aircraft, Republic began to look at Pratt & Whitney's R-4360 as a possible successor to the R-2800 then in use in the P-47 in 1943. The R-4360 was a monster of a radial engine. With four rows of seven cylinders each and a displacement of 4360 cubic inches, the Wasp Major or "corncob" was expected to generate at least 3500 hp. With that much power, Republic expected to see this "Super" version of its Thunderbolt attain somewhere in excess of 500 mph. During flight testing, with a less than fully developed engine, speeds of 480 mph were actually achieved. Republic built two prototypes of the XP-72. Both prototypes were armed with only six 0.5 caliber machine guns vs the P-47s eight. The first prototype had a 4 bladed prop of unknown type (possibly a Hamilton-Standard), a red spinner and no underwing weapons pylons. The second utilized a 6 bladed counter rotating prop (either Aero Products or Curtis Electric) with a bare metal spinner and the standard P-47 weapons pylons under the wings.
Since the Monogram kit comes with its pylons molded integral with the bottom of the wing it made Koster's choice of a conversion rather easy. The Koster conversion consists of a vacform fuselage, left and right halves, separate left & right vac engine cowl pieces, a resin supercharger intake insert, engine cooling fan and two-piece contra-rotating prop. All other parts are used from the kit.
When I purchased the Koster conversion, the Monogram kit was about the best bubbletop P-47 available. By the time I actually got around to building it however, several companies had obviously decided there was a niche to fill, and several newer kits became available. After reviewing the more modern kits, I decided to stick with the Monogram release. The conversion was designed to work with this kit, the parts lined up and frankly I had no intention of rescribing the vacuformed fuselage. The conversion had raised panel lines that matched the original Monogram parts quite nicely. As it turned out, I did end up rescribing everything - the kit parts and the conversion parts! The Koster parts are nicely detailed with raised panel lines which match the Monogram kit quite nicely. It is pretty obvious that the original Monogram fuselage formed the basis for the conversion parts, but panel line detail is well replicated in areas which are unique to the XP-72. The conversion does not come with clear parts, the kit id engineered to use the existing Monogram canopy. I elected to use the Monogram windscreen but used a Squadron vac'ed canopy for the sliding rear section.
Fuselage I decided to replace Monogram's interior. The kit interior looks a bit sparse and not quite to scale. One positive benefit of the glut of new kits was the availability of new resin interiors. I selected the True Details resin cockpit and set about building and painting it. The cockpit was painted Interior Green and given the wash and drybrush treatment to highlight the various details. Once the cockpit was complete, it had to be located inside the fuselage. Since neither the resin cockpit nor the vac fuselage halves had anything like locator tabs, this took a little effort. I took the assembled interior and matched its centerline to the aircraft centerline as carefully as possible. The interior unit was lightly tacked in place using superglue and then the two fuselage sides were taped together. Alignment of the cockpit with respect to the fuselage sides was then checked. I glued a couple of pieces of sprue to the underside of the cockpit and then shimmed them against one side of the fuselage to line up the interior.
In order to align the fuselage pieces I super glued long strips of Ľ inch Evergreen strip along the spine and belly. This provided a lap joint rather than a butt joint for the two fuselage halves. The lap joint works is just about required for vac kits as opposed to injection molded kits with their cleaner/ thicker mating surfaces. It also helps locate the vac parts since there are no locating pins as on injection molded kits. The cowling should not be added to the fuselage halves at this point as this will only make lining up the cooling fan more difficult as the fuselage is being joined.
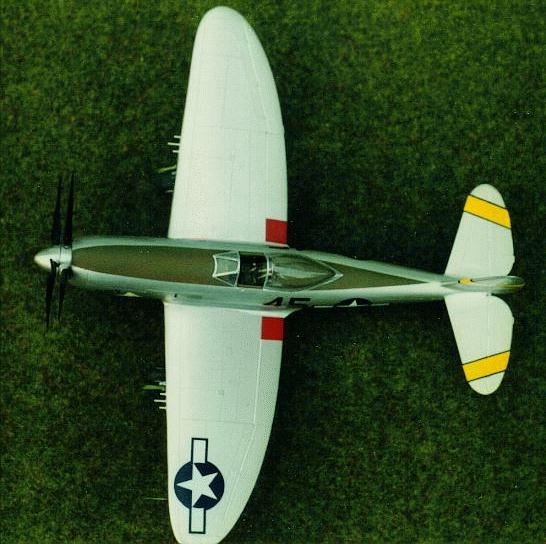
Wings/Landing Gear The XP-72, unlike its predecessor, had only 3 guns in each wing and they were staggered slightly differently. The Monogram kit has the wings installed in line with the leading edge of the wing instead of parallel to the ground as was the case. Both of these factors contributed to my decision to remove the kit guns and replace them with stainless steel tubing. The wing was built per the kit instructions and the leading edge was then sanded smooth. The wing was then drilled to accept the new barrels with the locations lined up with the ejector chutes. The two inner ejector chutes from the kit were filled in and a new ejector chute had to be scribed in the wing based on the stagger of the new gun installation.
The XP-72s wheel wells are a slightly different shape than the P-47s and a small piece of sheet plastic will have to be added to account for the change. The instructions provide a diagram of this area. A similar portion of the landing gear door will have to be removed to match.
Engine Unlike the F2G, the front of the R-4360 engine is not visible on the XP-72. Taking a cue from the radial engined Fw 190s, the XP-72 incorporated a cooling fan right inside the opening of the cowling. Kosters resin fan is located inside the separate vac cowling and it needs to be carefully aligned so that the spinner and fan end up properly centered in the engine inlet. The spinner is divided into a front half and rear half with the prop blades molded integrally to the spinner. My example had some flash and pin holes that needed to be cleaned up.
By 1945 almost everything that the American aviation companies built for the US Army Air Corps was left unpainted. In the minds of USAAC leadership, air superiority made camouflage rather superfluous. When you have 1000 B-17s in the air with squadrons of supporting fighters it's pretty hard to miss, camouflage or not. The aircraft also gained a little in performance as well since the weight and drag of the paint was eliminated. This, of course, is not good news for most of us who like building WWII aircraft models. Natural metal paint schemes are notoriously difficult to replicate, with many of the paints being fragile in the extreme and all of them requiring exceptional model prep. A friend of mine recommended Floquils Old Silver and Bright Silver. He indicated that they were tougher than many of the bare metal finishes and still gave that "real" metal look.
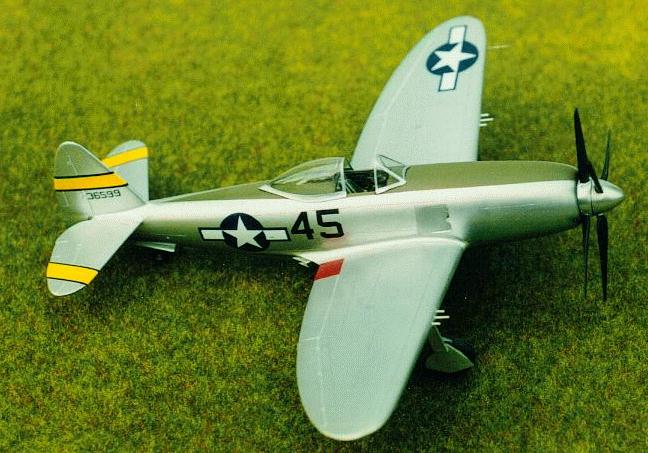
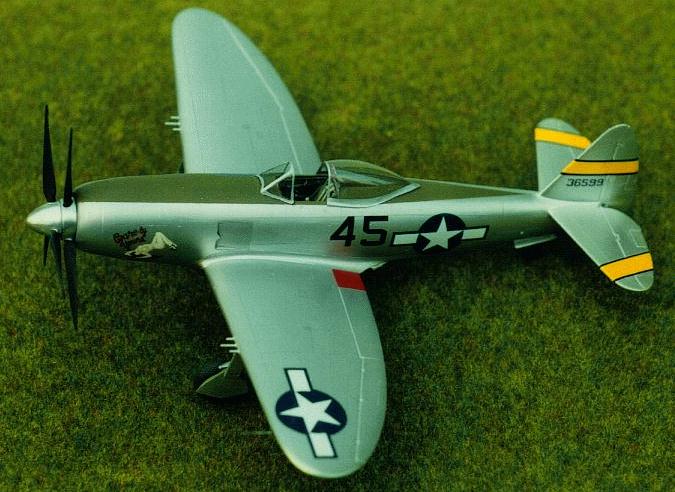
My first attempts to paint the kit illustrate why a perfectly smooth surface is required to make a NMF work no matter what paint you use. Several scratches surfaced where the vac fuselage was joined along the spine and belly as well as where the fuselage joined to the wings. Repeated polishing to get the surface smooth resulted in the loss of numerous panel lines. Several attempts were made to restore them, but none proved successful. The solution… scribing time. Once the kit's panel lines had all been re-scribed and the surface finish was restored, the kit was painted once again using the Floquil paints. The squadron and personal marking shown in the photos are spurious and temporary. The serial number (43-6599) is actually that of the second prototype. While I was applying the decals it occurred to me that it might be kind of fun to see what this aircraft would have looked like in squadron service. Going through my decals and reference material, it became clear that the lowest impact to the "real" scheme meant either a Pacific Theater aircraft or Mediterranean Theater. Once the pictures were taken for this article, the "theater" markings were removed and an "XP-72" was added over the serial number.
This was the first vac project that I have actually completed. I was very happy with Koster's vacform parts but found locating the supercharger intake and engine cooling fan a bit more difficult that I had expected. Problems with the paint also caused me more pain. Rescribing the whole kit was definitely not in the original plan. I think the next time I model something with a natural metal finish, I am going to try Bare Metal Foil. I also wish I had been able to replicate the altered shell ejector ports better than I did.
Model, Images and Article Copyright
© 2000 by Mike Millette Back to HyperScale Main Page Back to Features Page |