Home
| What's New |
Features |
Gallery |
Reviews |
Reference |
Forum |
Search
Home
| What's New |
Features |
Gallery |
Reviews |
Reference |
Forum |
Search
|
|
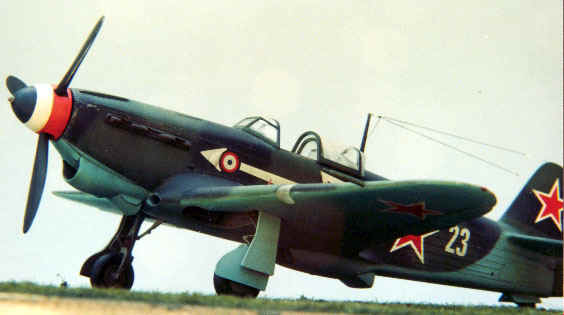
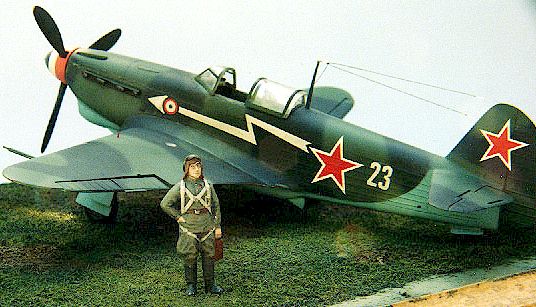
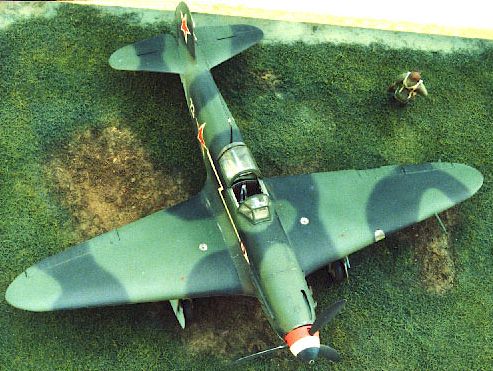
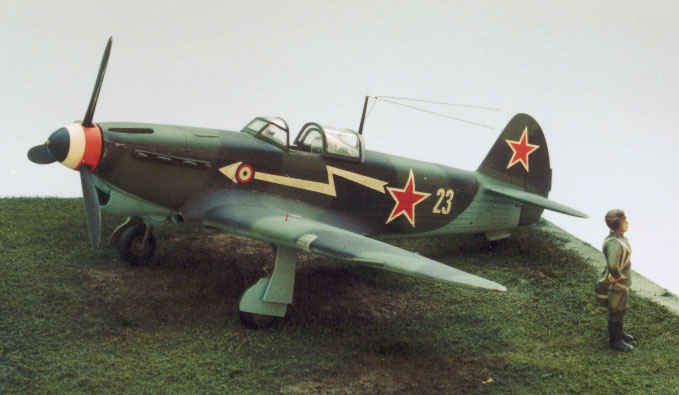
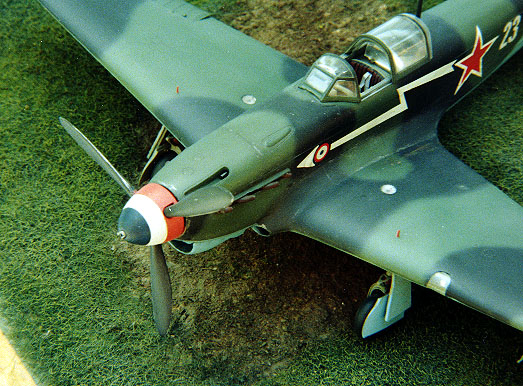
Yakovlev Yak-!b by Frank Crenshaw
Frank Crenshaw builds Accurate Minatures' new 1/48 scale Yak-1b and points out some areas that need correction:
The Yak-1 was the realization of his vision. Construction was simple, consisting of wooden wings, tail planes and fin. The fuselage was tubular steel covered with fabric. The cockpit was purely functional and had no gyro-stabilized instruments. Trimming adjustments could only be performed on the ground. The fuel gauges were located within the tank caps on the wings! The Yak-1 went into production in 1940 and was soon pitted against the best of the Luftwaffe. The Yak-1b model incorporated improvements to the airframe based on combat with the Luftwaffe. The most important change was the addition of a bubble canopy to improve visibility. The 7.62 mm cowling mounted machine guns were replaced by a single 12.7MM UBT machine gun. These minor changes reduced the weight of the 1b model by almost 500 lbs. The Yak-1b was real "hotrod". When the Accurate Miniature 1/48 scale Yak-1 kits was first released I was not sure if I really wanted one. After checking out the contents I decided I did!
I already had the kit under construction when read a series of reviews on the HyperScale "Plane Talking" discussion board regarding this kit. Mike Good had noticed that the intake in the kit was not correct. So much for my OOB effort! After a few email exchanges with Mike, I had determined pretty much how the correct intake should look and how I might correct it. For my first attempt I modeled it after a Yak-9 with is a very different shape - I wound up having to break this piece out and redo it after talking to Mike. This was not a lot of work, it took me about 30 minutes to fix.
With the benefit of hindsight, I'd suggest that the radiator should be cut from the cockpit section and manually fitted into the radiator fairing. That would probably be easier and much more effective than my solution. The fuselage is not wide enough to mate perfectly with the fuselage top. I used a .010 styrene strip to widen the halves enough for the top part to fit correctly. According to overall knowledgeable guy and VVS expert Pete Chalmers, the rear decking is too low and needs to be raised so that the armor plate touches the top of the rear canopy. I discovered this too late to fix.
I vac-formed a landing light cover, as the kit part is just too thick to use. I placed an MV lens in the receptacle and faired my formed cover over it. The final problem that I thought was going to be the hardest to fix turned out to be no problem at all. My kit canopy had a fine crack (all three of the canopy parts actually). I learned when I called Accurate Miniatures to get a replacement that the whole Yak production had this molding flaw in the canopy. At first I was worried, but after fine sanding and a dip in Future floor wax, the fine seam line disappeared. Don't let this small crack worry you- it is not visible at all on the finished model.
I liked the look of the green on black "tiger stripe" scheme I found on the VVS site. I had intended to mark this model as one flown by the Soviet Aviatrix Lydia Litvak, but when I saw the tiny picture of the Normandie regiment Yak in a Replic magazine, I quickly changed my mind. Luckily the Aeromaster sheet had these markings on it. I used Modelmaster enamels for the green and black and Pollyscale for the VVS underside blue. I painted the model and weathered it using Modelmaster enamels thinned with mineral spirits. The base was detailed using static grass with "sculpt-a-mold" dirt and weathered using advice given to me by Mike Good. The figure is from the ICM "Soviet pilots and ground crew" kit and was painted with Pollyscale acrylic paint. The figure is not bad but could use some extra detail. I hope some one puts out some detailed VVS figures in resin at some point.
Well that is it! I have to admit that this little project really has gotten me more interested in the VVS during the Great Patriotic War. This is a great little model and I hope Accurate Miniatures keeps subjects like this coming. Frank Crenshaw
Model, Photographs and Article Text Copyright © 1999 by Frank Crenshaw
Back to HyperScale Main Page Back to Features Index |
 Alexander
Yakovlev had a vision of a small, lightweight but powerful fighter.
Alexander
Yakovlev had a vision of a small, lightweight but powerful fighter. 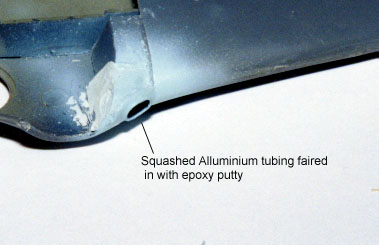 I did not
want to invest in reference - I just wanted to build this kit right out of the box.
I did not
want to invest in reference - I just wanted to build this kit right out of the box. 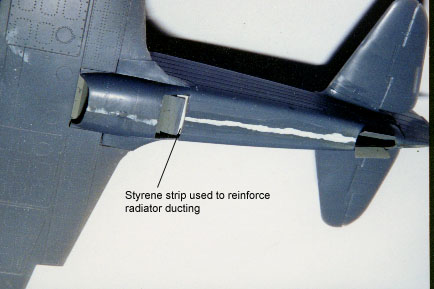 The
construction is straightforward but there are a couple of problems. The worst of these is
where the cockpit/radiator joins the fuselage near the end of the radiator fairing. I
wound up gluing a styrene piece into the fuselage to support the radiator (see the
picture). This did work, but there is a very visible gap between the radiator and the
radiator fairing. I did not notice this until it was too late!
The
construction is straightforward but there are a couple of problems. The worst of these is
where the cockpit/radiator joins the fuselage near the end of the radiator fairing. I
wound up gluing a styrene piece into the fuselage to support the radiator (see the
picture). This did work, but there is a very visible gap between the radiator and the
radiator fairing. I did not notice this until it was too late! 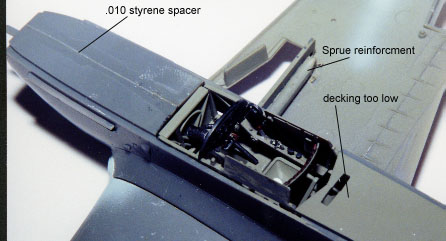 I had some
questions as to how the fuel gages looked and my best answer came from an ex Yak pilot!
HyperScale regular Michel Poutnikov has a friend who flew Yaks for the VVS. In addition to
this information Michel sent me some fantastic plans that were a huge help. As you can
tell, I think HyperScale is a great modeling resource.
I had some
questions as to how the fuel gages looked and my best answer came from an ex Yak pilot!
HyperScale regular Michel Poutnikov has a friend who flew Yaks for the VVS. In addition to
this information Michel sent me some fantastic plans that were a huge help. As you can
tell, I think HyperScale is a great modeling resource.