|
A-1H
Skyraider
by Patrick Chung
|
|
|
A-1H Skyraider |

Tamiya's 1/48
scale A-1H Skyraider is available online at Squadron.com
Affectionately known as "Able Dog", the Douglas AD series attacker was
one of the most welcomed machines among the US Navy and USMC pilots and
ground crews. Its sturdy construction and reliable mechanism allow the
dog to withstand even the toughest battle ware and the versatility of
the design enabled the dog multiple role in the fierce combat and that
is well proved during the Korean and Vietnam War. The AD-6 (later known
as A-1) was the last main type of the series and the H version, as a
carrier borned attack machine, gained its fame over the sky of North
Vietnam.
Perhaps there are already too much and too well description about
this machine on the web so any further bubbling of it would be annoying
to experts around. So lets go to the model itself.
Tamiya's
Skyraider in 1/48
|
Back in 1990s, Tamiya released the navy version of this famous plane
and later they presents another USMC version, both of Vietnam War era.
The kit is of this firm's normal high standard and the moldings are
crisp and delicate. However the kit is not as easy to build as a Mustang
or a Spitfire due to the complicatedness of the full scale counterparts
which caused a more sophisticated parts break down and thus more
sub-assembly and pre-painting/weathering/masking required during
construction.
Tamiya has a good reputation of making well thought out construction
sequence that will assist trouble-free construction. This kit is no
exception. The drawings are clear and sub-assembly/painting is called
for in each step.
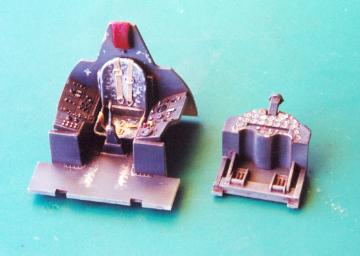
As normal I started from the pilot's "front office". The amount of
detail in this area is good enough for most builders so I only added
seat belts made with masking tape and fine copper wires. After painting
the entire office dark gray, a small amount of white was added to the
basic color for some subtle shading. The instrument panel was painted
black and kit decals for dial faces was used, it snug down perfectly
after a couple coats of Gunze Decal Softener. After these were dry I
hand picked the fine knobs and switches on the side panels with various
colors to make it looks busy.
Despite following the construction steps on the instruction sheet, I
turned to assemble those sub-assemblies before going to the major parts.
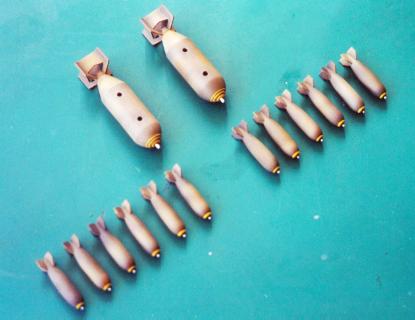
Air brakes, landing gears, wheels, tail wheels, arresting hook,
propeller, engine, pylons, ordnance and drop tanks are cemented, sanded,
painted, shaded and washed, some are even pasteled to enhance the
result.
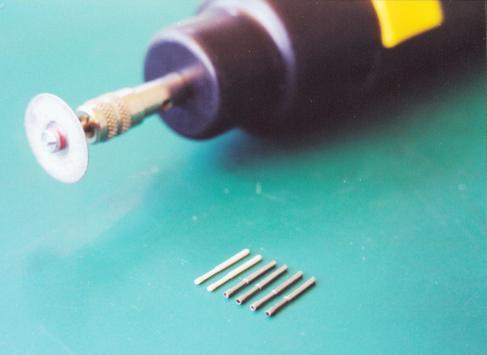
A few small things were added at this stage. The kit gun barrels were
replaced by hypodermic needle tubes and hydraulic plumbings made by wire
and fuses inside the wheel well which was already painted and weathered.
Major parts fit so perfectly that they almost fall together. After
thorough sanding and rescribing some panel lines (though Tamiya's kits
all feature fine recessed panel lines, there are places where they are
marred due to the mold release angles or sanding or excessive glue--in
most cases I use CA for almost all the assembly because it won't soften
the plastic and made the rescribing easier) the model is ready to
receive the first coat of paint.
All the inside of the airbrakes, wheel well/gear doors were
pre-painted with Tamiya gloss white. These were carefully masked before
the final spray. As for USN aircraft of 1960s, the flying surfaces and
undersides are all insignia white while the rest of the airplane being
painted light gull gray. So I first mixed some "desert yellow" to Gunze
flat white lacquer to obtain the "insignia white" and then spray the
complete underside plus ailerons, rudder and elevators with it, using
tan colour as panel line shading and leaking residues.
When these are dry, I masked all these area off with paper and
masking tape and then spray the rest of the model light gull gray. To
shade the panels of the gray area, I first use dark brown for the lines
and then a lighter shade of the basic gray to fill the center of the
panels.I use highly thinned paints when doing this to eliminate
otherwise too strong contrast.The bare metal leading edges were then
carefully painted and finally I masked the nose area to spray the
anti-glare black panel. The Curtiss-Wright R-3350 Engine on this
aircraft has a very unique exhaust stain pattern and this is achieved by
the finest setting of my Aztec model 470 airbrush with firstly red brown
then a few light coat of dirty black, both heavily thinned.
The model was then put overnight to let the paint thoroughly dry and
the next day I start putting decals on. Tamiya has enclosed two decal
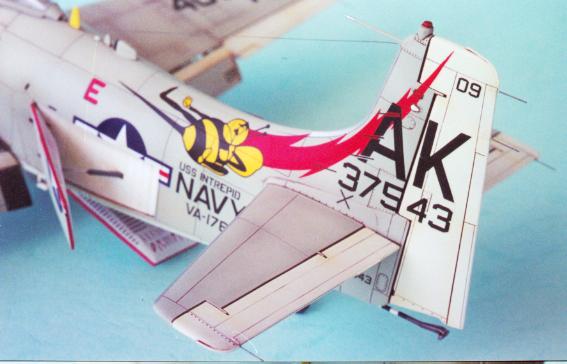
sheets in the box for 4 aircraft, all in Vietnam War era. I finally
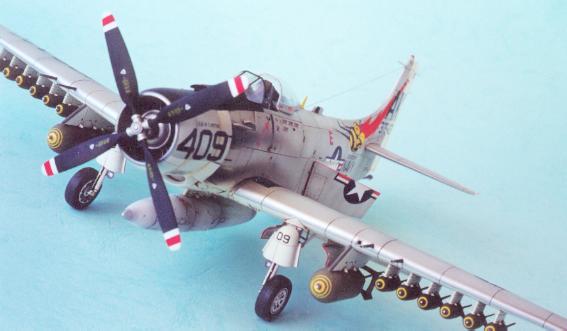
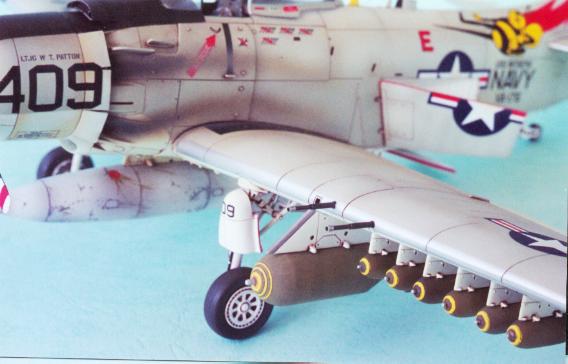
chose the markings of Ltjg W.T.Patton's AK409, VA-176 on board USS
Intrepid, because of his stunning victory on 9,October 1966 when he
downed a Mig-17 on a rescue sortie.
The decals are complete and well printed though still a bit thicker
than Aeromaster's. Under few coat of Gunze's Mr.Decal Softer, they
snuggled down very well.
Before putting those tiny sub-assembly on, the major assembly
received a wash using my home breed "washing liquid". This liquid is
nothing more than artist's oil colours (burnt sienna, red brown and
black pre-mixed) thinned with Zippo fluid. The advantage of using this
liquid is the fast drying nature of Zippo fluid won't bite the plastic
like kerosene or turp and will safe a lot of time waiting it to dry. The
oil colours could be then easily cleaned by a cotton swab dipped into
the artist's brush cleaner for oil colours.
The sub-assemblies were then put into their places and a monofilament
thread antenna was added while 0.1mm dia. fine steel wire made the
static electric release pins on all trailing edge tips.
Although I know when on the ground, A-1s normally won't have their
airbrakes posed open, but the fine detail of the airbrake just can not
be enclosed! so I let them open and pray for the absence of any
sharp-eyed expert.
Click the thumbnails below
to view the images full-sized.
Use the "Back" arrow on your browser to return to this page.
[../photogallery/photo20871/real.htm]
Model, Text and Images Copyright © 2001 by
Patrick Chung
Page Created 13 August, 2001
Last Updated 04 June, 2007
Back to HyperScale
Main Page
Back to Features Index |
 Home
| What's New |
Features |
Gallery |
Reviews |
Reference |
Forum |
Search
Home
| What's New |
Features |
Gallery |
Reviews |
Reference |
Forum |
Search