Home
| What's New |
Features |
Gallery |
Reviews |
Reference |
Forum |
Search
Home
| What's New |
Features |
Gallery |
Reviews |
Reference |
Forum |
Search
|
|
|
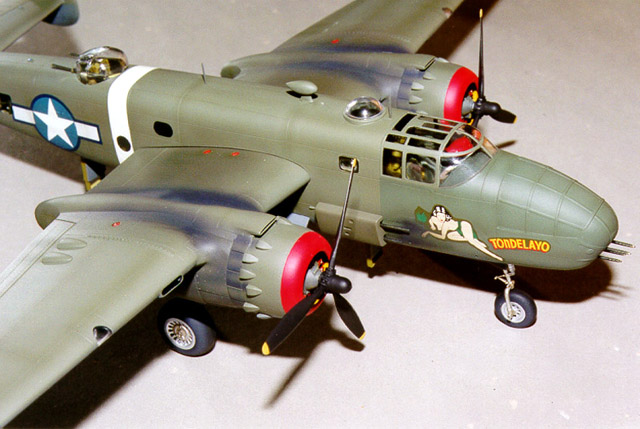
North American B-25D-1 By Don Fenton
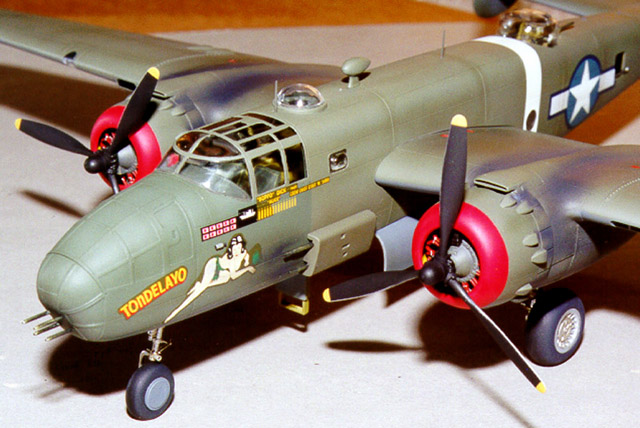
Despite appearances, this is not another Accurate Miniatures B-25C/D. This kit was built from an Accurate Miniatures B-25B kit plus parts from the Accurate Miniatures B-25G conversion set. I built this kit SOBS - straight out of the boxes. No corrections. No seam filling. No body work. No aftermarket parts.
I haven't built a kit in this way for over twenty years. It was great fun. The images of this model are offered for your considered examination - an Accurate Miniatures B-25 with all of its virtues and vices from the manufacturer and the builder.
Only parts that came out of the two boxes were used. These were Accurate Miniatures B-25B kit #3430 and B-25G Conversion Set #3432. The G conversion set supplied the twin .50 MG's (part B149), engine nacelle assemblies (parts B116, B117, and B153), nacelle air intakes (parts B98 and B99), exhaust cover plate (part B162 and B163) and fuselage side gun packs (part B80 and B164). The B-25B kit provided all of the remaining parts. The exceptions were the use of aftermarket decals and the installation of an additional .30 MG in the waist position. I took that MG from another Accurate Miniatures B-25B kit. Well…okay, I cheated. I could not bring myself to use those decal seat belts in the Accurate Miniatures kit. I used some cast off Reheat PE seat belts.
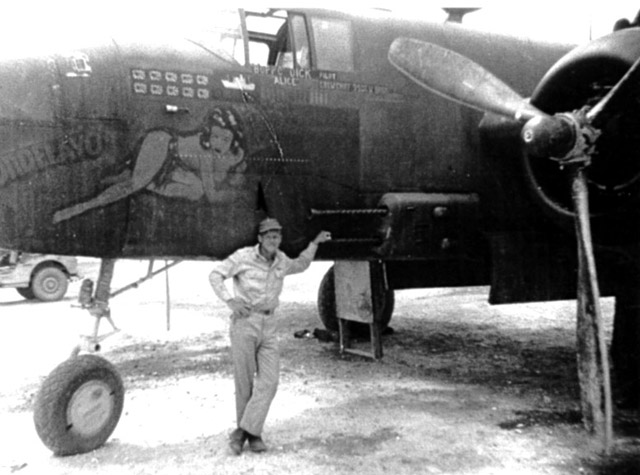
In 1944, Mr. Lynn Daker, pictured below standing beside the real "Tondelayo", flew this aircraft and others during his assignment to the 345BG.
He stated that Tondelayo had .30 cal. MG's in the waist windows and twin .50 cal. MG's installed in the tail. His recollection of .30 MG's in the waist is borne out by the narrative report of the famous October 18, 1943 mission to Rabaul. This report lists the expenditure of 1,500 rounds of .30 caliber ammunition aboard Tondelayo. Later mission narratives also list expenditures of .30 caliber ammo. Mr. Daker flew this aircraft well after battle damage from the October mission had been repaired. The aircraft returned to service in May, 1944. Mr. Daker flew his first, second and fifth missions in this aircraft on August 16, 17 and 29, 1944, respectively. He recalled the aircraft with .30 caliber MG's and I built it that way.
The interior of the model aft of the cockpit was painted with my favorite mix for yellow?green (a tinted zinc chromate finish coating) - 15 parts Floquil ATSF Yellow plus 1 part Floquil Engine Black. The bomb bay was finished with Floquil's Platinum Mist and the cockpit with Humbrol 75 Bronze Green. Cockpit decking was painted with Floquil ATSF Yellow. I used a flat black wash followed by dry brushing with Humbrol HD4 Zinc Chromate Primer. I didn't spend much time on the details in the back. Most of these details can not be seen. The interiors of the engine cowlings and nacelles were painted with Floquil ATSF Yellow to simulate zinc chromate primer. Likewise, the interiors of the gear doors and landing gear bays were painted ATSF Yellow.
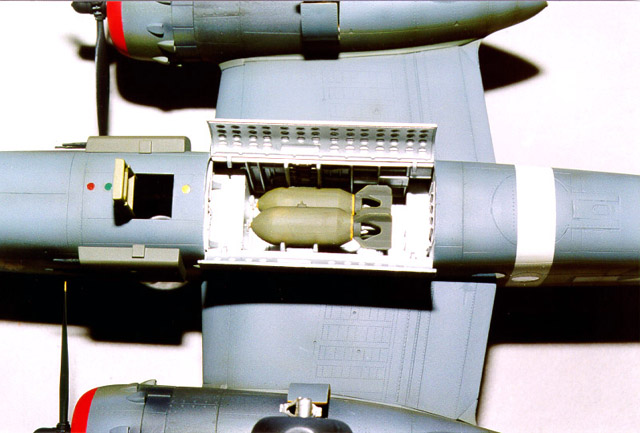
All locating tabs were removed from the fuselage. The bonding surfaces of both fuselage halves were made true by carefully rubbing them across 320 grit sandpaper on glass - the kitchen table. The kit was assembled using methyl ethyl ketone (MEK) and Tenax 7R. The canopy, after applying Future to the inside, was bonded in place with Weldbond Universal Space Age Adhesive, a kind of white glue. Some parts such as the astrodome and blisters on the starboard wing were bonded in place with Future acting as an adhesive and inherent seam filler in one. I hung a pair of kit provided 1,000 lb. GP bombs in the bomb bay.
The bombs were painted OD with a 1" wide yellow ring at nose and tail. After painting the fuses silver, the bombs were weathered to represent a scuffed up appearance. This being an out-of-the-box, I was spared the job of building the R2 bomb rack and 72 of those little 23lb. parafrags.
I did not like the suggested installation of the kit supplied brass weights. The majority of the weights are installed in the front wheel well. I took advantage of the painted over greenhouse of Tondelayo to place the weights in the bombardier's compartment. The large brass weights were cut in half. The bombardier's compartment was assembled with the gun barrels glued in. No other interior parts were installed. The interior seams were sealed with white glue. The brass weights were placed in the nose and polyurethane casting resin poured in to fix the weights in place. The white glue prevents the resin from oozing out before it cures. The completed bombardier's compartment was then bonded to the fuselage. Wings, engines, engine nacelles, engine cowlings, vertical and horizontal stabilizers were assembled as directed in the kit and conversion instructions. The nacelle extensions at the wing trailing edges were bonded to the nacelles with a thick application of CA adhesive. The bonding surfaces there are thin and require some reinforcement. After curing, the excess adhesive on the exterior was sanded away.
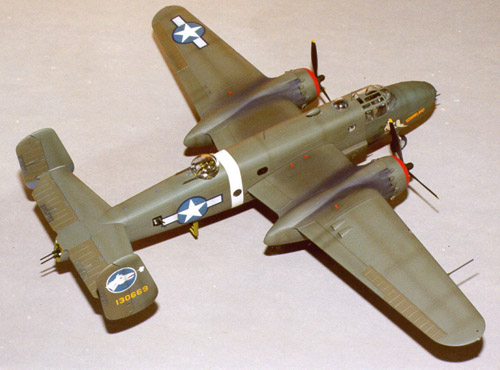
To simulate the blast panels under the muzzles of the fuselage guns, I masked off the desired pattern on both sides of the fuselage and sprayed on a heavy coating of Humbrol 75 Bronze Green. Any paint would do. I had this paint in the airbrush to spray the canopy framing prior to application of the OD topcoat. After the paint was applied, the tape was removed. After 24 hours, the panels were lightly wet sanded with a well-used piece of 600 grit sandpaper. This technique leaves a subtle, raised area after the topcoat is applied. The thickness of the raised area is controlled by the thickness of the dried paint film. If you are patient, repeated applications of paint will result in a more prominent raised area. I was not that patient. The canopy was masked with the vinyl masks included in the B-25B kit. The astrodome and bulged navigator's scanning windows were masked with liquid masking medium. The exterior of the model was finished in my own Floquil mixes for 41 Dark Olive Drab and 43 Neutral Gray. I wanted to capture the appearance of a used and grubby aircraft. Tondelayo was maintained as well as could be given the operational conditions and showed signs of repainting so I did not want to reproduce an extremely faded and worn finish. The faded finish was achieved by mixing fresh OD with various quantities of Brown Drab. The paints were mixed with 20% of a pale blue gray tinting color for scale effect. A slight amount of ochre was added to the tint used for the OD. This prevents the OD from shifting too much towards gray.
The control surfaces were painted with Brown Drab doctored with a little Humbrol 75 Bronze Green to represent the faded appearance of the fabric-covered areas. Fresh OD was used to represent the repainted nose of Tondelayo. A very thin application of Floquil Brown was sprayed over some panel lines and certain wing areas subject to wear and staining from servicing. After all paint was applied, Hard MSA Gloss Varnish was applied prior to application of decals.
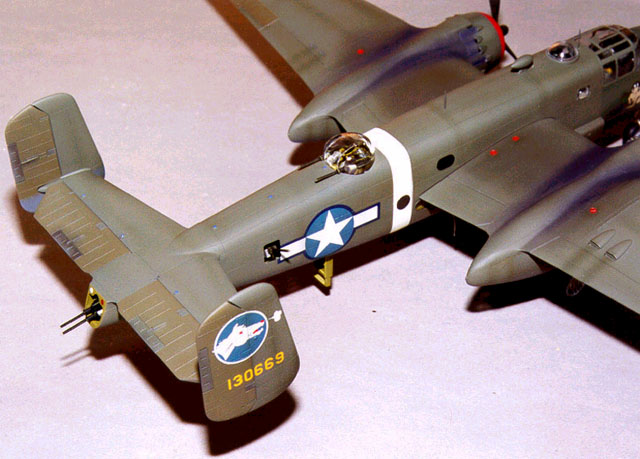
Aeromaster decal sheet #48-483 provided the 1944 markings for "Tondelayo". These are not the markings on this aircraft at the time of the 18 October, 1943 Rabaul mission. I had some difficulty getting these decals to conform to the surface details of the kit. Ultimately, cutting through the decals at panel lines and raised details plus a liberal application of SolvaSet achieved an acceptable result. The missing window in the starboard fuselage above the wing trailing edge was simulated with a piece of black decal cut to the appropriate oval shape. Likewise, the shell and links ejection slots in the underside of the nose were simulated with small rectangles of black decal. The red and white bomb formation lights in the tail were simulated with discs of white and red decals punched from decal sheet with a Waldron punch. The recognition lights on the underside of the forward fuselage were again simulated with discs of red, green and amber decals. Take note that early C and D models did not have factory installed wing tip recognition lights. This factory wing tip installation began with the C-10 and D-10 models.
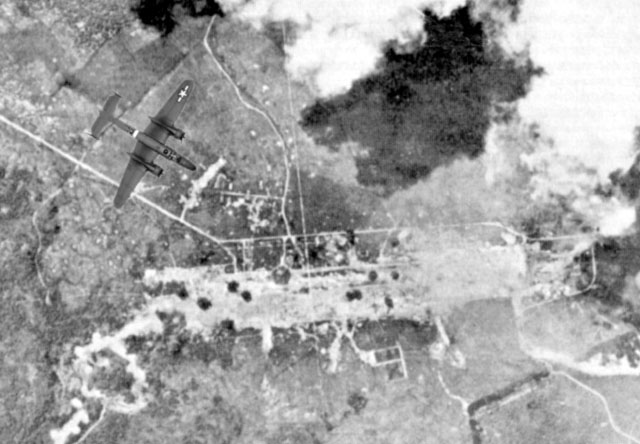
Shading of the panel lines covered by the decals was followed by another application of Gloss Varnish. After the additional application of a burnt umber tinted wash in selected areas, Hard MSA Matte Varnish was sprayed over the entire aircraft. The masking over the clear parts was removed. The masks can be difficult to remove as they adhere strongly. Make sure that your clear parts are well bonded. The Accurate Miniatures B-25B canopy masks worked well enough with suitable modifications to accommodate the B-25C canopy framing. The B-25C style canopy is one of the extra parts included in the B-25B kit. Some of the canopy masks fit poorly. Next time, only the curved pre-cut corners of the canopy masks will be used to get the best fit. I'll fill in the other parts with liquid mask or tape. Finally, exhaust stains were added. I carefully logged the hours spent on the building and finishing of this kit. Surprisingly, it took 87 hours. Now, back to my other B-25B to C conversion and the Doolittle B-25B raider. The last b&w image is my model of "Tondelayo" overflying Vunakanau, which was the largest, best defended and most important Japanese air base on New Britain. The image of the airbase is authentic, taken on 7 August 1942. I digitally superimposed an image of my model on the recon photo of Vunakanau, making the final image completely bogus.
Click
on the Thumbnails to view images full sized.
Text, Models and Images Copyright © 2000 by Don
Fenton
|
 Photo
via Daker
Photo
via Daker