|
North
American B-25G
by Ian Robertson
|
|
|
North American
B-25G Mitchell |

HyperScale is proudly sponsored by
Squadron.com
The B-25G was the first Mitchell variant to carry a 75 mm nose
cannon. The cannon, which measured 9.5 ft in length (about 3 m) and
weighed almost 900 pounds (400 kg), became the responsibility of the
navigator to load during an attack. Although a total of 21 rounds were
carried on board, only 4 rounds or so could be fired during an attack
because of the time needed to hand feed the 15 pound shells. A direct
hit from the cannon could sink most Japanese coastal vessels, the
prime target of B-25Gs operating in the South Pacific. Even Japanese
destroyers were vulnerable to an attack by these B-25 "cannon ships".
Based on the B-25C/D design, the B-25G variant had a shortened nose
with two .50 caliber machine guns mounted above the cannon. Some Gs
had a tail gunner's position installed, and a few also had side gun
blisters added at a field modification center in Townsville Australia.
These gun blisters became standard on later Mitchell variants. The
blisters on the G were directly opposite one another on the fuselage
whereas the blisters on later variants were offset slightly. A total
of 405 B-25Gs were produced (serials 264802 - 265201).
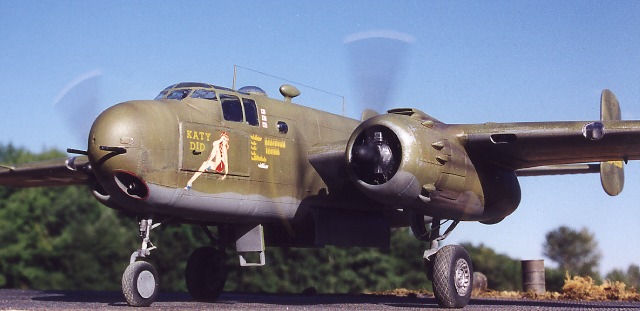
My
Model - The Fictitious "Katy Did"
|
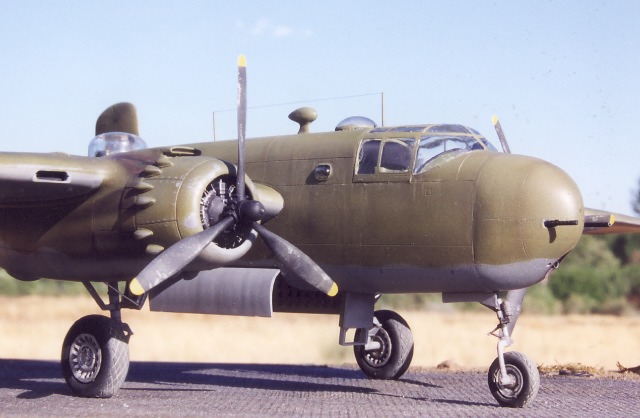
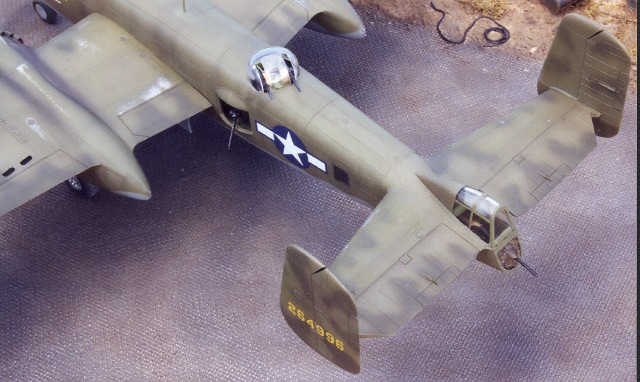
My objective was to build a late B-25G with both the tail gunner
position and side gun blisters. To my knowledge there are no decals
available for such a G variant. Therefore, after a brief period of
wavering over the importance of historical accuracy in model building,
I opted to create a fictitious aircraft using spare nose-art and
serial numbers.
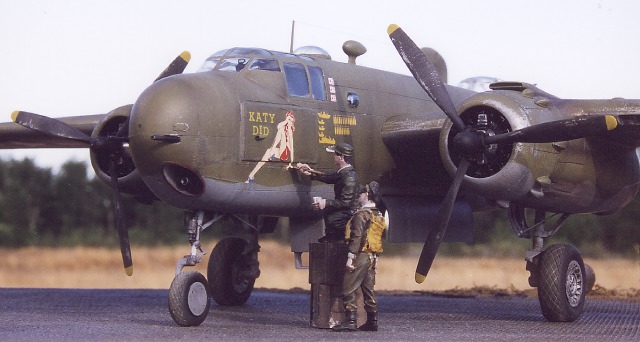
My goal was to create a model with nose-art that was consistent
with the style of the times. I decided to name the aircraft "Katy
Did", in keeping with my profession as an entomologist and because of
the double entendre. I did not come up with the name - I saw it on a
Corsair.
In an earlier article on Hyperscale I described the (almost)
out-of-the-box construction of an
Accurate Miniatures B-25D (resin tires, etched brass seatbelts and
Aeromaster decals were the only additions I made). Let me emphasize
that this kit is great out of the box and looks very much like a B-25!
However, for my second attempt at the kit I decided to indulge in some
modifications using a variety of aftermarket products, kit-bashing,
and minor reworking of the kit parts. I used the B-25B (Doolittle
Raider) kit plus the B-25G conversion parts. The modifications I made
are outlined below.
Before I proceed further - I have two tips for building the AM B-25:
(1) hold off on adding the front landing strut until late in
construction - it will break off if you add it in step 9 as suggested.
(2) hold off adding the dorsal turret until the model is complete,
including the paint and decals. The turret will fit into the completed
fuselage if you remove the small tab located beneath the gun barrels.
Painting around the turret would be a nightmare. OK, now for those
modifications**
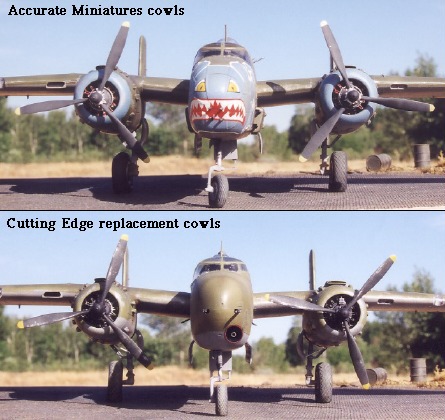
1) Engine
Cowls
The undersized engine cowl openings in the Accurate Miniatures kit
have been a flashpoint for rancorous discussion. After using the kit
cowls on my B-25D I decided to use the Cutting Edge resin replacement
cowls on my G variant. To illustrate the difference in appearance
between the cowls I took head-on photographs of my two completed
models. While the difference is noticeable to me, modelers will likely
continue to disagree over the significance of this modification to the
overall look of the model. The replacement cowls are more accurate and
look better in my opinion, but they add significant cost to an already
expensive project. Also, I'm now convinced that with a little filing
and sanding the kit cowls can be improved without the use of
replacement parts.
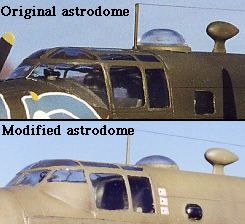
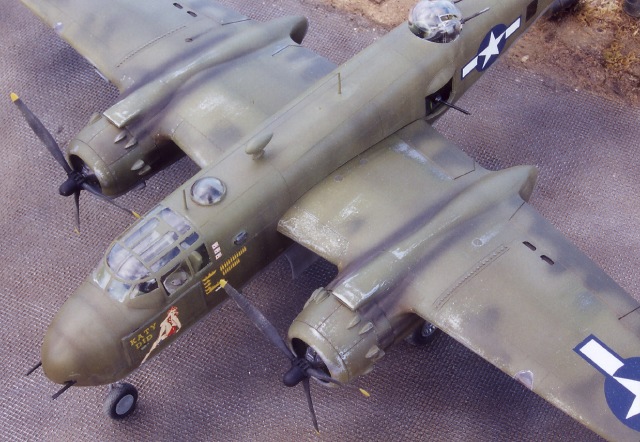
2)
Astrodome
Although I've heard little discussion on the topic, I found the clear
astrodome in the kit to be overly large and bulbous. Using photographs
for reference, I filed the base of the astrodome in my G kit until I
got a more satisfactory shape. For comparison I show the unmodified
and modified astrodomes on the finished models.
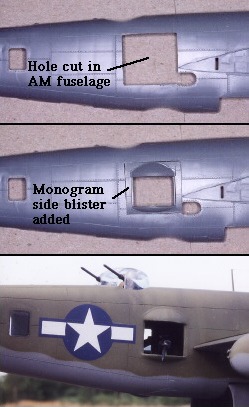
3) Side
Blisters
Installing side gun blisters was the biggest challenge in building
this model because there was no going back once I tore into the
Accurate Miniatures kit. I first cut the blisters from a
Revell/Monogram B-25J kit. These pieces were then used as templates to
direct where I should cut holes in the Accurate Miniatures kit. The
holes were cut slightly undersize using a dremel cutting disk and then
filed to accept the blisters from the Monogram kit. The seams were
filled with putty and sanded flush. Three stages of construction are
shown in the image below.
4) Tail
Gun
Accurate Miniatures supply a tail turret for their C/D kit and G
conversion. The framing on this turret seems a bit off to me (i.e., it
looks different from the photos I have of B-25D/G tail turrets), but
it certainly provides the correct impression. I sealed the hole where
the rear gun projects from the fuselage using metal foil and epoxy. My
initial plan was to use only metal foil to simulate the flexible
covering that surrounds the gun barrel, but this was flimsy so I added
some 5-minute epoxy and engraved it slightly as it became hard so that
it would appear like flexible material. The epoxy was then painted
brown and touched up with a wash of black paint.
5) Other
Details
Once again I used True Details weighted resin tires (with much of the
weighted effect sanded off) and etched brass seatbelts (lap belts
only). I replaced the kit's armor protection plate under the pilot's
position with a thinner piece of sheet styrene. Within the fuselage I
placed a piece of sheet styrene over the lower turret position so as
to provide a solid floor between the side gun blisters. I have no
references to support this modification - it just made sense to me. No
"glass" was added to the side gun blisters. Although glass in clearly
present over the blisters of later B-25 variants, it appears absent in
the G. The figures shown in one of the photographs are from Tarmac
(painter) and Verlinden (pilot).
Paint,
Decals and Weathering
|
I started by painting the model with SnJ aluminum since I wanted to
have bare metal show through in various places. I then pre-shaded
panel lines with black. The underside of the model was painted neutral
grey with Polly Scale acrylics; the topside was painted "faded olive
drab" using Aeromaster acrylics. To give the faded olive drab some
texture I sprayed subtle variations of the color over the model in
various locations. RAF dark green was used for the patches of green on
the tail and wings.
Fine grit sandpaper was used to create abrasions in the paint, some of
which exposed the aluminum base coat, particularly on the leading
edges of the wings, cowls and propeller blades.
The decals came from a variety of sources, including some from the
kit. Dry transfer decals were used for the name "Katy Did". The serial
number on the tail is appropriate for a B-25G, but I do not know if it
was used on a G variant with a tail turret and side gun blisters.
Having now completed two Accurate Miniatures B-25s, one out of the
box and the other with replacement cowls and additional modifications,
I can say that I thoroughly enjoyed building both kits and they look
great sitting side by side on my shelf. In my opinion any shortcomings
of the kit can be overcome and need not incur much expense (although
they did in the case of my model - OUCH!!).
Click the thumbnails below
to view the images full-sized.
Use the "Back" arrow on your browser to return to this page.
[../photogallery/photo28856/real.htm]
Model, Images and Text Copyright ©
2001 by
Ian Robertson
Page Created 25 August, 2001
Last Updated
04 June, 2007
Back to HyperScale Main
Page
Back to Features
Index
|
 Home
| What's New |
Features |
Gallery |
Reviews |
Reference |
Forum |
Search
Home
| What's New |
Features |
Gallery |
Reviews |
Reference |
Forum |
Search