|
Messerschmitt
Bf 109E-4/Trop
by
Frank Romano
|
|
|
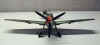
Messerschmitt Bf
109E-4/Trop |

Hasegawa's
1/48 scale Messerschmitt Bf 109E-4/7 Trop is available online from
Squadron.com
When I first started this project in 1998, I never thought it would
be 2001 before it was finished. I started building Tropical birds mainly
because I like the Desert color schemes but I also thought it would be
cool to have a section of my cabinet with just Trop birds.
I bought the Hasagawa E4/7 because I loved the tiger stripe paint job
on this aircraft. I immediately bought just about all the after market
stuff available at the time. I honestly don't remember what I used but I
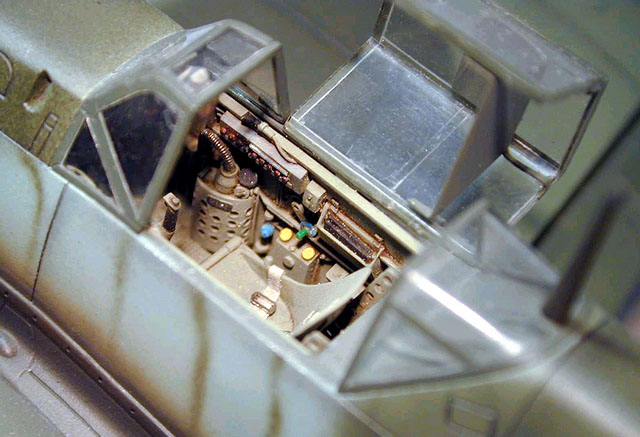
think it centered around the Tecknics set. I finished the cockpit within
a few months and then my building came to a grinding halt. At my hobby's
expense (and my employer for flipping the bill) the next 18 months were
spent completing a degree program. Other distractions to complicate
things were packing everything for a move and then my daughters arrival.
Finally things settled down and I was able to build a new modeling
bench and break out the 109. It was nice to be able to see all the
clowns at the Chino model club meetings again; classes, homework, and
research papers kept me away for almost two years. Those guys
fortunately didn't change, after some verbal abuse I felt right at home
again almost like I had not been gone. That was not the same feeling
about our hobby though, I felt like I was walking into a new hobby,
there was a boom in after market stuff and some new techniques were
being used.
When at first I started picking up the pieces from where I left off I
felt like I had ten thumbs and I had a hard time remembering how I used
to do things. I found myself redoing a lot off things over and over to
get it right and to some extent wasn't totally satisfied, but I went on.
I know others that have stopped modeling for a while then jumped back in
know how I feel, If you haven't jumped back in; do it, the waters a
little cold at first but warms up quick and soon you will get back up to
speed.
Construction was fairly basic, with a lot of pictures from my
references and photo etch I was able to reshape the chin, add screens
and nit pick. The cover for the filter is hinged and I can have it
either in the open or closed positions.
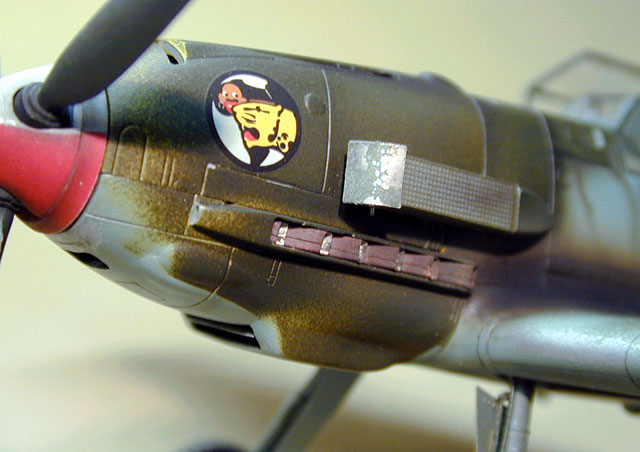
The large radiator exit flaps were cut out and photo etched
replacements used. I scratch built the brackets from left over photo
etch trees and used brass rod for the actuating mechanism for these
flaps. Since the 109 has a fairly pronounced fabric tape section
covering the ribs of the control surfaces, I duplicated this by masking
off the areas between the ribs with 3M "blue" tape and applied
a couple of coats of Mr. Surfacer 500. I peeled the mask away as soon as
I was done and just before Mr. Surfacer dried completely I used a # 11
x-acto blade and carefully made a cross hatch pattern to simulate the
threads of the stitching.
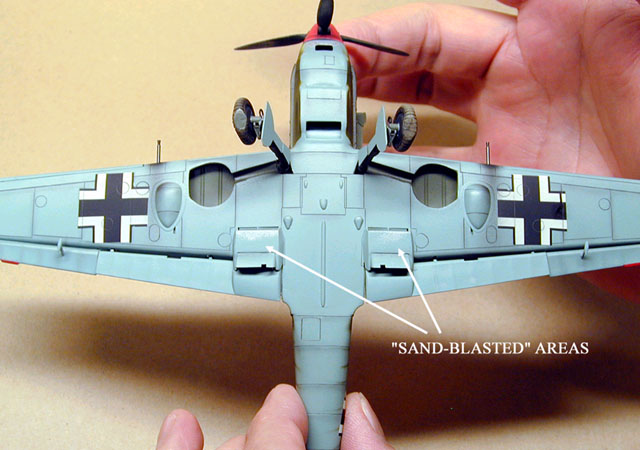
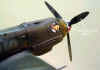
As far as weathering goes I have been experimenting with a new
technique. In building other Trop planes I was never satisfied with the
leading edges of the wings and propeller. As these aircraft took off and
landed the sand would gently "sandblast" these surfaces.
Chipping in my opinion just didn't look right, first you can never get
the "chips" small enough, second, no matter who hard you try
you can never get a nice uniform look, and third what do you do with
multiple color schemes? In the case of the my 109 the darker green is
painted over the lighter gray so when you try to weather, chipping
produces a chip all the way do to the metal surface.
Even when I wasn't able to build this problem stayed on my mind. One
day I was looking at glass mugs that had an etched design and wondered
if there was something there. I did some investigation and found that
Paasche Airbrush Co. makes a product called the Air Eraser designed for
illustrators; In short this thing is a tiny sandblaster. You can pick up
the kit which has everything you need for about $60. I bought the thing
as soon as I could and immediately started investigating it's potential.
This little tool is awesome! The first test was with a propeller. I
sprayed the whole thing in Floquil Old Silver, then sprayed Future over
the silver, and then sprayed the propeller color. Using about 18 lb. Of
pressure and using the blast media supplied in the Air Eraser kit I was
able to achieve a perfect sandblasted look (probably because it is
really sandblasted). Using the same technique, Silver, Future, color, on
the rest of the aircraft I was finally ready for my next test. Again I
was not disappointed; I was able to gently sandblast the cowl and the
leading edges down to the silver but most importantly was able to
achieve a balanced effect by being able to gently sandblast the darker
green down to the lighter gray.
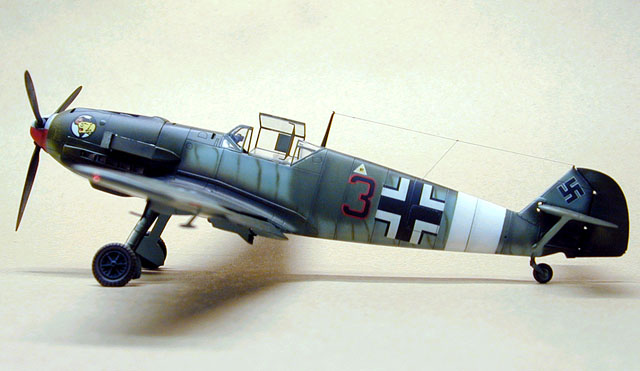
About the time my initial tests were complete I was ready to paint
the 109. I painted the whole plane in Floquil Old Silver and then
covered it with Future. I then used Tamiya Paints thinned 50/50 with
slow drying lacquer thinner, and lightened about 10 %. Once the splinter
pattern and the stripes were done, I lightened the colors about 15% and
Shaded the panels. I was now ready to sandblast my nice paint job
(sounds awful don't it?). I loaded up the Air Eraser and set the
pressure to about 18 Lb. I started pretty far back at first and then
moved in slowly until I started to see some results. I started from the
wing root and moved outwards drawing the Air Eraser farther away from
the model to lessen the effect. You want to remember the most damage is
done in the prop wash so you might want to mark about where the blade
would end on the leading edge. Move this mark in about a 1/4 inch, this
way you will have a reference point as you move the Eraser away from the
leading edge and it will feather out nicely so your weathering will look
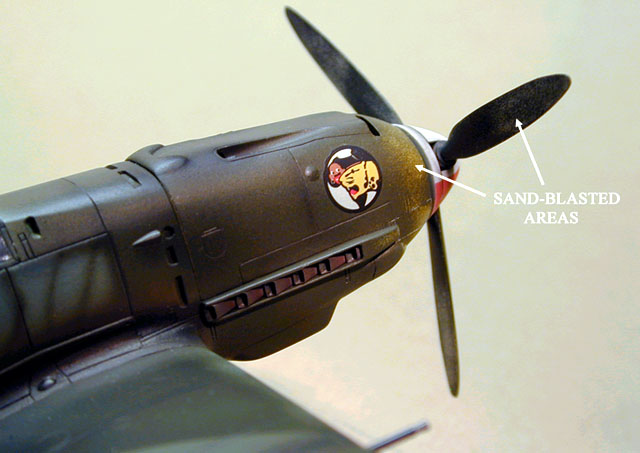
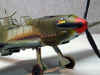
correct and not over done. Since the cowling was originally yellow
painted over with dark green, right around the spinner you can see the
yellow showing underneath the dark green. I did my leading edges first
and then went back to do the cowling. It is a lot easier to control the
degree of sandblasting done on the cowling, as opposed to blending in
the wing leading edges to it.
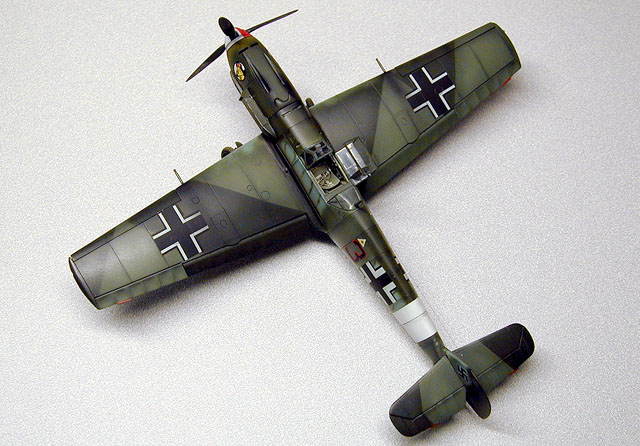
The effect is perfect. From the wing tips as you look at the leading
edge and move towards the fuselage you can see the dark green eroded to
the light gray and the light gray eroded to the bare metal. Since the
blast media size is in the Microns, the feathering of the edges of the
sandblasted areas are mind blowing. Under magnification you can see the
tiny little chips that produce the over-all effect.. I still have some
experimenting on some other effects I think the Air Eraser will work on
but for this type of weathering it is an absolutely must have tool.
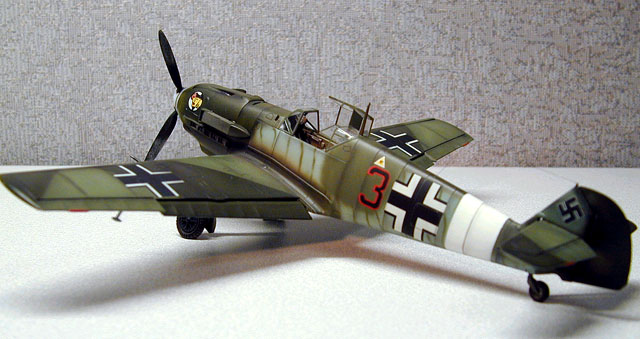
I was very pleased with the outcome of my 109 Trop, even though I
made a couple of alignment boo boos that had to be corrected it sure
feels good to be able to model again.
When I feel I have this technique somewhat perfected I will do an
article explaining the weathering process with the Paasche Air Eraser in
more detail.
Click the thumbnails below to view
the images full-sized.
Use the "Back" arrow of your browser to return to this page.
Model and Text Copyright ©
2001 by Frank Romano
Images Copyright ©
2001 by Frank Romano and Gregg
Cooper
Page Created 07 May, 2001
Last Updated 04 June, 2007
Back to HyperScale
Main Page
Back to Features Index
|
 Home
| What's New |
Features |
Gallery |
Reviews |
Reference |
Forum |
Search
Home
| What's New |
Features |
Gallery |
Reviews |
Reference |
Forum |
Search