|
|
|
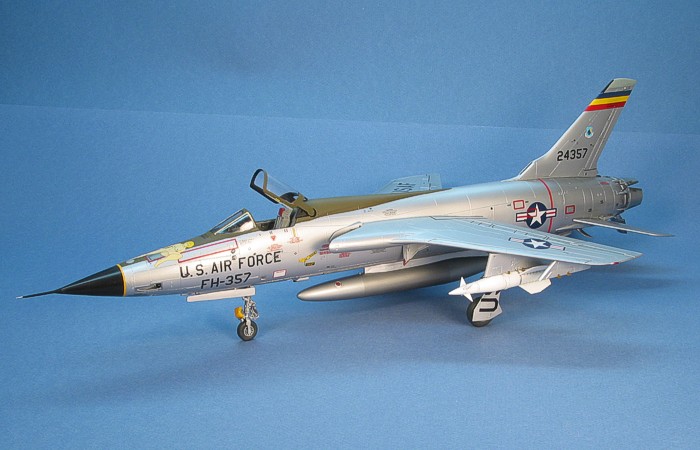
Republic F-105D Thunderchief |
by David W. Aungst
Welcome to my "Pin-Up Girl THUD" posting.
I have waited a long time for someone to finally make decals for some of
the more "suggestive" aircraft artworks. I was beginning to think that I
would have to do it myself, when along came Albatros Modelworks. Their
October (2000) release of some of the raciest nose arts to come from the
Vietnam conflict finally gave me what I was looking for. I dug out a
Monogram/Revell 1/48th scale kit and started building.
The decal sheet comes complete with an insert page outlining the
background behind the "Pussy Galore" aircraft. The insert is wrtten by
the THUD pilot that is responsible for painting both "Pussy Galore"
artworks, Capt. Victor Vizcarra. The whole insert is great reading, but
the basic story goes something like this --
On the first artwork, applied in July 1965, the purpose was mostly a
joke on the KC-135 tanker boom operators. The boom operators were known
for having trouble hooking up to and maintaining contact with the
fighters they were refueling. The artwork was applied to give the boom
operators something better to aim at and to hold their attention.
On the first mission with the artwork, the THUD pilot flying "Pussy
Galore" (not Capt. Vizcarra) radioed the tanker prior to making contact
and told the boom operator to be gentle because he was a virgin. The
boom operator apparently misunderstood the comment to mean the pilot was
an unseasoned newcomer and read the tanking procedure out to the pilot
over the radio (who was really a veteran of quite a few tanking
missions). The THUD pilots (Capt. Vizcarra amonstg them) looked at each
other from cockpit to cockpit and shrugged like what is this guy's
problem. No mention at all was made to the artwork, which disappointed
all the THUD pilots.
Later tankings with the aircraft had much better success at impressing
the boom operators. On several occasions, the boom operator could be
heard over the radio telling the rest of the tanker crew (over the
tanker's intercom) that "She's here!", meaning the naked lady jet was
getting refueled. The THUD pilots could see people crowding back into
the boomers position to get a look at the art and take pictures of this
sensation. On departing the tanker after fueling, comments like "Was it
good for you?", "Take good care of her." and "How much did that cost
me?" were heard. It made up for the lack of a response of the first
tanking.
Alas, as happened to too many THUDs in Vietnam, the original "Pussy
Galore" was lost to anti-aircraft fire on a mission up North in the
spring of 1967. The pilot of the mission went MIA and was never found.
By the time she was shot down, the aircraft was camouflaged in the
standard S.E.Asian colors and the artwork was long gone.
The second artwork was applied in October 1966, again by Capt. Vizcarra.
While the first artwork was applied to the aircraft after only needing
one permission (that of the squadron CO), the climate in the military
had changed. After going through three levels of asking for permission,
they finally found someone who would take a stand and allow the art to
be applied. The artwork was applied and flew a for a few weeks before
the wing CO caught wind of it and immediately ordered it removed.
As a postscript to these stories, Capt. Vizcarra flew a TDY mission to
Clark AFB in the Philippines with several other THUD pilots. In the
O-club, the pilots were having a drink and met some KC-135 crewmen. The
tanker crewmen recognized the THUD pilots by there patches on their
flight suites and spoke of a THUD they had seen that was the biggest
morale boost they ever had. The THUD had this naked chick sprawled over
the nose, strategically placed over the refueling receptacle. They
questioned if any of these THUD pilots knew of this aircraft.
One of his buddies sold out Capt. Vizcarra and told the tanker crew that
he was the person responsible for painting the art. For the rest of that
evening, Capt. Vizcarra was unable to buy any drink for himself without
having the tanker crew pick up the tab. Never underestimate the power of
good morale.
Click here to see a different build of the Monogram kit in these
markings by Thang Le. This additional posting was copied from the
Aircraft Resource Center web site.
I'm not going to go into a description of the Monogram/Revell 1/48th
scale F-105D kit. Suffice to say that the kit is good, the detailing is
well executed, and the completed model is attractive. It is typical
Monogram and builds easily with very few fit problems. The author of a
recent posting on Modeling Madness points out that there are some
noteworthy errors in the shape of the kit (in his opinion). But to me,
the finished model looks enough like a THUD to not go to great length to
try to fix it.
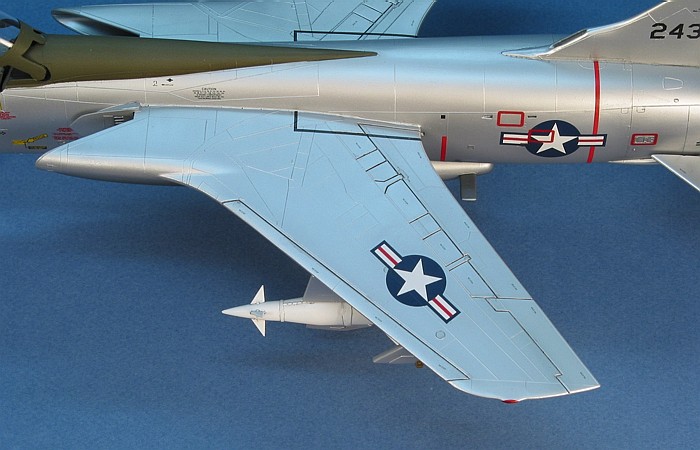
While the model is not built out-of-the-box, none of my modifications I
made were very extensive. The first set of changes I made were to
"de-weasel" the airframe, removing the F-105G antennae that Monogram
left in place when they changed their original F-105G molds over to be
an F-105D. The antennae in question are as follows.
-
The four small triangular antennae spaced
around the nose.
-
The large bulged antennae at the center of
the wing tips (where the wingtip navigation lights is found on the
F-105B/D).
-
The projecting stubs coming out of the
front of the wing tips (which are the wingtip navigation lights on an
F-105G).
I removed all of these with about ten minutes worth of filing and
sanding. The toughest ones were the wing tip antennae bulges as I needed
to preserve the shape of the navigation lights while still removing the
antennae. What I should have done is completely remove the bulge and add
clear lenses for the navigation lights, but I was not in the mood to
come up with the clear pieces. So, I "cheated" and left a bump on the
wingtip that I cold paint red/green to represent the lights.
With these changes done, the model is a fair representation of a late
F-105D, including most all of the later modifications done to the
airframe. One optional change that can be made involves the strike
camera under the nose. Apparently, this camera was not installed on many
aircraft. The pilots did not really like this camera since it required
them to overfly the target (wings level) -- not a good place to be.
Removal of this involves grinding off and flattening out the rear
prism-shaped portion of the under-nose ECM fairing.
The second set of changes I made to the kit was to backdate the
airframe to its appearance in 1965. The kit is molded with all the later
updates made to the THUD to fix maintenance issues and improve
"survivability". These need to be removed or modified to reflect the
appearance of the THUD in 1965 (when she had the "Pussy Galore" artwork
applied). The following picture highlights the areas that are most
noticeable.

The below provides a complete set of needed changes (to the best of
my research):
-
Delete the cooling scoops from the rear
fuselage sides (kit parts 21) and fill the locating holes.
-
Grind off the armor plating molded to the
rear fuselage in the place where the cooling scoops would have been
attached.
-
Omit the attachment of the ventral exhaust
shroud under the left rear fuselage (kit part 22) next to the ventral
strake. In its place, carve a small square vent hole that angles forward
into the fuselage.
-
Grid off all the antennae at the tail tip,
leaving only the navigation lights.
-
Grid off the anti-collision light on the
spine, behind the cockpit.
-
Grid off the small spine ridge/hump running
from behind the cockpit fairing to the base of the vertical tail. This
requires the reshaping of the rear cockpit fairing and forward tail
base. I chose to remove the rear cockpit fairing and forward tail base,
then replace them with strip styrene which I shaped prior attaching
them. I felt this was easier than trying to sculpt the upper fuselage.
|
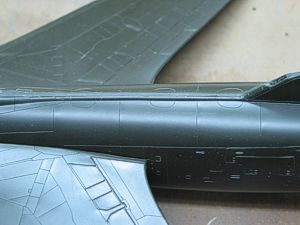
Before |
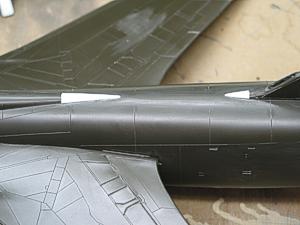
After |
-
Enlarge the cooling scoop opening in the
leading edge at the base of the vertical tail.
-
Remove the strike camera and all the
antennae from under the nose, in front of the nose wheel well.
-
Fill all the vent holes in the cannon
access door on the left side of the nose.
-
Fill a similar set of five vent holes on
the right side of the nose.
-
Grid off all the wing reinforcing panels on
the top and bottom of both wings.
-
Remove the arresting hook from in the
ventral strake. Fill the area where the arresting hook is located so
that the ventral strake is uninterrupted. Check your references on this
as it only pertains to the very first F-105Ds. My model reflects a bird
that did have the arresting hook.
-
Remove the rear antenna bulge behind the
vertical tail on top of the para-brake door. Then, add a fillet to the
rear vertical tail to fill the notch in the tail found in this area and
smoothly transition the tail into the para-brake door. Check your
references on this as it only pertains to the very first F-105Ds. My
model reflects a bird that did have the antenna installed.
-
As originally delivered, most THUDs appear
to have no blade antennae behind the nose wheel well. This changed
quickly in service, though, so check your references to determine how
many (if any) blade antennae are behind the nose wheel well. My model
reflects a bird that did not have any blade antenna in place.
As you can read, none of these changes was overly difficult, except for
trying to save as much of the surface scribing as I could. I attempted
to minimize the loss of surface detailing and scribing wherever I could.
I was successful in preserving enough of the panel lines that I did not
feel I needed to rebuild any that were lost.
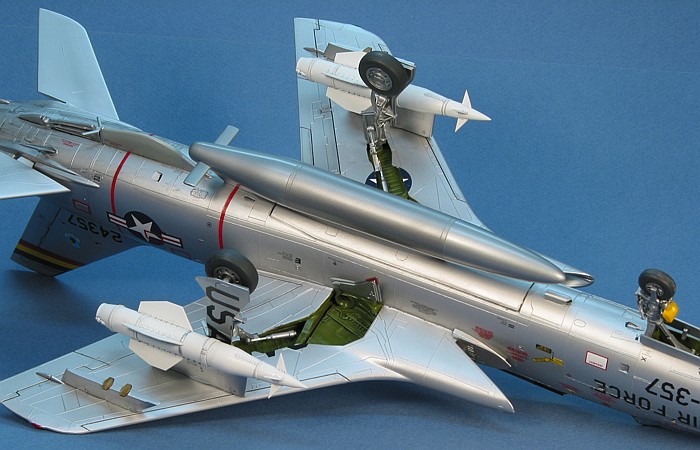
My last change to the kit involved the
weapons load. The kit provides a centerline Multiple Ejector Rack (MER)
with six 750lb Mk117 general-purpose bombs, two wing fuel tanks, and two
500lb Mk82 general-purpose bombs on the outboard pylons. This is pretty
much the "classic" THUD warload.
I wanted something a little more unusual without being incorrect. After
searching through several books, I found and settled on a load with a
centerline fuel tank and AGM-12C Bullpup missiles on the main wing
pylons. In this load, pictures showed that the outboard pylons were
either left empty or were actually removed. I always have liked the
shape of the Bullpup-C. Finding several pictures of THUDs with this load
gave me a chance to use some.
The centerline fuel tank is from a Monogram F-105G kit. To come up with
the weapons pylons for the Bullpup-Cs, I further robbed wing pylons from
a pair of F-105G kits. On a THUD, the wing fuel tank pylon is very
different from a wing weapons pylon, so I could not just cut off the
fuel tanks and use the kit provided pylons for weapons. I obtained the
F-105G pylons that Monogram molds for carrying the AGM-78 Standard ARM
missile. I cut off the missile adapters from these pylons, preserving
the sway brace detailing. The Bullpup-C missiles need no adapters, so I
just hung them directly on the pylons.
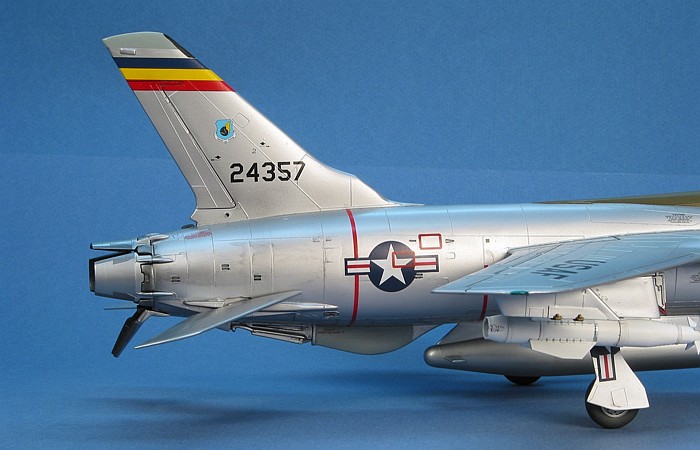
I finished the model in Testors Model
Master enamel paints and Metalizers.
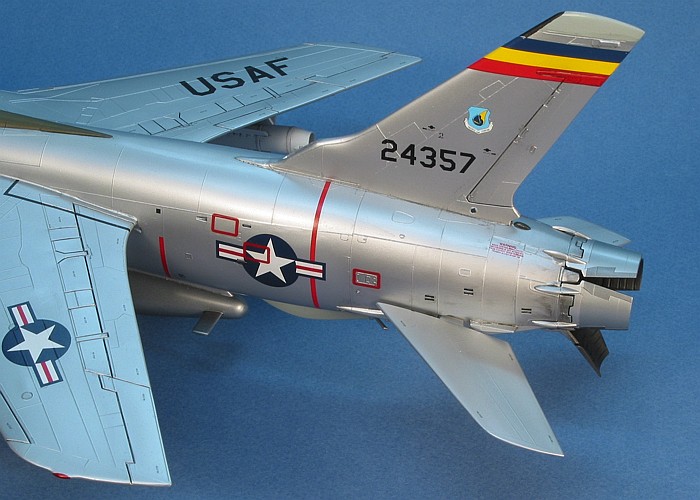
This THUD is a product of "Operation Look Alike". For a brief period in
the early 1960s, the US Air Force decreed that all aircraft needed to
look alike. Since they were not prepared to name a specific camouflage
to accomplish the task, they merely ordered all natural metal aircraft
to be painted in a Silver lacquer paint. At the same time, all special
unit markings were ordered to be removed. Thus, in reality, this THUD is
a silver painted aircraft, not natural metal.
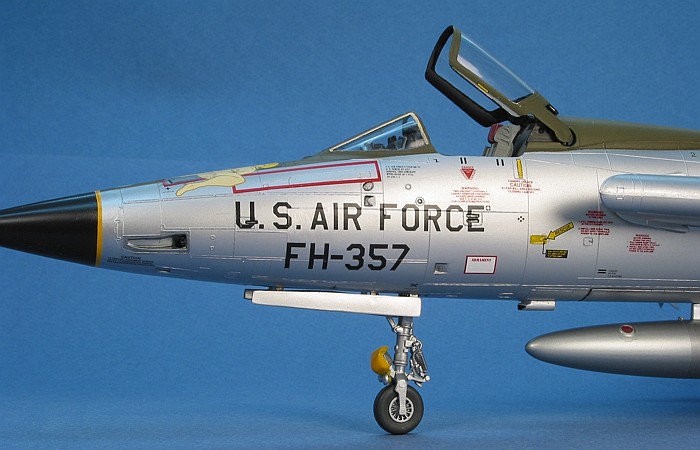
To begin the process of painting the model in a silver finish, I primed
the whole model with a coat of Aircraft Gray (F.S.16473). This is a
gloss paint that covered all my sanding marks without needing to go
crazy sanding and polishing the surfaces. I chose this color rather than
my usual gloss white undercoat because the THUD has a number of surface
antennae that are painted in this color.
I masked off the appropriate antennae that stay gray (the tail top and
the forward ventral strake), and I used an overall coat of non-buffing
Aluminum metalizer to achieve the painted silver lacquer finish. I have
yet to find silver paint (other than the Metalizer type) with fine
enough pigment to realistically look like a scale painted silver finish.
I sealed the metalizer using Floquil Crystal Coat.
To break up the "all one silver" look of the model, I chose to paint the
fuel tank in natural metal using Steel and Anodized Aluminum metalizers.
It was not uncommon to have unpainted fuel tanks as these were regularly
replaced with new tanks after the old tanks were punched off on a
mission "up north". While masking for this, I also masked and painted
the engine exhaust petals in the same colors.
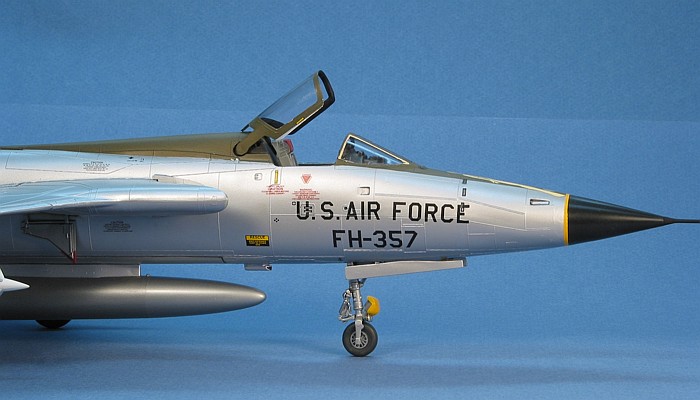
The final painting task for the overall finish involved painting the
anti-glare panel over the cockpit area. I masked this and painted it
Olive Drab (F.S.34087). On lifting the mask, I was horrified to see some
silver metalizer lift up with the tape. I thought that using non-bufing
metalizer and gloss coating it would protect me from this -- silly me.
Fortunately, not enough lifted to ruin the finish and I was able to
gloss coat it (again) and continue with the project. Next time I will
stick to the buffing variety as I have never had much trouble with
lifting it.
With more care, I masked and painted the Interior Green (F.S.34151)
wheel wells, just before I made my final gloss coat (preparing for
decals). The landing gear legs, wheels, and interiors of the wheel well
doors are all painted with Steel metalizer. The tires are Panzer Gray.
I used 3/0 and 5/0 paint brushes to apply all the little detail painting
items (navigation lights, antennae, etc.). The light beige window
sealant on the side windscreen edges was brushed on before removing the
canopy masking.
The Albatros Modelworks decal sheet
provides decals for seven different THUDs. All have names and/or artwork
applied to them. Some are more mundane, like "Memphis Belle II" and
"Daisy Mae". The more important ones (to me) are "Pussy Galore" and
"Cherry Girl". "Pussy Galore" is presented in three different versions
on the decal sheet -- one silver with only the name, one silver with
only the artwork, and one camouflaged with only the artwork (different
artwork from the silver aircraft). The image quality of the decals is
excellent and the registry was dead-on in the copy I received.
The two silver "Pussy Galore" aircraft are from the 80th TFS / 6441st
TFW. The camouflaged version is from the 354th TFS / 355th TFW. I
decided that I wanted to build a silver aircraft and it was a given that
I would choose the one with the artwork.
I applied the Albatros Modelworks decals using Solv-a-set as a setting
solution. The decals responded well to this setting solution. They
softened enough to snuggle into every crack, but they still stayed solid
enough to allow me to make minor adjustments to them after I had applied
the setting solution.
I read another review where the reviewer claimed the Solv-a-set tainted
the colors of the woman on the nose. I do not think this is the case,
though. My decal also was color shifted when I applied her, but I think
the shift is due to the Olive Drab paint showing through just minimally
enough to effect the color of the woman. If you look closely at the
woman, also visible through the decal is a faint red outline of the
block that marks the refueling door. It would not take much Olive Drab
showing through to taint the light color of the flesh tone to a more
olive-yellow color. I would recommend to anyone else building this
aircraft to undercoat the location where the woman goes with white (by
decal or paint) before applying her.
As complete and nice as the decal sheet looked when I first bought it,
there are numerous issues that I found while trying to use the decals.
Many of these items are just annoyances. But as annoyances go, they
really started to bother me.
The "Pussy Galore" artworks (as nice as they are) are not correct. I
found color pictures of both artworks in different books.
The silver aircraft (the one I built) is in the book Roll Call: THUD
from Schiffer publishing on page 150. The proportions of the decal
artwork are off with the image being too long. The torso should be
shorter with the woman's raised knee being level with her shoulder, but
it is not. She should fit on the model without touching the red
rectangle of the "probe and drogue" refueling door. She will not fit
this way as printed.
The camouflaged version is in Famous Airplanes of the World, volume 4,
on the F-105 Thunderchief. The decal image is over-simplified with less
detail than the original artwork had. Notably, the original artwork had
"hair down there" that the decals omitted. Also the flesh should have
more graduation in the tones, not just a simple two-color printing. I
can understand why the details are missing and why the flesh tones are
simplified, but I would prefer them to be more correct.
The national insignia for a non-camouflaged THUD should be 30 inches
tall for both the wings and fuselage. The sheet provides undersized
stars that are only 24 inches. This makes a big difference in the look
of the completed model. I replaced the Albatros stars with some taken
from a SuperScale sheet.
Silly me -- with the national insignia being too small, I should have
questioned the USAF size. After I was finished applying the decals, I
thought they looked a bit small, so I checked them. They should be 35
inches tall. The Albatros USAF markings are only 24 inches tall. Finding
this out after they were applied and dried, I decided to not risk
marring the finish by removing them and left the undersized markings on
the model. I will be more careful in the future.
I found the sheet had inconsistent numbers of decals provided for
various markings.
-
There are enough RESCUE arrows on the sheet
to do nine THUDs, providing four varied styles. What gives (as there are
only seven aircraft on the sheet)?
-
There are six 15 inch national insignia
stars. With four stars per aircraft, this is enough to do one and one
half camouflaged THUDs. I would expect four or eight stars, but why only
six?
-
There are fourteen ejection seat triangles
in four styles. The instructions completely ignore two of the styles.
There are two "probe and drogue" refueling door blocks. Both are printed
too wide, but I did not realize this until I was already placing the
decal on the model. One is printed longer than the other. The short one
is too short to fit where it goes on the aircraft.
-
There are four "flying boom" refueling door
blocks. All four are too small. They should exceed the size of the
actual door by about four inches on all sides. The provided decals are
only just the size of the refueling door. I cut up two of these blocks
and pieced them together so as to correctly mark the refueling door.
-
Most of the rest of the data markings are
provided with enough items to mark one aircraft. But, there are still
more markings provided in enough quantity to mark two or three aircraft.
The problem with this inconsistency is that I was left scratching my
head and wondering if there were more places for some of the data
markings to go (since I had irregular numbers of each remaining at the
end). I often use the number of decals on the sheet as a guide to tell
me when I am done. When all the decals are gone, I am done. With so many
variations to the numbers of markings provided, I could not be sure with
these decals. This really bugged me.
Add to the inconsistent numbers of markings the fact that the
instructions for the data markings are vague and incomplete. There are
numerous data markings that the instruction sheet does not mention. And,
there are a few the instructions call for that are not on the decal
sheet. I needed to supplement the Albatros Modelworks data markings with
more decals that I obtained from a SuperScale THUD sheet. The most
notable omissions in the decals are the large red rounded rectangles
that go on the rear fuselage. All THUDs (silver or camouflaged) get
these, but none are found on the decal sheet or in the instructions.
Another shortcoming of the instructions is that no bottom view is
provided for any of the versions. This is most needed on the silver
versions as the underside USAF and national insignia markings are not
placed where you would expect (mirroring the locations of the upper
markings). In reality, the markings are positioned close to the
fuselage, right over the wheel well doors, but you will not find this
out from the decal instruction sheet.
I do not generally like numeric rating
scales, but I feel compelled to give one for this sheet. When I first
bought the sheet, I was completely elated that someone finally got the
nerve to print this type of marking in decal form. I would have given
the sheet a perfect "10" at that point. After using the sheet, I have to
drop that number to about a "7". And, the only reason I keep it that
high is that the subject of the sheet is one that I have waited too long
to see. Making me work for the aircraft data is not that surprising. I
have done about the same on many SuperScale sheets. But, the errors in
national insignia and USAF sizes, specifically, are inexcusable when
they are so well documented (I have four different books that provide
the sizes of these markings in two languages).
After decaling, I finished the model using Floquil Flat Finish. I have
never been able to figure how to make Flat Finish produce a flat finish.
I always get a semi-gloss sheen from this paint. In this particular
case, that is what I wanted, a semi-gloss sheen to represent the gloss
silver lacquer paint of the real aircraft. The Flat Finish also affected
the metal-look of the metalizer paint, giving the metalizer finish a
texture that (IMHO) captured the look of painted silver.
For weathering, I used my typical style of thinned down enamel paint
washes and air brush shading. For a more complete discussion of what I
do to weather my models, see my posting on "Weathering Aircraft".
The subject of the Albatros Modelworks
decal sheet is great. Albatros Modelworks has finally provided adequate
representation of one of the biggest troop morale boosters of any aerial
conflict. Almost every aerial conflict has produced some provocative
artworks on the aircraft. It is great that some decal company has
finally been brave enough to produce the markings in decal form for
modelers to build. I hope to see more of these type markings in the
future. I only wish Albatros Modelworks had paid closer attention when
producing the decals and not had so many size and usability issues.
My model club had a "nose art night" (also referred to as "pornography
night") where we all built politically incorrect aircraft to display. I
built "Pussy Galore" for this model club meeting. The model made for a
great addition to the overall display and a lively conversation topic
for the whole night.
As a side note, for obvious reasons, my wife has not committed (yet) to
allowing me to openly display this model on my display shelves in the
living room. For the time, it remains tucked away on the top of the
shelves where you really can not see it. My wife finds it unique, not
vulgar. But with two small sons loose in the house, for now she feels
"out of sight" is a more appropriate place to keep the model. I can not
really argue the point.
This posting marks the first one where I
used my new digital camera to take the pictures. Some of you may
remember my placing a question on the Discussion Board in early October
looking for recommendations and information regarding the cameras being
used by other modelers to pictures their models. I got lots of really
useful information from that posting that helped narrow down what is an
intimidating array of digital cameras on the market.
After reviewing the various web pages outlining the features of the
cameras that were mentioned in the responses I got, I narrowed the field
to two cameras -- the Cannon PowerShot G1 and the Kodak DC4800. After
some long thought, I settled on the Cannon product. Then, I learned the
Cannon G1 was being phased out and replaced by the Cannon G2. The G2 was
a little more expensive, but jumped up another notch in resolution to a
4 megapixel camera.
Slaving over the price difference in the camera store, my wife looked at
me and simply told me to get the G2 because "you know you want it". I
love my wife and the easy way she lets me spend money. The camera is
everything I hoped for and more. I am thinking, now, that I will never
buy film again...
|
Additional
Images and Project Summary
|
Click the
thumbnails below to view images full-sized.
Click the "Back" arrow on your browser to return to this page.
|
|
|
Project
Statistics
|
|
Completion
Date:
|
8 November 2001 |
|
Total Building
Time:
|
35.3 |
|
Research:
|
1.1 |
|
Construction:
|
9.3 |
|
Painting:
|
13.6 |
|
Decals /
Markings:
|
7.6 |
|
Extra Detailing /
Conversion:
|
3.7 |
|

Model, Description and Images Copyright ©
2001 by David Aungst
Page Created 22 November, 2001 Home
| What's New |
Features |
Gallery |
Reviews |
Reference |
Forum |
Search
Home
| What's New |
Features |
Gallery |
Reviews |
Reference |
Forum |
Search