|
Vought
F4U-1A Corsair
by
Roy Long
|
|
|
Vought F4U-1A Corsair |

Tamiya's 1/48
scale F4U-1A Corsair is available
online at Squadron.com
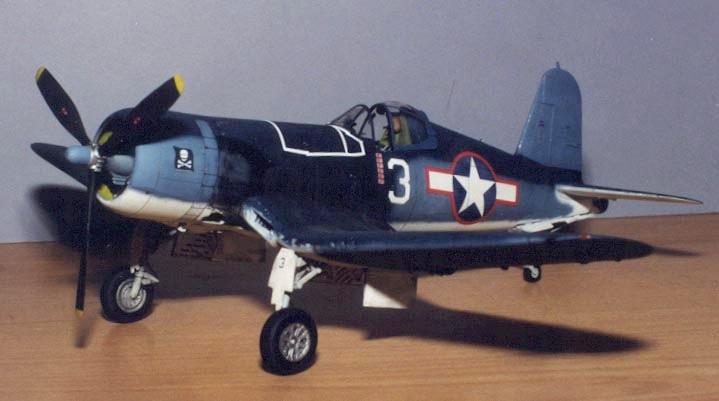
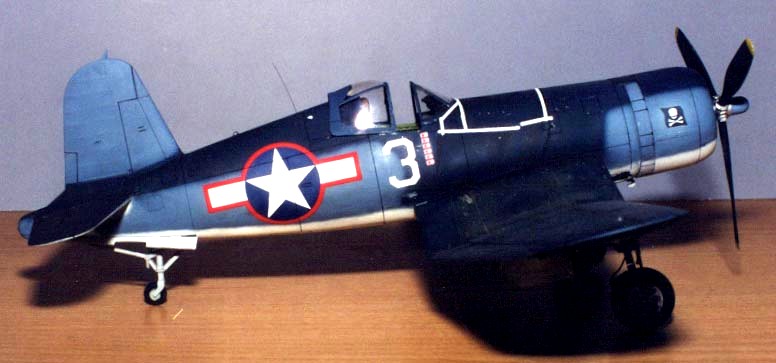
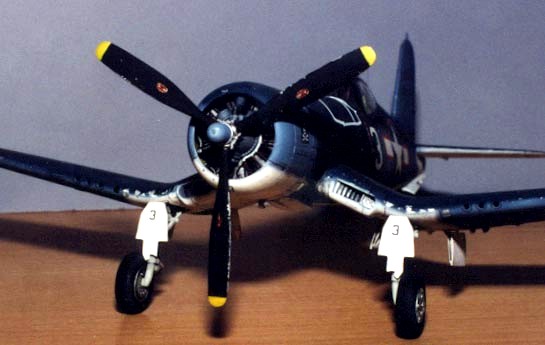
This is Tamiya's 1/48 scale Vought F4U-1A built to depict a Corsair
flown by LTCDR James "Big Jim" Strieg of VF-17.
VF-17s operational record was impressive, especially when one considers
that the squadron’s tour was less than six months long. Their story is
well documented in several books including "The Skull and Crossbones
Squadron, VF-17 in WWII", by Lee Cook. This book was used as the main
reference for my Corsair’s camouflage and markings.
The model is Tamiya's 1/48 scale F4U-1A.
For those who are not familiar with this kit, it is very nice with a
well-detailed interior. It appears to me that the F4U-1A is largely a
combination of the two previous Tamiya Corsairs, leaving some handy
spare parts. Needless to say, construction of this kit would have been
pretty straightforward out of the box, if it weren't for my addiction to
resin update sets coupled with the desire to build something a little
different from the norm.
At the time I started this model I was working on Tamiya's Birdcage
Corsair. I went to my local hobby shop and found the Aires cockpit and
landing gear bays for the Corsair. I hadn't gotten too far into the
cockpit of the Birdcage when I thought these two sets would be a nice
addition. (Luckily for me, the Aires Corsair Detail set with engine had
not yet been released).
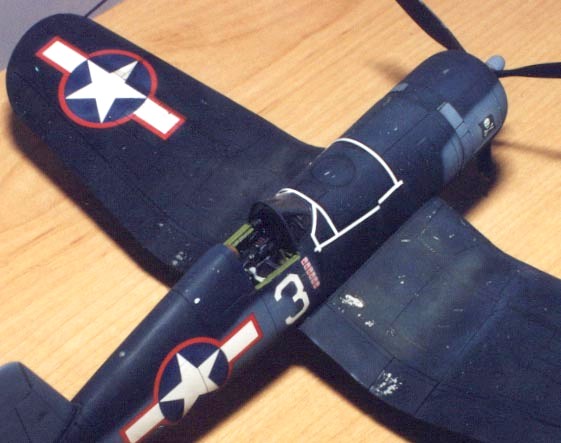
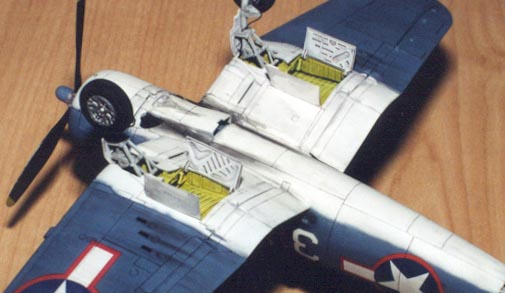
The Aires Corsair cockpit set is in my opinion a marvel of engineering
and is very comprehensive and detailed. It provides in resin, a lower
cockpit tub, two sidewall pieces, front and back bulkheads, a seat,
control stick and other details as well as a photo etch fret for the
instrument panel, seatbelts, and canopy interior details which include
the interior frame mirrors and latch handles.
The landing gear set includes detailed gear bays, and detailed
landing gear covers that were more to scale thickness. After studying
pictures in the Detail & Scale on the Corsair and other references and
some informative, helpful answers to several questions posted to Plane
Talking, it was apparent that the Aires cockpit wasn't suitable for the
Birdcage Corsair, but would work nicely in the Tamiya F4U-1D or the
newly released F4U-1A. As I had planned to build an island based USMC
fighter-bomber at some time, I thought the F4U-1A would be a good
choice. So, after a quick call to the hobby store, which had just
received a few F4U-1As, I went and picked one up.
Interior
I got out my Dremel and started grinding to start the project. All
interior detail in the cockpit and landing gear bay areas was ground off
and then smoothed with curved Exacto blade and sanding pads. The resin
parts were then cleaned up. As a note of caution, as Aires seems to try
to get parts as close to scale thickness as they can, some parts of the
set have some very thin surfaces very close to the molding blocks making
their removal anywhere from tricky to nearly impossible. The areas where
I thought I was running the risk of breaking through the part were
reinforced with gap filling super glue hit with accelerator and sanded
down during the final clean up of the part.
As is often necessary with sets like these, lots of dry fitting was
done to get everything to a point where the resin parts would fit
properly. When I was happy with the fit of the cockpit parts in the
fuselage I began its assembly and painting. The cockpit was built up
according to the Aires instructions and with only a few minor
adjustments it went together with out any problems. One of the most
exasperating aspects of building and painting Corsairs is the question
"What color should the interior areas be?”. Again, I studied pictures in
the Detail & Scale on the Corsair and other references and some more
questions posted to Plane Talking, as well as the article "USN WWII
Aircraft Interiors" by William Reece found on the IPMS/USA webpage on US
Navy Interior colors.
Many variations seem to be possible and there is no definitive
answer. The possible choices for F4U-1A cockpit colors looked like
Interior Green, Flat Black or a combination of Interior Green and Flat
Black. Other choices existed for non-cockpit interior colors, such as
the wheel wells and cowling interior, Yellow Zinc Chromate, Light Grey,
Flat White or over painted in whatever the undersurface was painted in,
or even Salmon, but probably only applicable to the F4U-1. With this
information I decided to paint my cockpit in Interior Green with Flat
Black instrument panel and canopy frames and the wheel wells and cowling
interior in Yellow Zinc Chromate.
The interior parts were given a dirty black/brown wash and dry
brushed. I then went through and did all the detail painting and
flat-coated the parts. The fuselage halves were glued the together and I
assembled the tub and installed through the open fuselage. I set the
fuselage aside for the time being and turned my attention to the wings.
Wings and Fuselage
After flipping through the several Corsair books I had accumulated by
this time I came to the conclusion that it was not that common to see
many Corsairs on the ground with dropped flaps. Looking at reference
pictures, it looked like a very simple undertaking. I assembled the
individual flaps and prepped them for installation by cutting off the
mounting stubs and reshaping their leading edges and thinning the
appropriate areas of the wings. Initial test fitting made me think there
would be no problem with sliding the flaps in the re-shaped gaps and
gluing them in. So I turned next to assembling the wings.
I had already prepped the wings to accept the Aires wheel bays and
painted the bays. I glued the tops of the wing center section after
chopping off the parts of the wing fold inserts that either prevented
them from fitting around the new gear wells or might possibly interfere
with the flaps. This resulted in the wing fold inserts being about half
as long as they had been and devoid of mounting tabs on the back. I had
hoped to use the clever bar Tamiya developed for the wing fold to help
align and strengthen the wings, but was unable after removing so much
material from the inserts.
Once this step was finished, I attached the center section to the
fuselage. I glued a series of card stock tabs to the inside surfaces of
the outer wings and the wing center section to join them. When that
dried, I started to fit and glue the modified flaps in place. I
encountered several spots where the flap would not line up where I
wanted it to go, and as a result I used force, superglue and accelerator
to make them comply. Generally, the flaps ended up where they needed to
be; however, I learned that the flaps are a hair short on either side
and ended up with gaps at the ends of each flap.
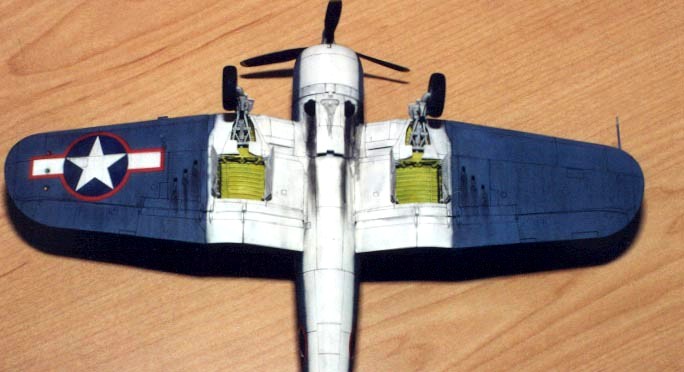
I then set out to add the flap covers. On a real Corsair there are
covers that run the length of the flaps along the hinge line. These
covers fold up and into the wing when the flaps were lowered. Tamiya
molded the wings with the covers in a "retracted" position, which made a
nice indentation for aligning and attaching the new covers. I cut the
covers from 10 thousand card stock and glued them in place. The covers
stood a little proud in some spots so they were sanded flush with the
wing surface. I wasn't too happy with the join line between the inner
and outer wing sections so I filled them with superglue, sanded them out
and re-scribed them.
While I was scribing, I took a few swipes at the flap cover joints to
define them a little better. While I was working on the wing, I took the
opportunity to fill in the landing light near the left wing tip, which
was moved to the leading edge of the left wing after BuNo 17930. To fill
it in I used the original part and a good size glob of thick superglue
and sanded and carved it to match the rib detail. Much later, I found
that Corsairs that had the light moved had a round panel bolted over the
now useless spot.
I also scribed in two circles to represent the fuel filler caps missing
from the Tamiya kit and drilled out the formation lights to accept some
MV lenses.
Back to the fuselage. I had some gaps around the window under the
cockpit and at the join on the bottom of the fuselage where the wing
section fit, so these areas were filled, sanded and rescribed where
needed. The elevators were then added.
I decided to detail the visible part of the engine. I added a wiring
harness made of thin solder and even thinner copper wire, I also cut
away the molded on push rods and added new ones from brass rod. I used
pictures from the Corsair D&S book to detail the engine and found later
(again) that the F4U-1A typically used the flat, horseshoe shaped
harness found in the kit as opposed to the round tubular style I used.
As often happens, frustration and boredom from the filling, sanding and
scribing on the wings set in and I shelved this model for a month or so.
And as happens just as often, I got a spark of motivation to finish. The
spark came in the form of Tom Tullis' book "Eagles Illustrated, Vol. 1,
Fighters of WWII" which had a profile of this airplane.
So I picked up EagleCals #20 "VF-17 Jolly Rogers" and "The Skull and
Crossbones Squadron, VF-17 in WWII", by Lee Cook. I started by priming
the model with Humbrol Aluminum, over top of this I sprayed a coat of
Future. I preshaded the model along the panel lines and in spots and
blotches in gray on the undersurfaces that would be painted white and
dark blue on the rest. I painted the white areas first using Model
Master Flat White with a drop or two of Camouflage Grey to take the edge
off a little. The Dark Sea Blue and the Intermediate Blue were both
Aeromaster enamels. I lightened each a touch with flat white and sprayed
the appropriate areas while trying to keep from over lapping the
neighboring color. Each was lightened more and thinned further and then
misted in irregular blotches.
After a day, the entire model was sanded with an 8000 grit sanding pad
and then with a 12000 grit sanding pad. The model was then washed with
warm water and dish washing soap and allowed to dry. When it was dry I
dusted it off and gave it another light coat of Future. When the Future
was dry, I started on the decals. EagleCals decals, printed by
MicroScale were a breeze to work with, thin and the white was opaque and
in register. I used Solvaset on them with no problems. When they were
dry, I shot Future only on the areas covered by the decals and let it
dry.
I then started the weathering, with a sharp pin, an Exacto and a 4000
grit sanding pad, I chipped and sanded the paint to replicate the
chipped and worn appearance found on this and other VF-17 Corsairs. I
then mixed up a thick batch of black and brown artists in thinned with
non-toxic airbrush cleaner. I slopped this over the model and then wiped
most of it off with a damp rag in the direction of the airflow. The same
colors, heavily thinned were loaded into a drafting pen and I filled in
panel lines. I filled in the lines around flight control surfaces with
black ink.
The plane was finally flat-coated with Testors clear lacquer. A wash of
Turpentine and black and burnt umber was brushed on to represent fuel
and oil stains. Pastels were used for dirt and some scuffing on the wing
as well as the exhaust stains.
As mentioned before the Aires set includes the interior canopy frame in
photoetch. I was looking forward to using this part together with a
vacuform canopy but there is no available vacuform canopy available
which fits the Tamiya F4U-1A/D. I test fit the frame to the kit canopy
and it fit OK, but only with the canopy closed. As a result, I used only
the mirrors and a couple of handles.
Colored and silver MV lenses were coaxed into the holes I had drilled
earlier and I only lost two to the interior of the model. The
appropriate silver lenses were painted with Tamiya Clear Blue. A clear
round bulb was added to the tail and a clear tear drop bulb was added to
the fuselage behind the cockpit.
For some inexplicable reason I didn't notice that I had ignored the wing
tip lights until this point so I painted them silver and then used
Tamiya Clear Red and Green on them.
This Corsair was equipped with a whip antenna on the fuselage spine and
it was replicated with a piece of stainless steel wire.
The landing gear was assembled and thin wires were used to represent the
brake lines on the main gear legs. They were then painted white and
cemented in the gear bays
I would like to publicly thank my wife for her patience and
understanding during the final construction phases of this model. I
spent every free moment for a week finishing this model for the upcoming
IPMS Region 2 Convention and Contest, finishing it one hour before we
left. It won second place to fellow Hyperscaler Randy Lutz's beautiful
P-51D.
-
"The Skull and Crossbones Squadron, VF-17
in WWII", Lee Cook Squadron/Signal "F4U Corsair in Action" (both
editions)
-
"F4U Corsair In Detail & Scale" Part 1,
Bert Kinzey
-
"Eagles Illustrated, Vol. 1, Fighters of
WWII" Thomas A. Tullis
-
"USN WWII Aircraft Interiors", William
Reece
Model, Text and Images Copyright © 2001 by
Roy Long
Page Created 13 September, 2001
Last Updated 04 June, 2007
Back to HyperScale
Main Page
Back to Features Index |
 Home
| What's New |
Features |
Gallery |
Reviews |
Reference |
Forum |
Search
Home
| What's New |
Features |
Gallery |
Reviews |
Reference |
Forum |
Search