|
Grumman
F8F-1 Bearcat
by Lee Rouse
|
|
|
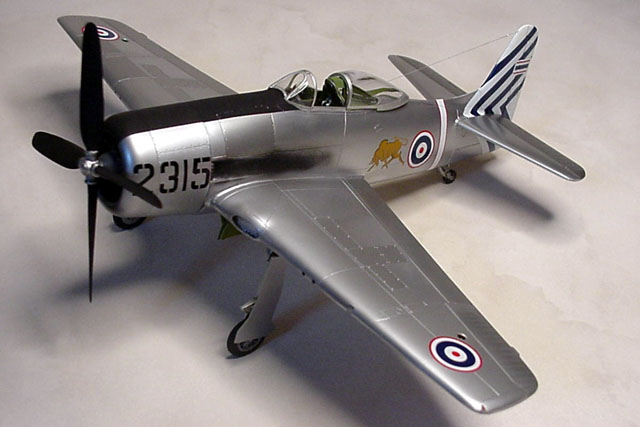
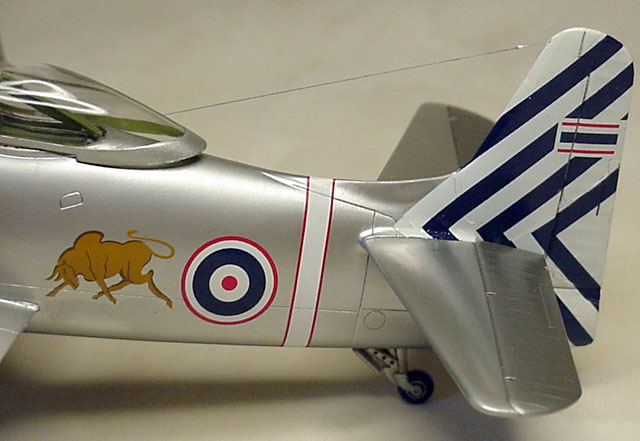
Grumman F8F-1 |

Hobbycraft's F8F-1 Bearcat is available online
from
Squadron.com
This is my 1/48 scale
Hobbycraft F8F-1 Bearcat in markings for a Royal Thai Air Force
aircraft during the early 1960’s.
Several aftermarket sets were
used. The stock cockpit was replaced with a resin cockpit from Cutting
Edge. The cockpit is beautifully cast and I would highly recommend it
for anyone building the Bearcat.
I did not replace the cowling
with the Cutting Edge resin one, as I was feeling rather stingy and
decided I could live without it.

Other refinements included
installing brass screen in each of the leading edge air scoops, and
detailing the engine with spark plug wiring and ignition harness from
various sizes of copper wire.
After assembly, sanding and
filling seams, the plastic was prepared for painting with several
handbrushed coats of Future floor wax. This produced a very shiny
surface, and helped fill in any micro-crevices which will pop out like
a red flag under a natural metal finish. I used several paints for
metalizing, the main one being Krylon chrome spray which was drained
from the spray can, and then thinned with medium temperature
automotive enamel reducer. Selective panels were masked off and
darkened with Alclad II dark aluminum, Testors metalizer steel, or
Tamiya smoke. I did not put a clear coat (handbrushed Future floor
wax) on top of the paint, although I have done so with other models.
It depends on how “new” you want the finished product to look.
The decals are from an old
Aeromaster set, F8F Bearcat collection (48030).
This project almost didn’t
happen because I was unable to find the decal sheet. Aeromaster
produced the marking for this aircraft in one of their early sets,
which unfortunately has been out of circulation for quite a while.
After several fruitless searches on Internet websites for the set, as
well as phone calls to several hobby stores, I posted a request on
HyperScale. Within a couple of days I got a response from Bob Whaites.
We had quite a time figuring out how to work out payment, and Allen,
out of the goodness of his heart, sent the decals to me anyway,
assuring me that we would work something out eventually (We did. I was
able to locate another Aeromaster set he was looking for and we ended
up making a swap).
The
decals went on quite well, except for the tail decals which consist of
one large decal for each side of the tail. Because of their size they
required very careful attention to prevent tearing when moving them
around. The decal instructions recommend applying the decals, then
attaching the horizontal stabilizers. I followed this advice and
things worked out well.
The Hobbycraft kit is a number
of years old, and suffers from fit problems in several areas. Still,
it’s leaps and bounds ahead of it’s closest competition, the long out
of production Testors kit, which if memory serves me correctly, was a
rebox of the old Hawk kit.
Slideshow -
Additional Images
|
Click the thumbnail to display the
larger image below:
[../photogallery/photo5293/real.htm]
Model, Images and Text Copyright © 2001 by
Lee Rouse
Page Created 05 August, 2001
Last Updated
04 June, 2007
Back to HyperScale Main
Page
Back to Features
Index
|
 Home
| What's New |
Features |
Gallery |
Reviews |
Reference |
Forum |
Search
Home
| What's New |
Features |
Gallery |
Reviews |
Reference |
Forum |
Search